Print-ready Upscaling
What resolution is needed to print an AI-upscaled photo?

TL;DR
- Print readiness depends on pixel dimensions for your target size, not the
72 DPIlabel shown in file info.- Use
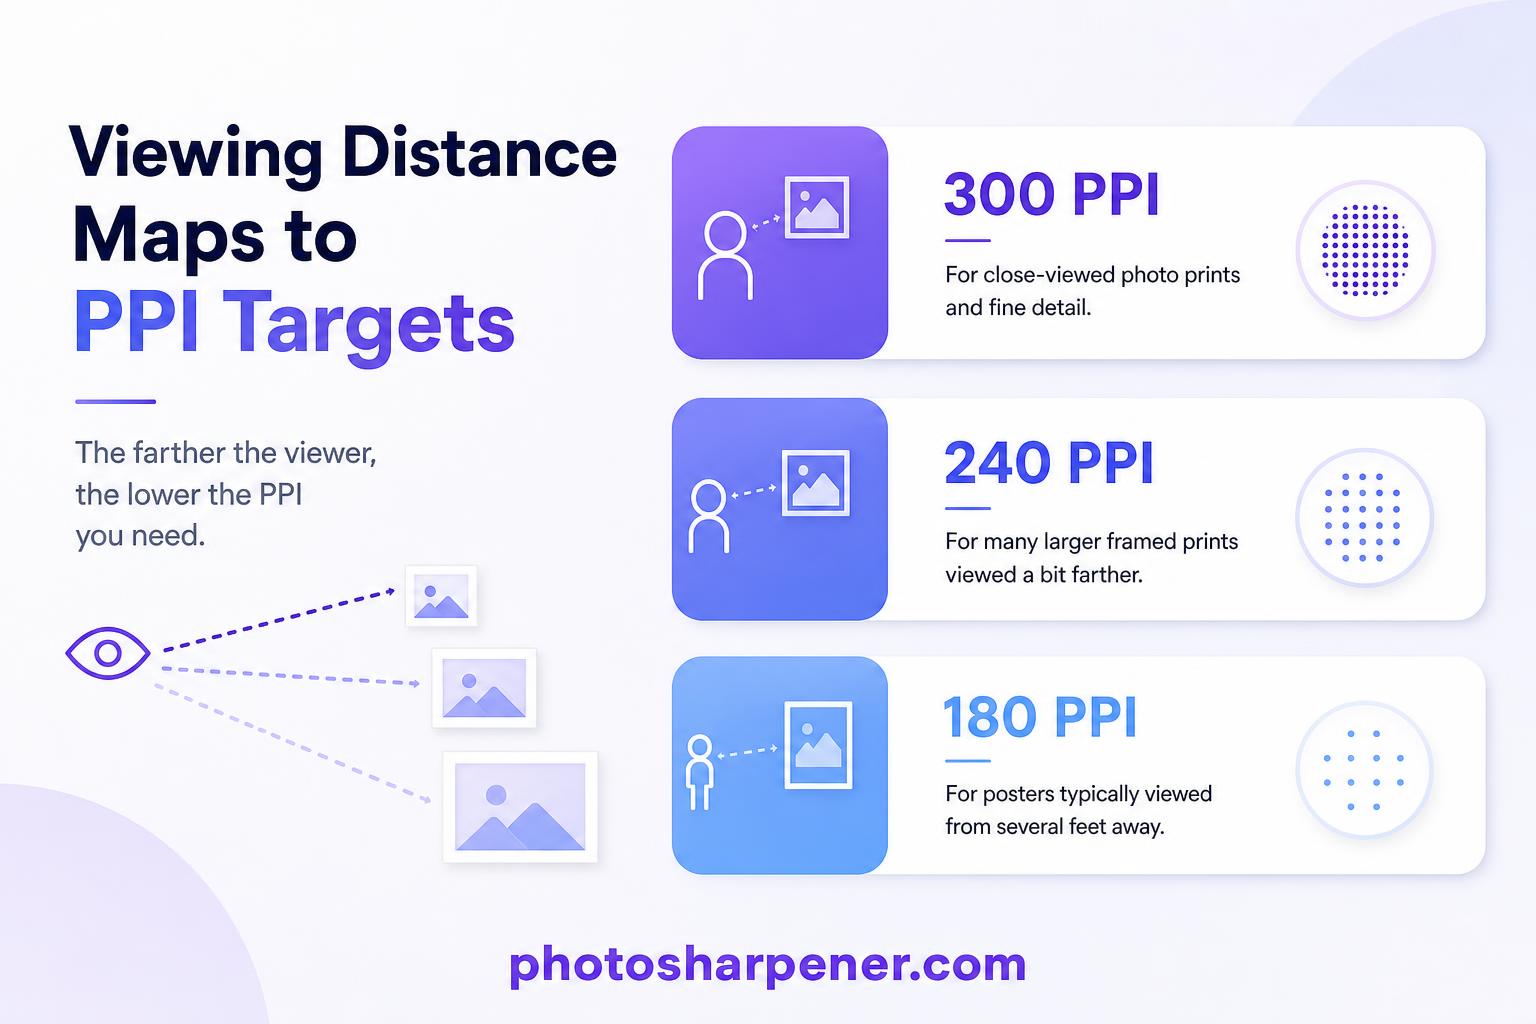
300 PPIfor close-viewed prints,240 PPIfor many larger framed prints, and around180 PPIfor posters seen from farther away.- A 2x or 4x upscale can make a file printable, but you still need to inspect the result at
100%to catch waxy skin, fake texture, or overdrawn edges.- A tool like
PhotoSharpenercan speed up print prep by combining upscaling, cleanup, and optional face restoration, but the final print size should still be limited by what looks believable.
When people ask what resolution is needed to print an AI-upscaled photo, the useful answer is not just "300 DPI." What matters is whether the file has enough real pixels for the print size you want, whether the upscale still looks natural at full size, and how close people will stand to the final print. An AI-enhanced image can print beautifully, but only when the print size, pixel count, and source quality all make sense together.
That is why two files with the same "300 DPI" label can behave very differently at the printer. One may have enough pixels for a clean 8x10. The other may still be too small for anything beyond a postcard. The safest workflow is to calculate the required pixels first, then judge whether a 2x or 4x upscale gets you there without creating waxy faces, fake textures, or crunchy edges.
Start with pixels, not the 72 DPI label
Why the number in file info can mislead you
Many photos carry a 72 DPI tag because that is a common screen default, not because the image is doomed for printing. Printers care about how many pixels are available for each inch of paper. If your image is 4800 pixels wide, it can print about 16 inches wide at 300 PPI whether the metadata originally said 72, 240, or 300.
This is where people lose time. They open the file, see 72 DPI, panic, and start changing export settings. But changing metadata alone does not create detail. If the pixel dimensions stay the same, the print quality does not improve.
Use this quick formula before you do anything else
The simple rule is:
required pixels = print size in inches x target PPI
So if you want an 8x10 print at 300 PPI, you need:
- 8 x 300 = 2400 pixels on the short edge
- 10 x 300 = 3000 pixels on the long edge
That means a 2400x3000 file is comfortably ready for an 8x10 print. If your current file is 1200x1500, a 2x upscale gets you close. If it is 800x1000, you are asking much more from the AI and should be more cautious about the final print size.
![]()
Use the resolution target that fits the viewing distance
When 300 PPI is the right goal
For photo prints that people hold in their hands, place in frames, or inspect from close range, 300 PPI is still the safest benchmark. It gives facial detail, edges, and subtle texture enough density to look crisp without obvious pixel structure.
Use 300 PPI when the print will be:
- a standard photo print like 4x6, 5x7, or 8x10
- a portrait on a desk or wall where people stand close
- a product print, flyer, or art print with fine detail
If the image contains text, eyelashes, jewelry, or other small features, 300 PPI is worth protecting. If the file is a tribute portrait instead of general wall art, this memorial print guide is a good reminder to protect likeness before you chase extra sharpness.
When 240 or 180 PPI is often acceptable
Larger prints are usually viewed from farther away, so they do not always need 300 PPI. A wall poster or memorial display can still look very good around 240 PPI, and many larger prints remain convincing at 180 PPI when the source image is strong and the viewing distance is not close. For bigger wall pieces, this poster upscaling guide shows how those targets play out across common poster sizes.
The practical rule looks like this:
- 300 PPI for close viewing
- 240 PPI for larger framed prints and wall art
- 180 PPI for posters viewed from several feet away
Below that, softness becomes easier to notice unless the print is very large and seen from a distance. If you are already relying on AI upscaling, it is usually smarter to reduce the print size slightly than to chase a huge enlargement at a weak pixel density.
Match common print sizes to real pixel needs
Pixel targets for the sizes people order most
Use this table to check whether your upscaled file is realistically ready for print:
| Print size | 300 PPI target | 240 PPI target | 180 PPI target |
|---|---|---|---|
| 4x6 in | 1200x1800 px | 960x1440 px | 720x1080 px |
| 5x7 in | 1500x2100 px | 1200x1680 px | 900x1260 px |
| 8x10 in | 2400x3000 px | 1920x2400 px | 1440x1800 px |
| 11x14 in | 3300x4200 px | 2640x3360 px | 1980x2520 px |
| 16x20 in | 4800x6000 px | 3840x4800 px | 2880x3600 px |
| 18x24 in | 5400x7200 px | 4320x5760 px | 3240x4320 px |
| 24x36 in | 7200x10800 px | 5760x8640 px | 4320x6480 px |
This is why an AI-upscaled file can be "print-ready" for one size and not for another. A 3200x4800 image is excellent for a 10x16 print at 300 PPI, solid for a 13x20 print at 240 PPI, and still usable for some 16x24 poster jobs at 200 PPI or a bit less. But that same file is not honestly ready for a sharp 24x36 poster.
Run one example before you place an order
Say your original scan is 1500x2250 pixels and you apply a 4x upscale. The result becomes 6000x9000 pixels.
That gives you a few realistic options:
- about 20x30 inches at 300 PPI
- about 25x37.5 inches at 240 PPI
- about 33x50 inches at 180 PPI
This does not mean every one of those prints will look equally good. It means the file is large enough on paper. You still have to judge whether the AI-generated detail looks believable at the size you plan to print.
What AI upscaling changes, and what it does not
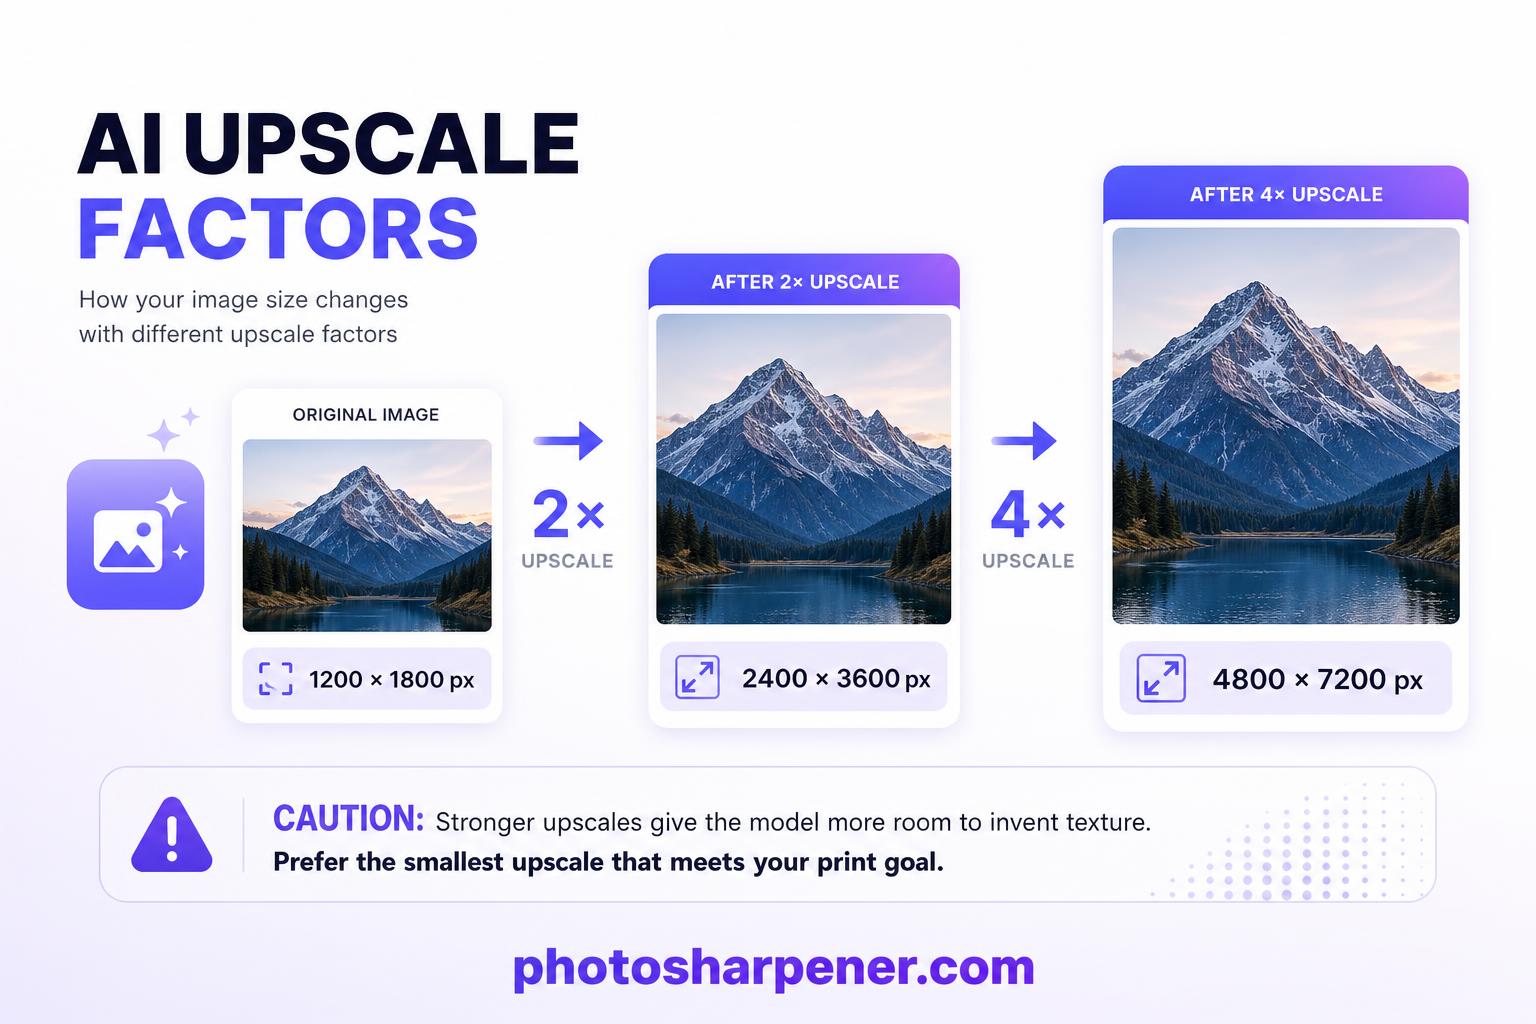
A 2x or 4x upscale changes the math
AI upscaling increases the pixel dimensions, which can make a print possible that was previously too small. A 1200x1800 image becomes:
- 2400x3600 at 2x
- 4800x7200 at 4x
That is why AI is so useful for print prep. It can move a small file into a realistic print range without the mushy look that comes from ordinary resizing.
But the safest target is still the smallest upscale that solves the print problem. If 2x gets you to the size you need, 4x is not automatically better. A stronger upscale gives the model more room to invent texture, and that is where skin can go waxy, hair can turn stringy, and edges can look overdrawn.
AI adds plausible detail, not guaranteed truth
This matters most with faces, text, and high-contrast lines. A good upscale can make them cleaner and more printable. A weak source can also trick the model into inventing shapes that only look sharp from a distance.
Before you trust the print, inspect the file at 100% and look for:
- halos around dark edges
- repeated or patterned texture in hair, fabric, or grass
- facial features that look too smooth or too drawn
- text that looks thicker but not actually clearer
If you see those problems on screen, a larger print will make them easier to notice, not harder.
Check the upscaled file before you order the print
Review the image at full size
Do not judge the result only from a fit-to-screen preview. That is how people approve files that fall apart on paper. Zoom in and check the places your eye goes first: eyes, skin texture, product edges, typography, and any area with strong contrast.
Ask yourself three practical questions:
- Does the image look cleaner, or just sharper?
- Do important details look believable up close?
- If I print this larger, will the weak areas become more obvious?
If the answer to the third question is yes, reduce the print size or go back to a gentler enhancement pass.
Export a clean final file and proof it
Once the image looks right, export a master file at the final pixel dimensions. TIFF is a strong choice when your print shop accepts it. A highest-quality JPEG is usually fine for consumer print labs and easier to upload. Save the final file once, at the end, so you do not add extra compression with repeated exports.
Before ordering an expensive large print, make one proof. That can be a smaller print, or a cropped test of the most critical area. A proof catches the issues that matter in real life:
- faces that looked okay on screen but feel synthetic on paper
- texture that becomes noisy at print size
- shadows that block up more heavily than expected
- light halos around sharp edges
The best print size is not the biggest size the file can technically reach. It is the biggest size that still looks believable when someone stands in front of it.
A practical workflow that works for most people
Follow this order instead of guessing
If you want the shortest reliable path, do this:
- choose the final print size first
- calculate the pixel target using 300, 240, or 180 PPI
- check your source file's actual pixel dimensions
- decide whether a 2x or 4x upscale is enough
- inspect the upscaled result at 100%
- export one clean final file
- make a proof before ordering the large print
This order keeps you from over-editing. Most disappointing prints come from people running enhancement tools first and asking print questions later.
Keep the tool choice simple and the review strict
For most readers, a browser-based workflow is enough. If the file mainly needs more pixels and a cleaner edge structure, a tool like PhotoSharpener can be practical because it combines super-resolution, artifact cleanup, and optional face restoration in one quick pass. The important part is not the brand. It is the review step afterward. If the upscaled file does not hold up at full size, the print will not rescue it.
If you are printing a portrait, stay conservative. If you are printing a product or landscape, you can usually push detail a bit harder. In both cases, stop as soon as the file looks naturally cleaner. More enhancement is not the same as more quality.
When to print smaller instead of pushing resolution harder
Signs the file is already at its limit
Sometimes the smartest print decision is to back off the size. That is usually true when:
- the original file came from social media, chat, or a screenshot
- the subject is slightly out of focus before upscaling
- faces look synthetic after even a mild enhancement pass
- the image needs more than one aggressive upscale to reach the target size
If you are seeing those limits, a smaller 8x10 or 11x14 often looks much better than a stretched 16x20. A believable print nearly always beats a larger print that looks obviously processed.
Use this final decision rule
If the file meets the pixel target and still looks natural at 100%, print it at that size.
If it meets the pixel target but looks artificial up close, print smaller.
If it does not meet the pixel target even after a reasonable upscale, lower the print size instead of forcing it.
That one rule will save you from most bad print orders.
FAQ
Is 300 DPI always necessary for an AI-upscaled photo?
No. It is the safest benchmark for close-viewed prints, but larger wall art and posters can still look very good at 240 PPI or even 180 PPI when viewed from farther away.
Does changing the DPI setting in file metadata improve print quality?
No. Changing the metadata alone does not add detail. The real issue is pixel dimensions, not the number stored in the file info panel.
Is a 4x upscale enough for a large poster?
Sometimes, but not always. A 4x upscale can make a poster possible, yet the source still needs to be strong enough that the invented detail looks natural. Always check the result at full size before you order.
What file format is best for printing an AI-upscaled photo?
TIFF is ideal when your print provider supports it. A highest-quality JPEG is usually fine for most consumer labs. What matters most is exporting once from the finished master, not repeatedly recompressing the file.
How can I tell if the upscaled photo is actually ready to print?
Check two things: whether the file meets the pixel target for your print size, and whether the image still looks believable at 100% zoom. If either one fails, reduce the print size or redo the enhancement more gently.
