Scanning & Prep
Best way to scan an old print before AI restoration?

TL;DR
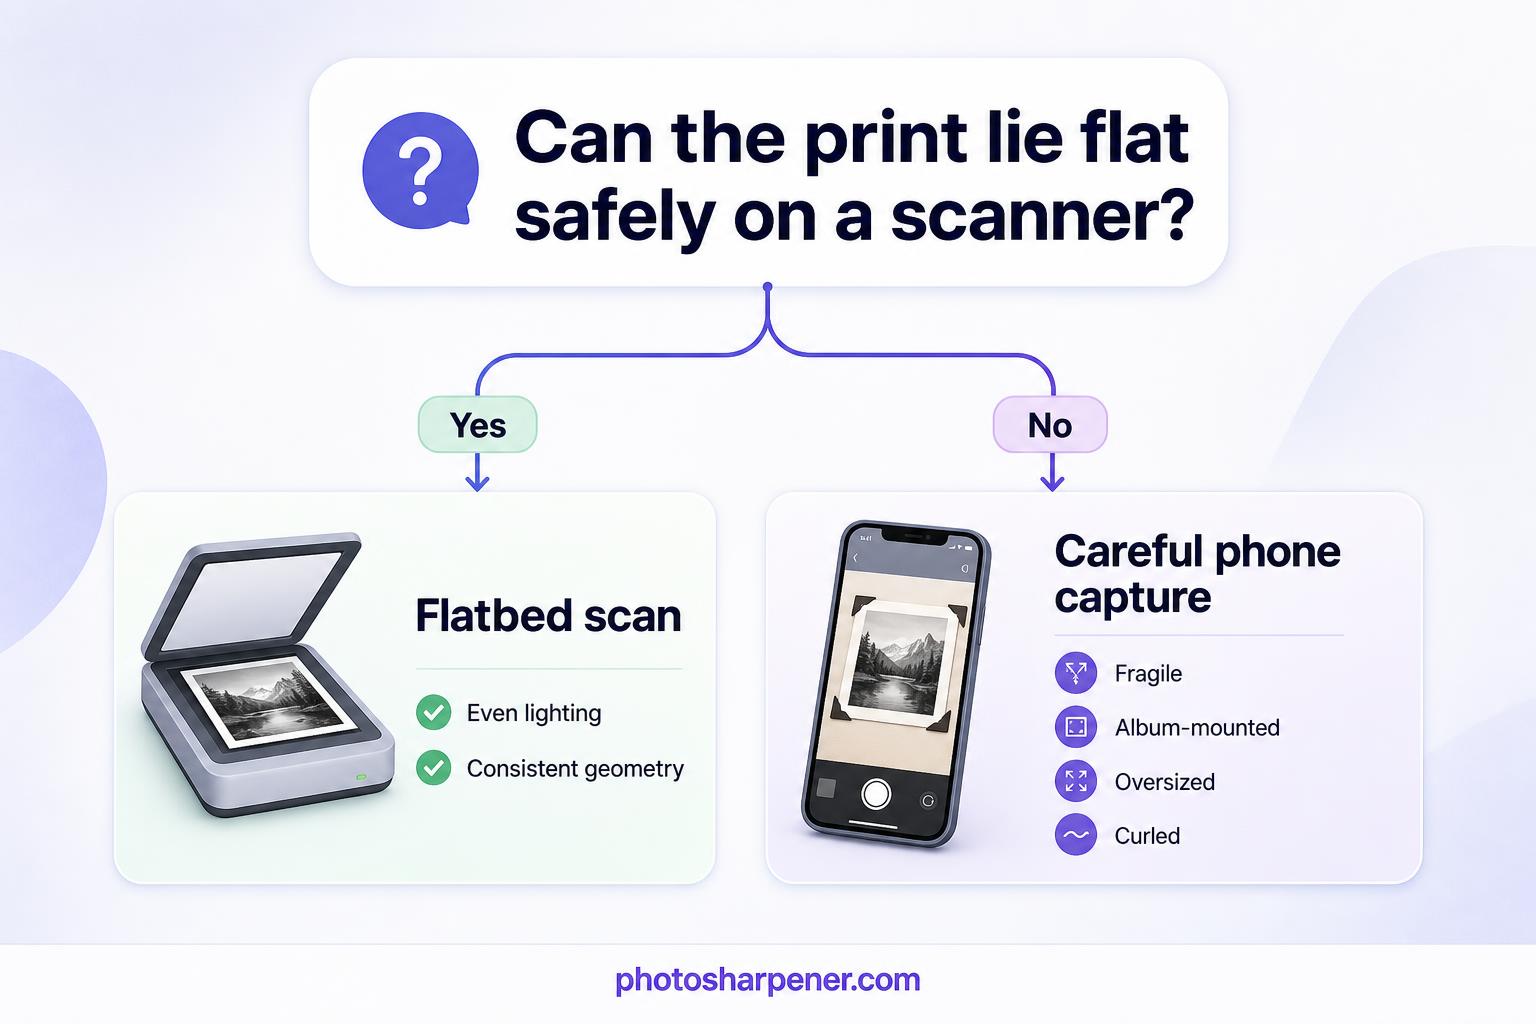
- Scan loose prints on a flatbed when it is safe, and use a careful phone capture only for fragile, oversized, or album-mounted photos.
- Use 600 DPI for most standard prints, and move to 1200 DPI only for small, damaged, or heavily cropped originals.
- Scan in color, turn off scanner auto-fixes, and save a master TIFF or PNG with a small border before you edit anything.
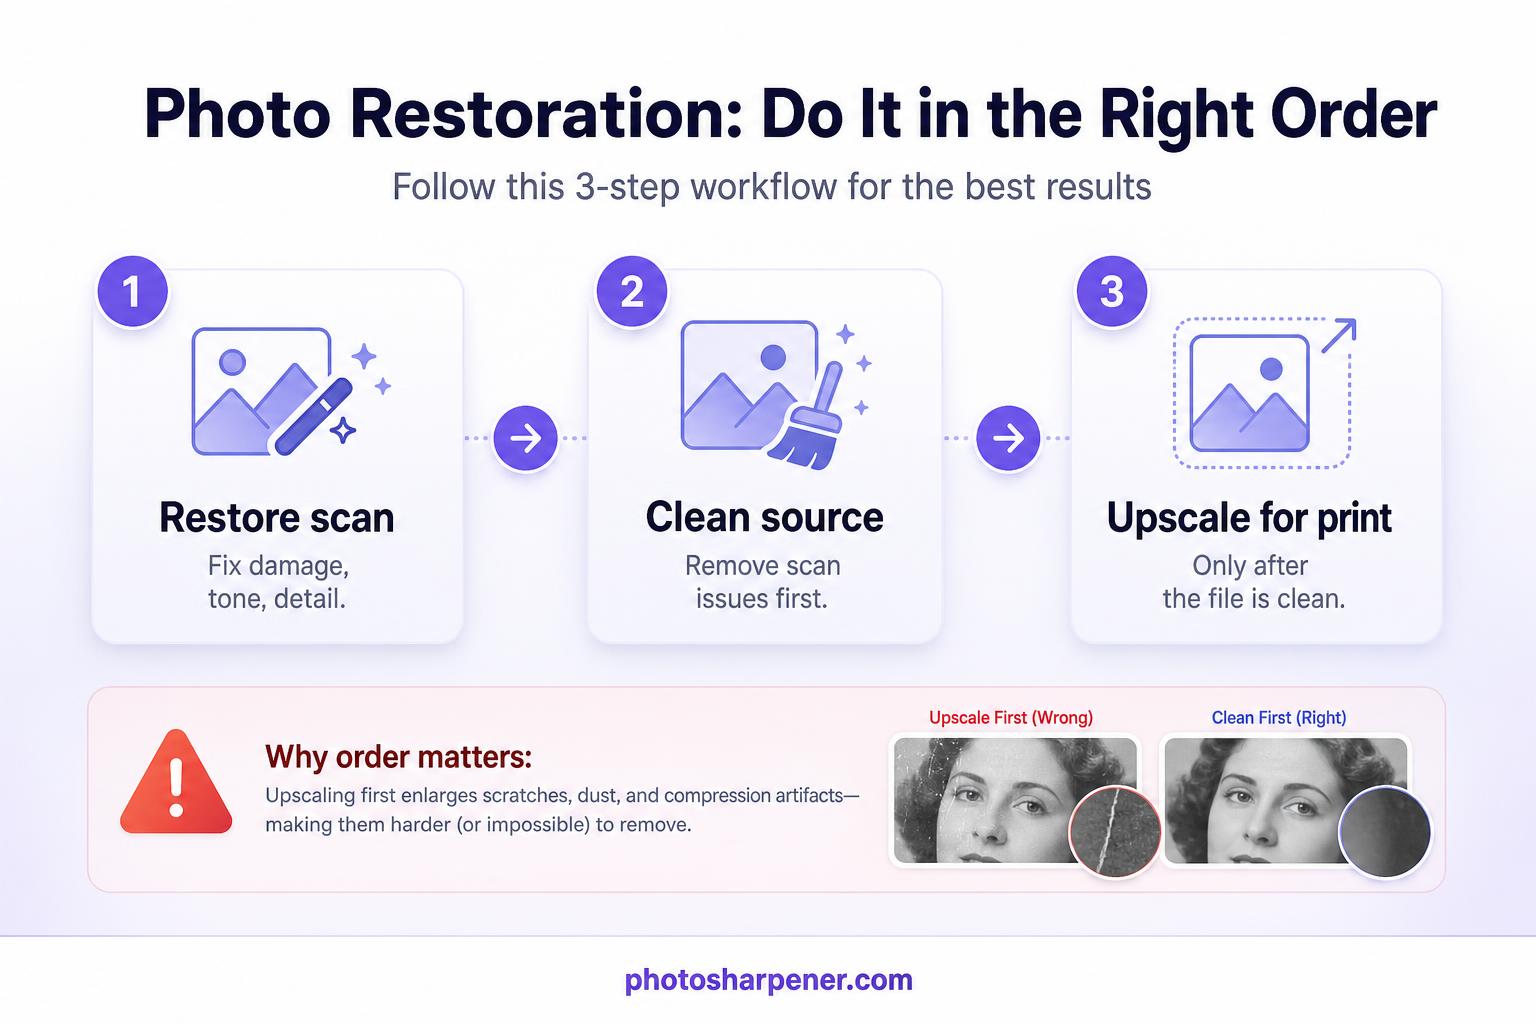
- Restore the clean scan first, then use PhotoSharpener to rebuild detail or upscale for print once the file is already clean.
If you want AI restoration to work well, the scan matters more than most people expect. A strong model can clean damage, improve softness, and rebuild believable detail, but it still needs a clean capture to work from. If the file starts with glare, scanner auto-sharpening, crushed contrast, or a tiny low-quality JPEG, the AI spends half its effort fighting the scan instead of restoring the photo.
The best approach is simple: make the most faithful digital copy you can, then let restoration happen on top of that clean source. In practice, that means choosing the safest capture method, scanning at the right resolution, keeping scanner corrections off, and saving a master file you do not keep re-editing.
Why the scan matters before any AI restoration
AI can only work with what you capture
AI restoration is good at cleaning up and reconstructing what still exists in some form. It is much weaker when the scan already threw detail away. If scanner software clipped the highlights in a wedding dress, blurred the grain into mush, or added crunchy sharpening halos around a face, that damage is now baked into the file.
This is why two people can run the same restoration tool on the same print and get very different results. The better scan usually wins because it gives the model more real structure to interpret.
A good scan preserves damage clues and real detail
Old prints often have mixed problems at the same time: fading, paper tone, dust, crease lines, and a little softness from the original photo or an old reprint. A raw, well-scanned file keeps those signals separate enough for later cleanup. An overprocessed scan tends to flatten them together.
That matters even more when the photo has physical damage. Fine cracks, tape marks, and edges are easier to repair when the scan still shows what is image detail and what is surface damage. If your source is a brittle clipping rather than a normal print, use a more specialized newspaper restoration workflow because the print pattern adds another layer of cleanup.
Choose the safest capture method for the original print
When a flatbed scanner is the best option
For most loose photo prints, a flatbed scanner is still the best starting point. It gives you even lighting, consistent geometry, and predictable resolution. That makes later restoration easier because you are not fighting keystone distortion, phone motion blur, or reflections from ceiling lights.
If the print fits comfortably on the glass and can lie flat without stress, scan it. That is usually the fastest path to a file that restores cleanly.
When a phone capture is the safer fallback
Sometimes scanning is not the safest move. If the print is stuck in an album, mounted behind a sleeve, very curled, brittle at the folds, or larger than your scanner bed, forcing it flat can do more harm than the AI will ever fix later. The Library of Congress FAQ is a good reminder that fragile or stuck photographs should be handled conservatively, not peeled apart just to get a scan.
In those cases, use a phone carefully:
- place the print on a matte surface
- use soft, even light from both sides
- keep the camera parallel to the print
- turn off flash
- take a few versions and keep the highest-resolution original
It is still a fallback, not the ideal, but a careful phone capture is better than damaging the original while trying to force a scan.
Prepare the photo and scanner before you press scan
Handle the print gently and avoid risky fixes
Before you do anything digital, protect the original. Hold the print by the edges. If it is valuable or easily marked, follow the National Archives guidance and use clean gloves while supporting the photo with both hands.
Do not try to improve the print physically right before scanning. Do not peel old tape, scrub stains, or use liquid cleaners on the image surface. If the photo has surface dust, remove only loose debris gently with a soft cloth or a blower. If there is damage that looks structural, scan first and decide on restoration from the digital copy.
Clean the glass and keep the photo flat without forcing it
A dirty scanner bed creates fake problems that the AI may mistake for texture. Wipe the glass first, then preview the scan and zoom in on the corners and darker areas where dust often hides.
If the print has a mild curl, letting it rest under a clean book for a short time can help. But if it feels stiff or brittle, do not force it flat. The goal is not a perfectly flattened object. The goal is a safe capture with as little new damage as possible.
Use scan settings that keep real detail
Best DPI for small, standard, and damaged prints
This is the setting most people overthink. For regular photo prints, higher is not automatically better. The Library of Congress notes in its resolution guidance that reflective prints often stop benefiting much beyond the point where you are mostly capturing grain and dust instead of more useful detail.
For practical AI restoration, this is a good rule set:
| Print type | Good starting point | When to go higher |
|---|---|---|
| Large print, already fairly clear | 300 DPI | Go to 600 if you may crop or print larger later |
| Standard 4x6 or 5x7 print | 600 DPI | Stay here for most restoration jobs |
| Small print, wallet photo, or damaged print | 1200 DPI | Worth it when faces are tiny or cracks are fine |
| Negative or slide | Use a film workflow, not normal print settings | Usually needs a dedicated scanner |
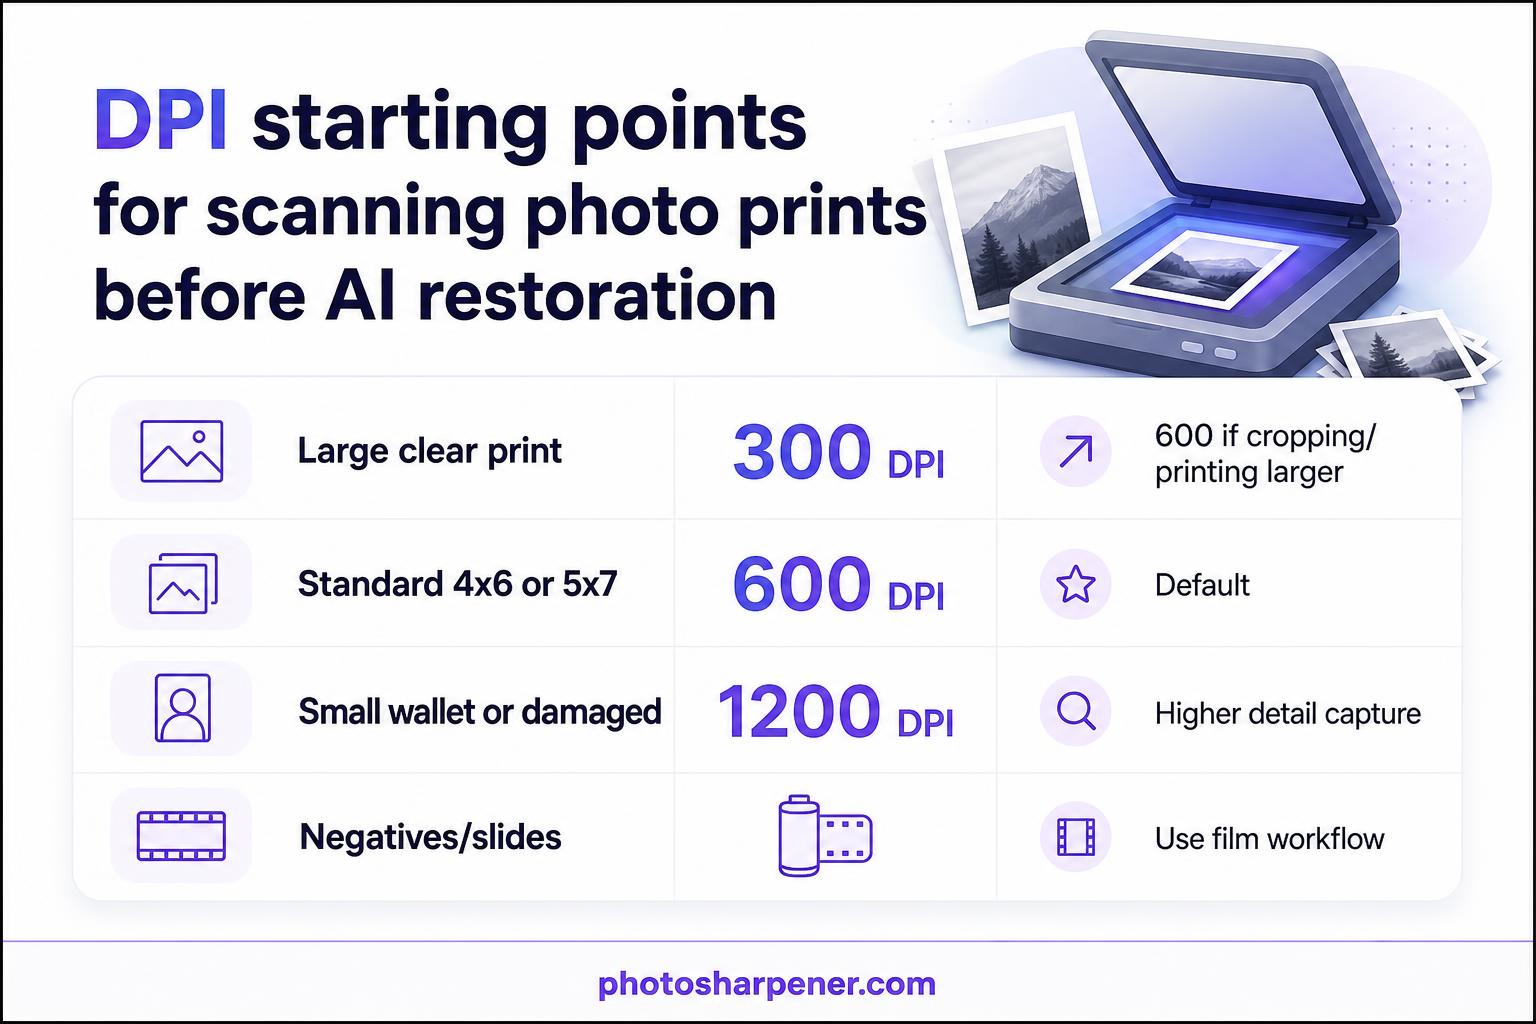
If you are unsure, choose 600 DPI for a normal print and 1200 DPI only when you have a clear reason: the photo is small, damaged, or likely to be cropped hard.
Scan in color and turn scanner auto-corrections off
Even if the original photo is black and white, scan in color. Old paper tone, stains, yellowing, and faded chemistry often live in the color channels, and that extra information can help separate damage from image content later. It also gives you a better base if you later need to recover detail from a washed-out scanned photo without crushing the faint tonal variation that is still there.
Use the cleanest capture mode your scanner offers:
- 24-bit color minimum
- 48-bit color if your scanner supports it and file size is not a problem
- no auto contrast
- no auto sharpening
- no auto color restoration
- no heavy dust removal unless you have tested it on a copy
Scanner software likes to make the preview look better. That is not the same thing as making the source file better. For restoration, neutral and boring is usually what you want.
Save a clean master file you can restore later
Pick TIFF or PNG first and crop later
If your scanner allows it, save the master scan as TIFF. PNG is also a good option for many home workflows. JPEG is acceptable only if that is all your scanner software gives you, and even then it should be the highest quality setting with no repeated re-saves.
Do not crop the photo too tightly on the first pass. Leave a small border around the print. That extra edge context helps when you need to repair corners, align the image, or judge where paper damage ends and picture content begins.
Keep one untouched original and work on copies
Think of the first good scan as your master negative. Keep one untouched version and do restoration on a copy. That way, if a tool over-smooths skin, changes a face too much, or creates artifacts, you can restart from a clean file instead of from an already-processed version.
This also keeps your workflow cleaner if you later want a different result for social sharing, for archiving, or for print.
What to do right after scanning and before AI restoration
Check the file at 100 percent before enhancing
Open the scan and zoom in before you upload it anywhere. Look at faces, edges, and high-contrast areas. You are checking for simple things:
- is there obvious glare or uneven lighting?
- did the scanner software blur fine detail?
- is dust on the glass showing up across the image?
- did the preview crop cut off corners or borders you may want later?
If you catch a bad scan now, rescanning is easier than trying to repair a bad digital source later. And if rescanning is no longer possible, switch to a more deliberate bad scan cleanup workflow before you start sharpening or upscaling.
Restore first, upscale later
This order saves a lot of frustration. First restore the scan so you clean damage, rebalance tone, and recover believable detail. Then decide whether you need more pixels for printing or reframing. If you upscale first, you often make scratches, compression, and scanner junk bigger before the cleanup stage.
That is where a browser-first tool like PhotoSharpener fits well. Once you have a clean scan, it can help rebuild detail, reduce softness, and upscale for print without making you start inside a heavy desktop workflow. But the result still depends on the quality of the scan you feed it.
Common scanning mistakes that hurt restoration
Overscanning, underscanning, and tight crops
A lot of people swing too far in one direction.
If you scan a normal 4x6 print at an extreme setting, you may mostly get more paper texture, dust, and longer scan times. If you scan a tiny, damaged print too low, you may not leave enough real detail for restoration or later cropping. And if you crop too close to the subject, you lose useful edge context that can help with alignment and repair.
The safe middle ground is usually simple: 600 DPI for most prints, 1200 DPI for small or damaged ones, and a little border left around the image.
Auto-enhancement, JPEG re-saves, and glare
These are the silent quality killers.
Auto-enhancement can make a scan look punchy while actually throwing away subtle tone. Repeated JPEG saving softens edges and adds compression blocks. Phone glare can wash out half a face or turn tape residue into a bright streak that hides the detail underneath.
If you avoid those three problems, you are already ahead of a lot of so-called restoration workflows online.
FAQ
Is 300 DPI enough for an old photo I want AI to restore?
Sometimes, yes, especially for a larger print that is already fairly clear and not heavily damaged. But for most everyday family prints, 600 DPI is the safer starting point because it leaves you more room for cleanup and cropping.
Should I scan black-and-white prints in grayscale or color?
Color is usually better for restoration. Even black-and-white prints often carry paper tone, yellowing, and stain information that grayscale throws away.
Can I use my phone instead of a scanner?
Yes, when the original is too fragile, too large, or stuck in a way that makes scanning risky. But if the print can be scanned safely, a flatbed scan is usually cleaner and easier to restore.
Should I crop out the border before restoration?
Usually no. Keep a small border on the master scan, then crop later on a working copy if you want a cleaner final composition.
