Scanning & Prep
Can AI recover detail from a washed-out scanned photo?

TL;DR
- AI can recover detail from a washed-out scan when faint tonal separation is still present.
- Rescanning with auto-corrections off usually helps more than aggressive sharpening later.
- Fix tone and color before denoise or sharpening, because many "soft" scans are mainly low contrast.
- PhotoSharpener works best after basic cleanup, when it can rebuild edge detail instead of fighting a foggy source scan.
- If highlights are clipped to blank white or the file is tiny and compressed, expect improvement rather than perfect recovery.
Yes, often it can. A washed-out scanned photo usually still contains more information than it first appears to. If faces, clothing folds, background shapes, or shadow transitions are still faintly visible, AI can often rebuild contrast, separate tones, and make the image look much clearer.
The limit is simple: AI can strengthen weak detail, but it cannot faithfully recover detail that was never captured or has already been clipped away. If the scan has large blank highlights, a paper-white face, or completely flattened shadows, the result becomes reconstruction rather than recovery.
What AI can and cannot recover from a washed-out scan
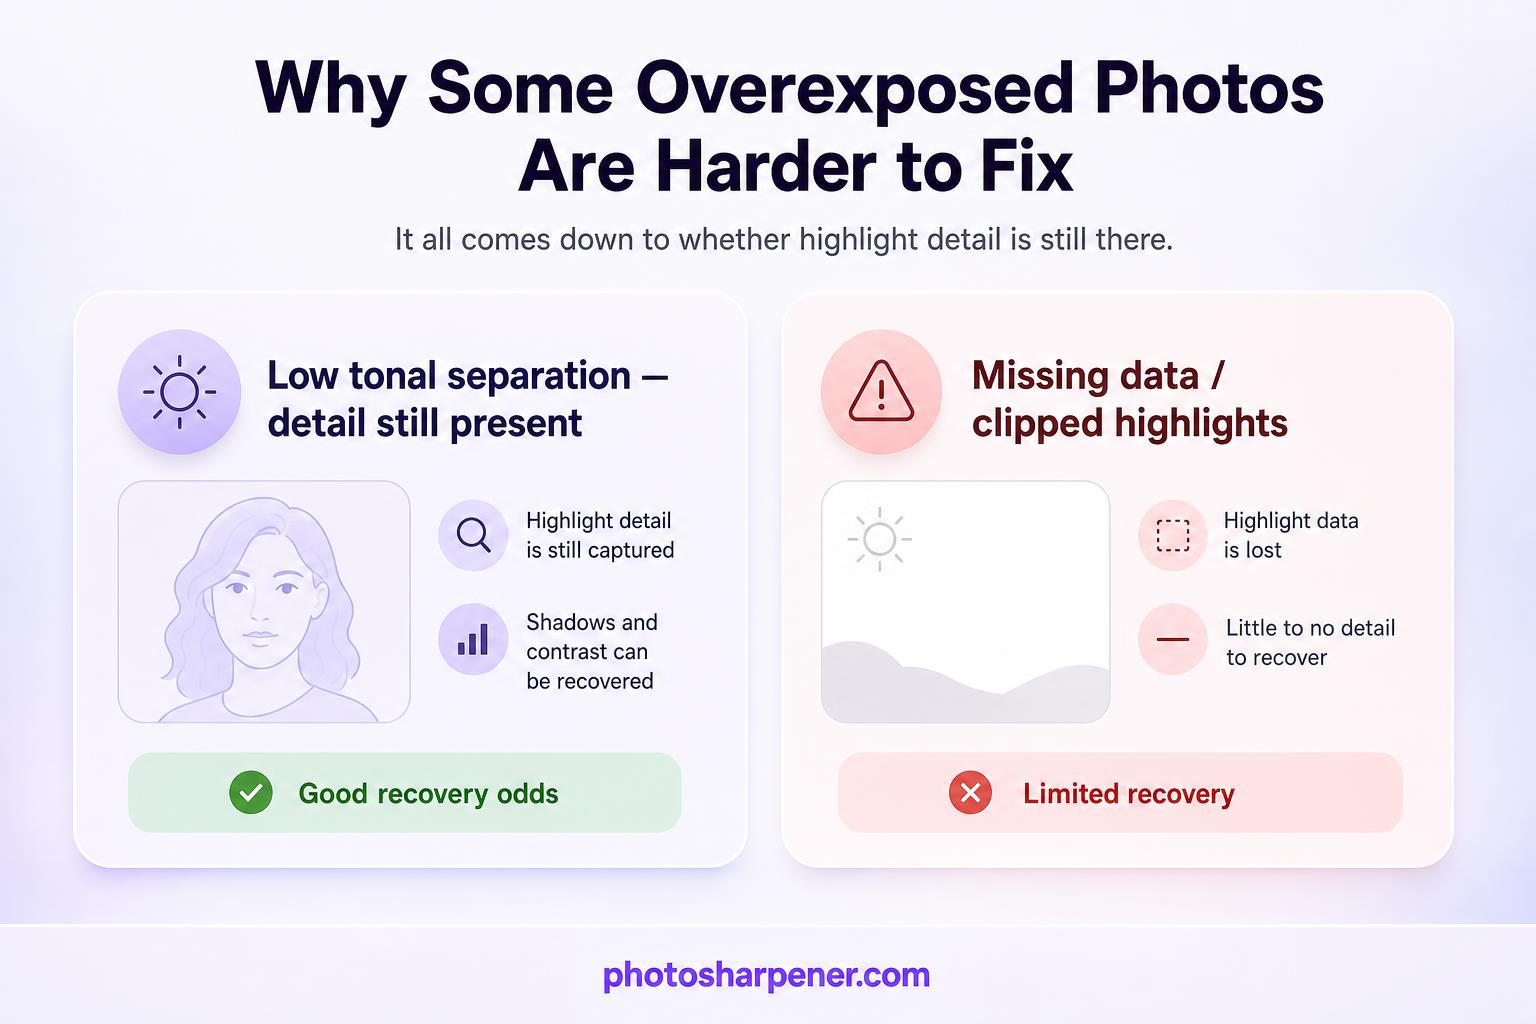
The difference between faded tone and missing data
When people say a scan looks washed out, they often mean one of two very different things.
The first is low tonal separation. The image still has information, but the blacks are weak, the midtones are compressed, and the colors have drifted. This is the good scenario. AI and careful manual correction can often recover a lot because the file still contains structure to work with.
The second is missing data. Highlights may be clipped so hard that a white shirt, wedding dress, or forehead has turned into a flat patch with no internal tone at all. In that case, the software is no longer revealing detail. It is guessing what should be there.
That is why two washed-out scans can respond very differently to the same tool. One still has a pale version of the original image. The other has holes in the information.
Signs the scan still has usable detail
Before you edit, zoom in and check for these clues:
- eyelashes, hair strands, or fabric texture are faint but not gone
- edges between light and dark areas still look soft rather than fully erased
- skin has some tonal variation instead of turning into one bright slab
- shadows still show shape, even if they look gray and weak
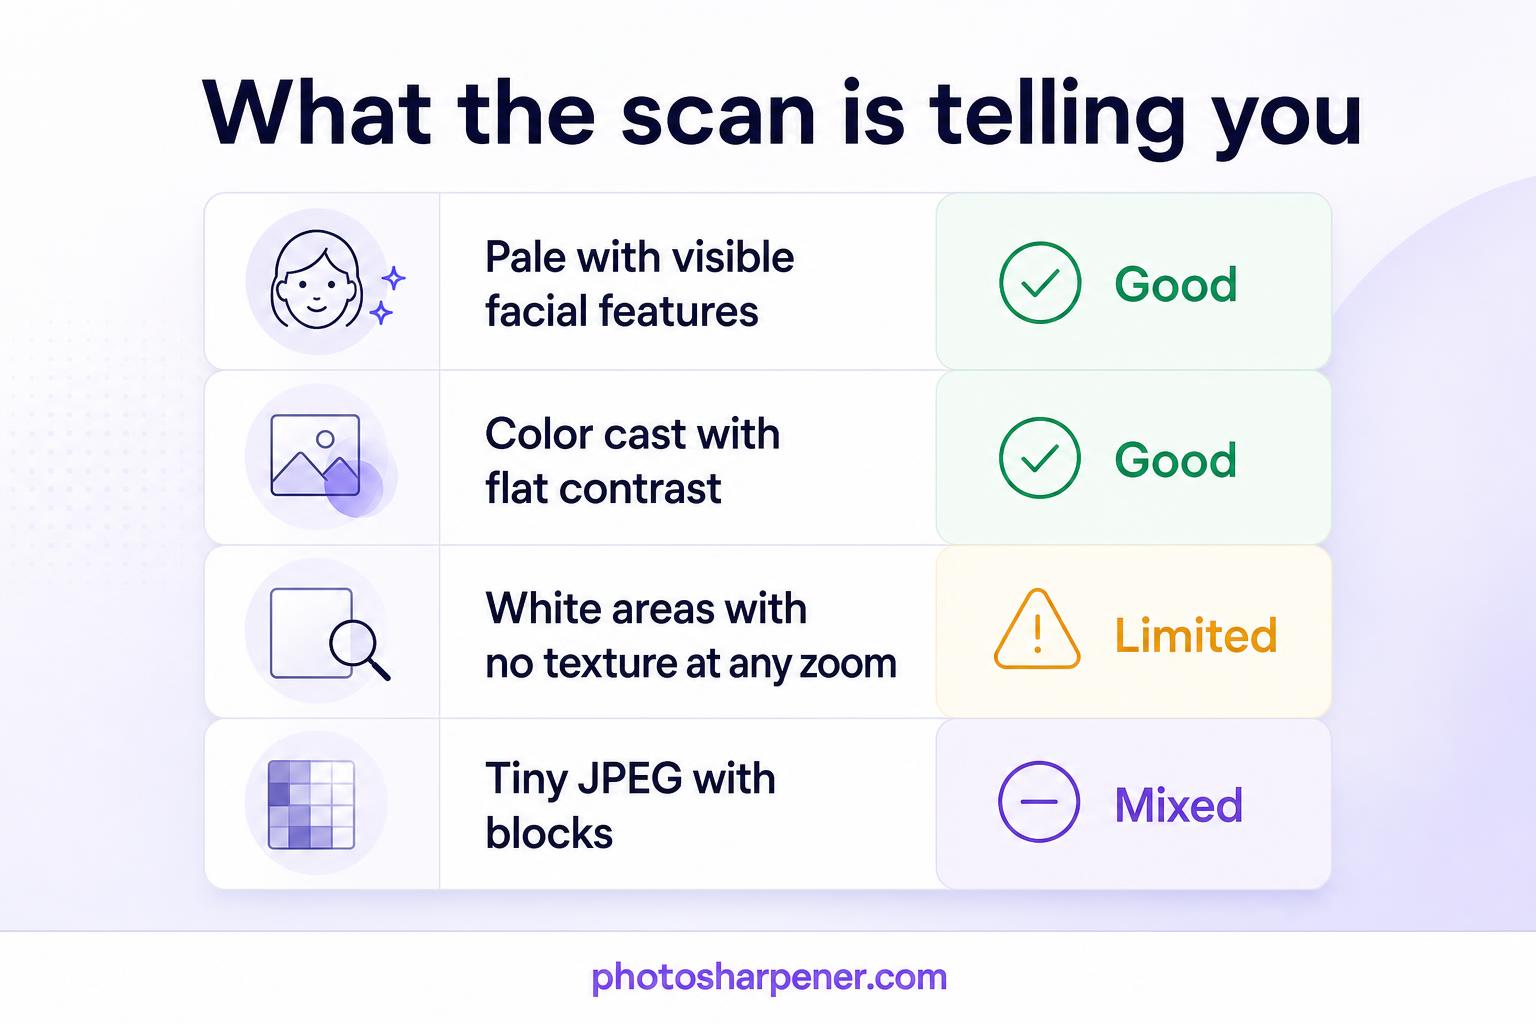
This quick table helps you judge what you are looking at:
| What you see | What it usually means | Recovery odds |
|---|---|---|
| Pale image with visible facial features | Tone is compressed, but detail remains | Good |
| Yellow or blue cast with flat contrast | Aging or scanner color drift | Good |
| White areas with no texture at any zoom level | Highlights are clipped | Limited |
| Tiny JPEG scan with blocky artifacts | Low capture quality plus compression | Mixed |
If the scan falls in the first two rows, AI has a real chance to help. If it falls in the last two, AI can still make it more usable, but you should expect a believable improvement, not a perfect restoration.
Why scanned photos end up looking washed out
Scanner auto-settings and flat contrast
Many washed-out scans are not only about age. They come from the capture itself.
Home scanners often apply automatic exposure, contrast smoothing, dust handling, and color balancing before you even see the file. Those adjustments are meant to make average photos look "nice," but they can flatten shadows, mute highlight separation, and wipe out the subtle tonal differences that restoration tools need.
This is why a scan can look both pale and soft at the same time. The softness is not always blur. Sometimes the scanner has simply collapsed the contrast so much that the detail no longer stands apart.
If you still have the original print, rescanning with auto-enhancement disabled can give you a noticeably better base file. Our guide on the best scan setup walks through the safest capture setup.
Paper aging, fading, and color casts
The print itself can create the same washed-out look. Light exposure, heat, humidity, adhesives, and chemical aging all weaken dye stability over time. That is why old photos often shift yellow, brown, magenta, or blue-green while also losing depth.
Competitor guides consistently frame this as a tone-and-color problem first, not a sharpening problem, and that is the right way to think about it. If a faded print has decent underlying structure, you usually get the biggest improvement by restoring tonal range before you try to "add detail."
Start with the cleanest possible source file
How to scan or re-scan for better recovery
If rescanning is possible, take it. A better source almost always beats a more aggressive edit.
The LOC basics are a good benchmark for home archiving. For most prints, a clean scan in the 300 to 400 PPI range is already useful, and 600 DPI is often worth testing when you expect to retouch or print larger later. What matters more than chasing the highest number is whether the scan is capturing real detail rather than just extra dust and paper texture.
For the best recovery odds:
- clean the scanner glass
- disable scanner auto-correction if you can
- scan the full print, not a tight crop
- save a master copy as TIFF or PNG if possible
- only use JPEG for sharing copies
If you do not have a scanner, use an evenly lit phone capture with no flash and no strong glare. A careful phone photo is often better than a rushed, heavily auto-processed scan.
Why you should keep an untouched master copy
Never edit your only digital copy directly.
Make one untouched master and one working file. This protects you from two common mistakes: overprocessing the image and forgetting what the original actually looked like. Both happen all the time with washed-out photos because improvements can look dramatic at first, then artificial after a second look.
If you are working in Photoshop, Adobe's restoration workflow is a good reminder to keep edits non-destructive and separate cleanup from tonal adjustments. Even in simpler tools, the same rule applies. Work on copies, save versions, and compare often.
Fix tone and color before trying to sharpen detail
Set black and white points first
This is the step that most often makes people say, "I thought the scan was blurry, but it was really just flat."
Start by re-establishing the tonal range:
- pull the black point down until dark areas look anchored again
- bring the white point in only until highlights feel bright, not brittle
- adjust midtones so faces and clothing stay readable
A practical rule is to stop as soon as important areas look separated again. If you push the endpoints until the image looks punchy on a phone, you will often clip the very detail you were trying to recover.
When you are unsure, watch three zones while you adjust:
- the brightest skin area
- the darkest clothing fold or hair section
- a midtone transition like a cheek, wall, or sky
If one of those collapses into a hard block, back off.
Neutralize yellow, blue, or magenta casts
Once the tonal range is back, fix the cast that is making the image feel lifeless.
Yellowed prints often need cooler balance and better black definition. Blue-green drift often means the red channel faded first, which is common in older color prints. Magenta scans can come from aging or bad auto-correction. The goal is not "perfect color." The goal is believable color that lets the remaining detail read naturally.
Small corrections beat large ones here. A washed-out face may look better with slightly muted color and honest skin texture than with strong saturation and fake vitality.
If the photo is black and white, remove the stain or cast, then keep the file neutral. Do not add unnecessary contrast just because the cleanup made the image look flatter for a minute. Many black-and-white scans need tonal separation, not drama.
Use AI recovery in the right order
Restore faded contrast before noise cleanup and sharpening
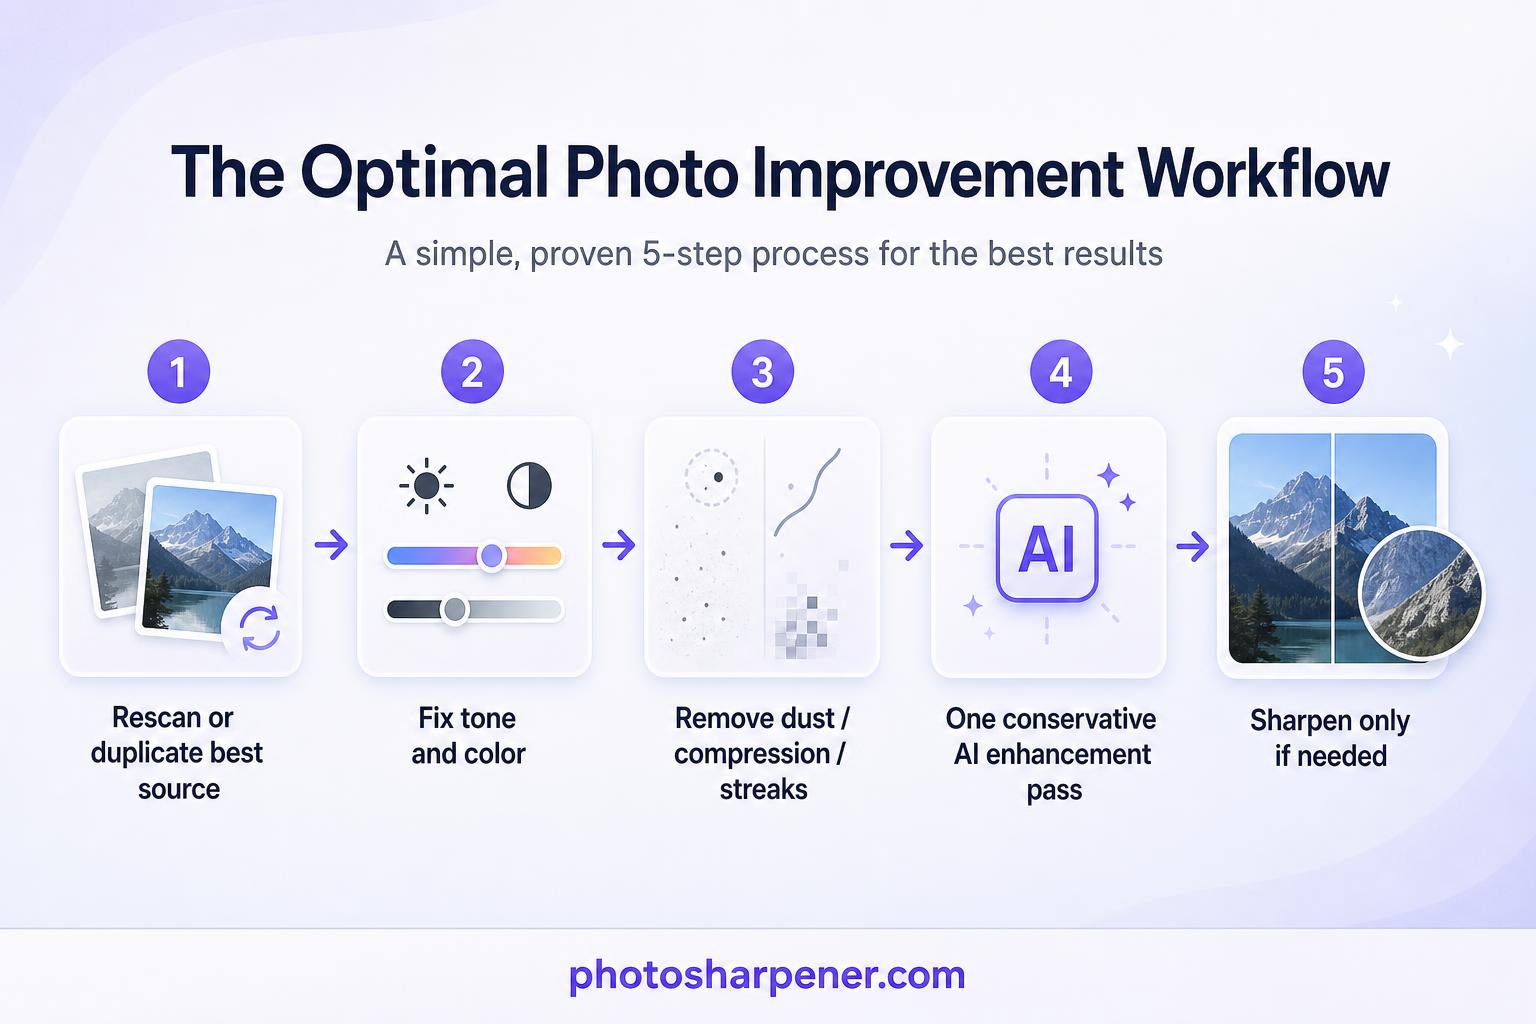
The safest sequence is usually:
- rescan or duplicate the best source you have
- fix tone and color
- remove obvious dust, compression, or scanner streaks
- apply one conservative AI enhancement pass
- sharpen only if the result still needs a small final lift
This order matters because sharpening a washed-out file too early exaggerates noise, paper grain, and JPEG junk. Then the AI has to interpret damage that you made more visible.
If the scan is pale but fairly clean, AI may recover detail after only basic tone correction. If it is pale and noisy, clean the noise first so the model spends more effort on real edges rather than random texture.
When PhotoSharpener or similar tools help most
PhotoSharpener fits best after you have already corrected the obvious tonal problems. That gives the model a truer base image, so it can focus on rebuilding edge clarity, separating texture, and optionally improving faces instead of fighting a weak, foggy scan from the start.
This is especially useful when the image suffers from several mild problems at once:
- faded contrast
- slight scan softness
- low-resolution capture
- JPEG compression
- weak facial definition
Use one careful pass and then inspect the result at full size. If a face suddenly changes shape, skin turns plastic, or background texture looks painted in, the tool is doing too much. For broader scanner issues, this article pairs well with our bad scan guide.
How to tell if the recovered detail is believable
Check faces, edges, and texture at 100% zoom
Always judge the file at 100% zoom before you accept the result.
At screen-fit size, almost any restored image can look better than the original. The real test is whether the recovered detail still belongs to the same photo.
Check these areas first:
- eyes, eyebrows, and hairlines
- shirt seams, jewelry, or printed text
- transitions between face and background
- repeated texture like brick, fabric, or foliage
If those areas look clearer without becoming patterned, crunchy, or rubbery, the recovery is probably trustworthy.
Warning signs of overprocessing
Stop and dial the edit back if you notice:
- glowing halos around edges
- waxy or airbrushed skin
- repeating AI patterns in hair or eyelashes
- backgrounds that look sharper than the subject
- colors that feel newer than the era of the print
One simple decision rule works well: if the image looks more impressive but less believable, it is overprocessed.
That matters even more with family photos because realism usually ages better than drama. A slightly soft but honest restoration is often the better final file.
When a washed-out scan has reached its limit
Blown highlights and blank areas
Some scans simply do not contain enough information.
If a white dress has no lace texture anywhere, if a face is paper-white from forehead to cheek, or if the sky and the wall have merged into one blank field, you are not recovering hidden detail anymore. You are inventing it.
The same is true for aggressively compressed files. A tiny scan that has been sent through email, messaging apps, or repeated JPEG saves may still improve, but it is already several generations away from the original signal.
When rescanning or manual restoration is the better move
Choose rescanning over heavier AI when:
- the original print is still available
- the first scan was done with strong auto-correction
- important faces are clipped or badly color-shifted
- you need a cleaner file for print
Choose careful manual restoration, or a human retoucher, when:
- one important region needs selective repair
- the image has stains, tears, and washed-out tone at the same time
- historical accuracy matters more than speed
If the photo is emotionally important and the result still feels fragile, do not keep stacking AI passes hoping for a miracle. A better scan or more controlled manual work is usually the smarter move.
FAQ
Can AI fix a scan that looks almost white?
Sometimes, but only if faint tonal variation still exists. If the file looks pale but features are still visible, AI can often recover usable contrast. If the area is truly blank white, there is little real data left to reveal.
Should I sharpen a washed-out scan before restoring contrast?
No. Start with tone and color first. Many washed-out scans look soft because the contrast is weak, not because the detail is gone. Sharpening too early usually makes noise and compression worse.
Is 600 DPI always better than 300 DPI?
Not always. A better scan is the one that captures more real image information, not just a larger file. For many prints, 300 to 400 PPI is already enough. Use 600 DPI when you expect to retouch, crop, or print larger and the original actually contains more detail to capture.
Can AI recover the original colors exactly?
No, not exactly. It can often produce believable color and tone based on what remains in the scan, but once dyes have faded or highlights are clipped, there is no guaranteed way to reconstruct the precise original appearance.
