Scanning & Prep
How to improve a bad scan without the original photo?

TL;DR
- Diagnose whether the weakness comes from low resolution, scanner auto-processing, JPEG compression, or physical damage before you choose a fix.
- Keep the original untouched, then move your working copy to TIFF or PNG if possible so you do not stack extra compression.
- Correct tilt, crop, exposure, and color before you denoise or sharpen anything.
- Clean dust, streaks, and noise first, then use PhotoSharpener or another AI enhancer on the cleanest copy you can make.
- Upscale only when the final print or delivery size needs it, and stop before halos, waxy skin, or fake texture appear.
If the only copy you have is a bad scan, the job is different from a normal restoration. You cannot go back for a cleaner capture, so every edit has to protect what little real detail is already in the file. That usually means fixing the scan in the safest order, staying conservative with sharpening, and using AI only after the basics are under control.
The good news is that a weak scan is often more salvageable than people think. Flat contrast, mild blur, JPEG mush, dust specks, and scanner softness can all be improved. The bad news is that some problems are baked in forever. If the scan is tiny, badly compressed, or clipped so hard that highlights and shadows are gone, no tool can truly recreate the missing information. You are aiming for a cleaner, more believable image, not a perfect rewind.
Start by judging what is actually wrong with the scan
A bad scan is not always a damaged photo
People often describe every poor digital copy as a "bad scan," but the failure can come from different places. Sometimes the original print was already faded or scratched. Sometimes the scanner introduced the damage through low DPI, auto contrast, heavy sharpening, or a dirty glass bed. And sometimes the file itself was made worse later by being saved as a small JPEG over and over again.
That distinction matters because each problem has a different first fix. If the photo itself is torn, you need repair work. If the whole image looks crunchy, the scanner probably over-sharpened it and more sharpening will only make it worse. If the file is flat and gray, you may get a big improvement just from tone correction. When the main issue is faded highlights and weak contrast rather than physical damage, this pairs especially well with our guide to recovering detail from a washed-out scanned photo.
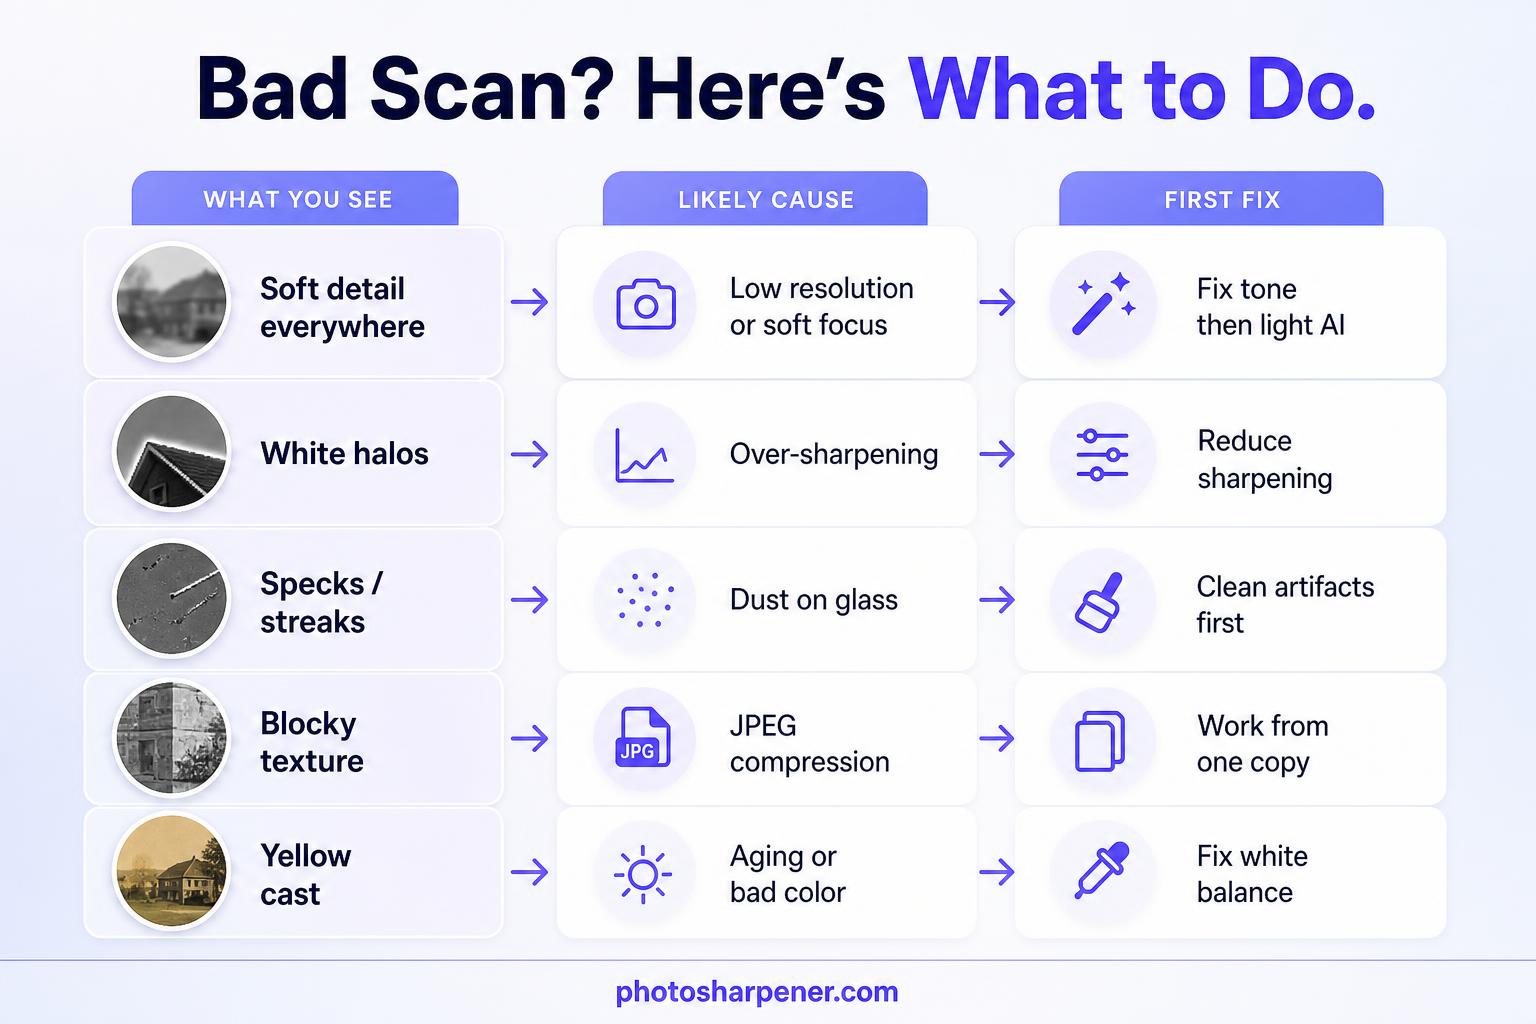
This quick diagnosis table helps:
| What you see | Likely cause | Best first move |
|---|---|---|
| Soft detail everywhere | Low-resolution scan or weak original focus | Correct tone first, then test light AI enhancement |
| White halos around edges | Scanner auto-sharpening or aggressive editing | Back off sharpening and reduce contrast a little |
| Specks, streaks, repeated spots | Dust on the scan or glass | Spot-clean artifacts before any upscale |
| Blocky texture and smeared fine detail | JPEG compression | Work from one clean copy and denoise gently |
| Yellow cast and washed-out blacks | Aged print or bad auto color | Fix white balance and contrast before detail work |
What you can still recover, and what you probably cannot
You can usually improve readability, local contrast, texture separation, and overall clarity. You can often make faces look more defined, clothing edges cleaner, and faded prints less lifeless.
What you usually cannot do is recover exact detail that was never captured. A 400-pixel face cannot be turned into a faithful high-resolution portrait. A scan with blown highlights in a white dress will not reveal the original lace pattern. AI can generate plausible detail, but plausible and original are not the same thing.
That is why good restoration starts with realistic expectations. Your goal is to preserve identity, mood, and usable detail while avoiding fake texture.
Make a safe working file before you edit anything
Keep the original scan untouched
Before you change a single slider, duplicate the file and rename it clearly. A simple naming pattern is enough: family-photo-original-scan.jpg and family-photo-working-copy.tif.
This matters for two reasons. First, bad edits are easier to undo when the untouched source still exists. Second, you may notice later that one problem came from your edit, not from the scan itself. When that happens, restarting from the original is much faster than trying to reverse a stack of changes.
If you are using Photoshop, Adobe's restoration workflow is a good reminder to work nondestructively on separate layers rather than writing directly over the background image. The same idea applies in Photopea, GIMP, and similar editors.
Move to a better working format if you can
If the only file you have is a JPEG, do not keep editing and re-saving that JPEG. Open it once, then save the working version as TIFF or PNG if your editor supports it. That does not restore lost data, but it prevents new compression damage from stacking up while you work.
If you only have a browser-based tool, the same principle applies. Upload the best version once, download the result, and avoid running the already-compressed download through a dozen more save cycles unless you truly need another pass.
Fix the image in the order that causes the least damage
Straighten, crop, and exposure first
Start with the boring corrections because they influence every later step.
Straighten the image if it is tilted. Then crop only as much as you need. Leave a small border if the edges contain clues about damage, paper tone, or the real frame of the print. Cropping too early can also remove helpful context when you later spot-clean corners or rebuild edges.
After that, correct the obvious tonal issues:
- lift dark scans that are hiding facial detail
- pull back washed-out highlights if there is recoverable tone
- set a cleaner black point so the image does not look foggy
- keep midtones natural instead of chasing dramatic contrast
This step alone often makes a bad scan look much more usable. Many files seem blurry when the real problem is flat contrast.
Correct faded color and flat contrast before detail work
Old scans often lean yellow, green, or magenta because of paper aging, scanner auto color, or poor white balance at capture. Fix that before you touch sharpness. A muddy color cast hides edge contrast and makes the whole image feel softer than it really is.
For black-and-white photos, keep the file in grayscale or a neutral monochrome look once you have removed the cast. For color photos, neutralize the cast first and then make smaller color adjustments. Do not oversaturate a faded family print just because the corrected version suddenly looks livelier. Old photos should look restored, not newly manufactured.
If the file has major fading, use small moves. One large auto-correction often clips detail faster than three careful manual ones.
Remove scan artifacts before you sharpen
Clean dust, streaks, and JPEG noise
Once tone is stable, zoom in and look for the junk that is not part of the picture. Common bad-scan artifacts include:
- dust spots
- thin scanner lines
- dirty-glass smears
- compression blocks around faces
- color speckles in shadows
Remove the obvious distractions first. Healing or clone tools are best for isolated marks. For broader noise, a light denoise pass is safer than spot-correcting every pixel by hand.
This is also the moment to decide whether the image has physical damage from the original print, such as cracks or torn edges, versus damage introduced by scanning. If the file has both, clean the scan artifacts first. It is much easier to judge the real damage once the digital junk is gone.
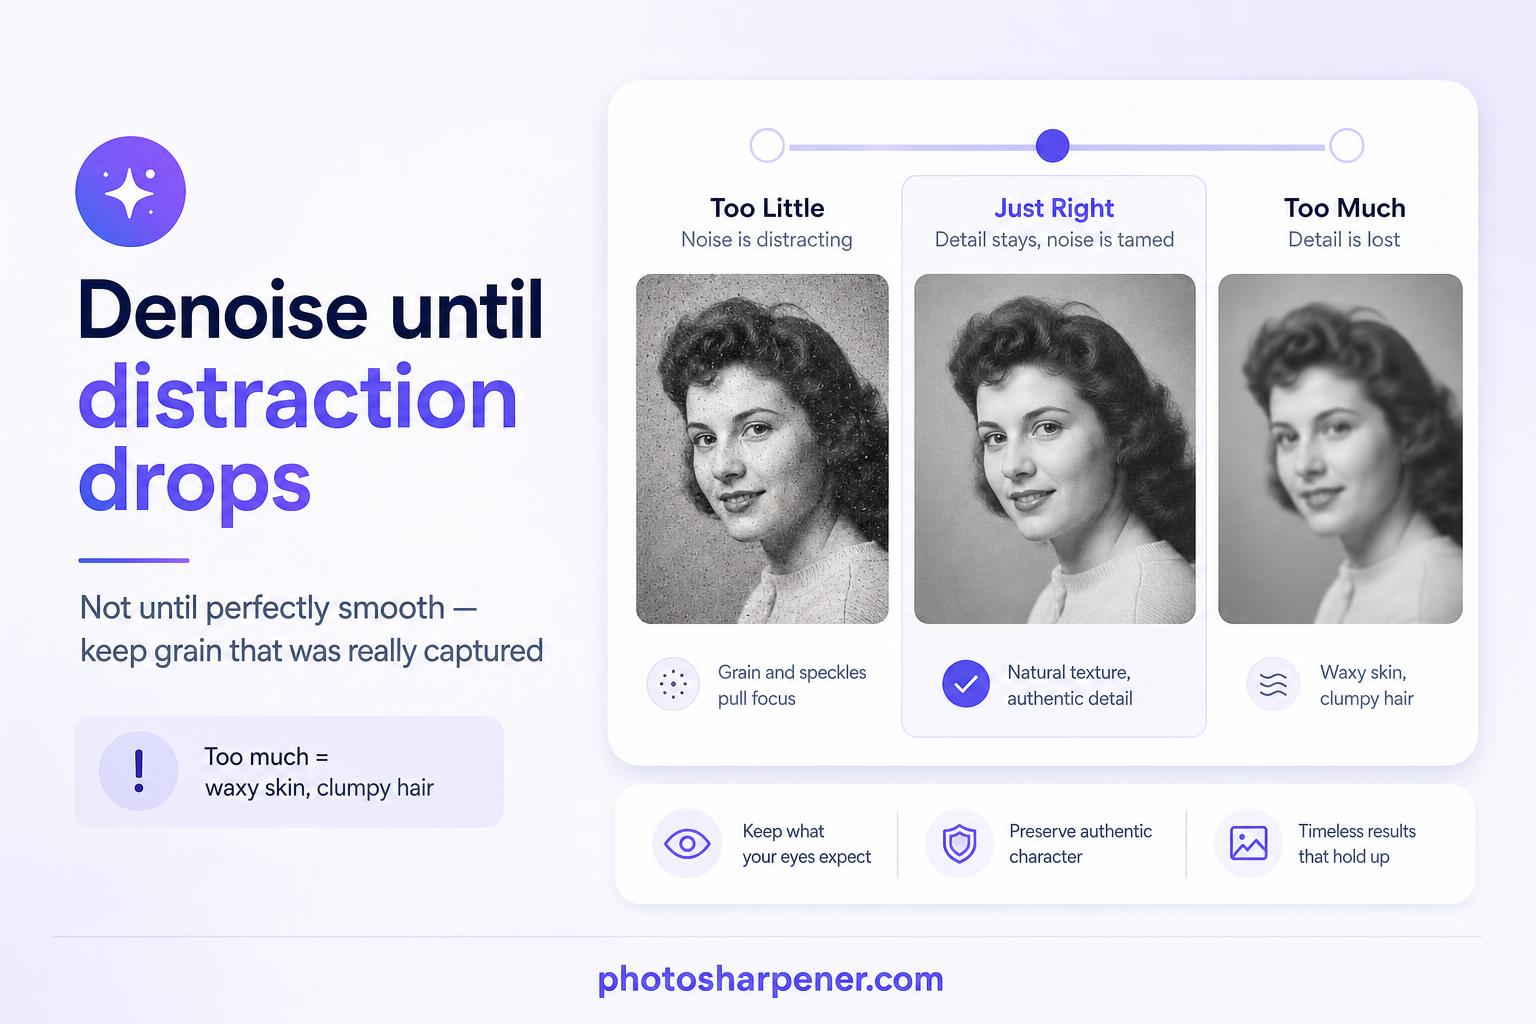
Be careful with denoise settings
Noise reduction is where many rescues go sideways. Push it too hard and skin becomes waxy, hair turns into soft clumps, and fabric loses its weave. Leave too much noise and sharpening will exaggerate it later.
A simple rule works well: denoise until the distraction drops, not until the file looks perfectly smooth. At 100% zoom, you still want pores, grain, paper texture, and natural transitions to exist where the scan captured them.
If you are unsure, do less. Slight grain usually looks more convincing than plastic texture.
Recover detail with sharpening or AI, not both at full strength
When normal sharpening is enough
If the scan is reasonably detailed and just looks a little soft, a modest sharpening pass may be all you need. This works best when:
- facial features are already recognizable
- edges are present but not crisp
- there is no severe compression or noise
- the final use is screen viewing or a small print
Use local, controlled sharpening if your editor supports it. Eyes, hairlines, clothing seams, and text usually benefit more than skin or backgrounds. Small-radius sharpening is safer than a heavy global pass because it adds crispness without building thick halos.
When an AI enhancer makes more sense
If the scan is soft everywhere, tiny, or already hurt by JPEG mush, a normal sharpen filter often just amplifies defects. That is the point where an AI enhancer can help because it tries to rebuild structure instead of only boosting edge contrast.
This is where a browser-first tool like PhotoSharpener fits naturally. After you have corrected tone and cleaned the worst artifacts, it can improve overall detail and upscale the file without needing a full retouching setup. The important part is the order: feed it the cleanest working copy you can, not the untouched low-contrast scan with dust and compression still baked in.
Stay conservative with faces. If a tool offers face restoration, compare the result against the original at 100% zoom. Keep the pass only if it makes the person clearer without changing their expression, eye shape, or overall identity.
Upscale only after the file already looks clean
Use print size to decide whether upscaling is necessary
Not every rescued scan needs more pixels. If the photo is only going to live on a phone, a family group chat, or a small album print, clarity matters more than maximum size.
Upscaling becomes worth it when:
- you want to print larger than the file comfortably allows
- faces are too small for the intended output size
- text or fine edges need to remain readable
If you are printing, think from the final size backward. A file that looks acceptable on screen can still break apart on paper because print reveals softness quickly.
Do not expect upscaling to replace missing detail
Upscaling can give you a cleaner, larger file. It cannot prove what was inside a blurred eye or a crushed shadow. So treat it as the last structural step, not the first miracle step.
The practical sequence is simple:
- straighten and crop
- fix tone and color
- remove artifacts and noise
- sharpen or enhance detail
- upscale only if the final use case needs it
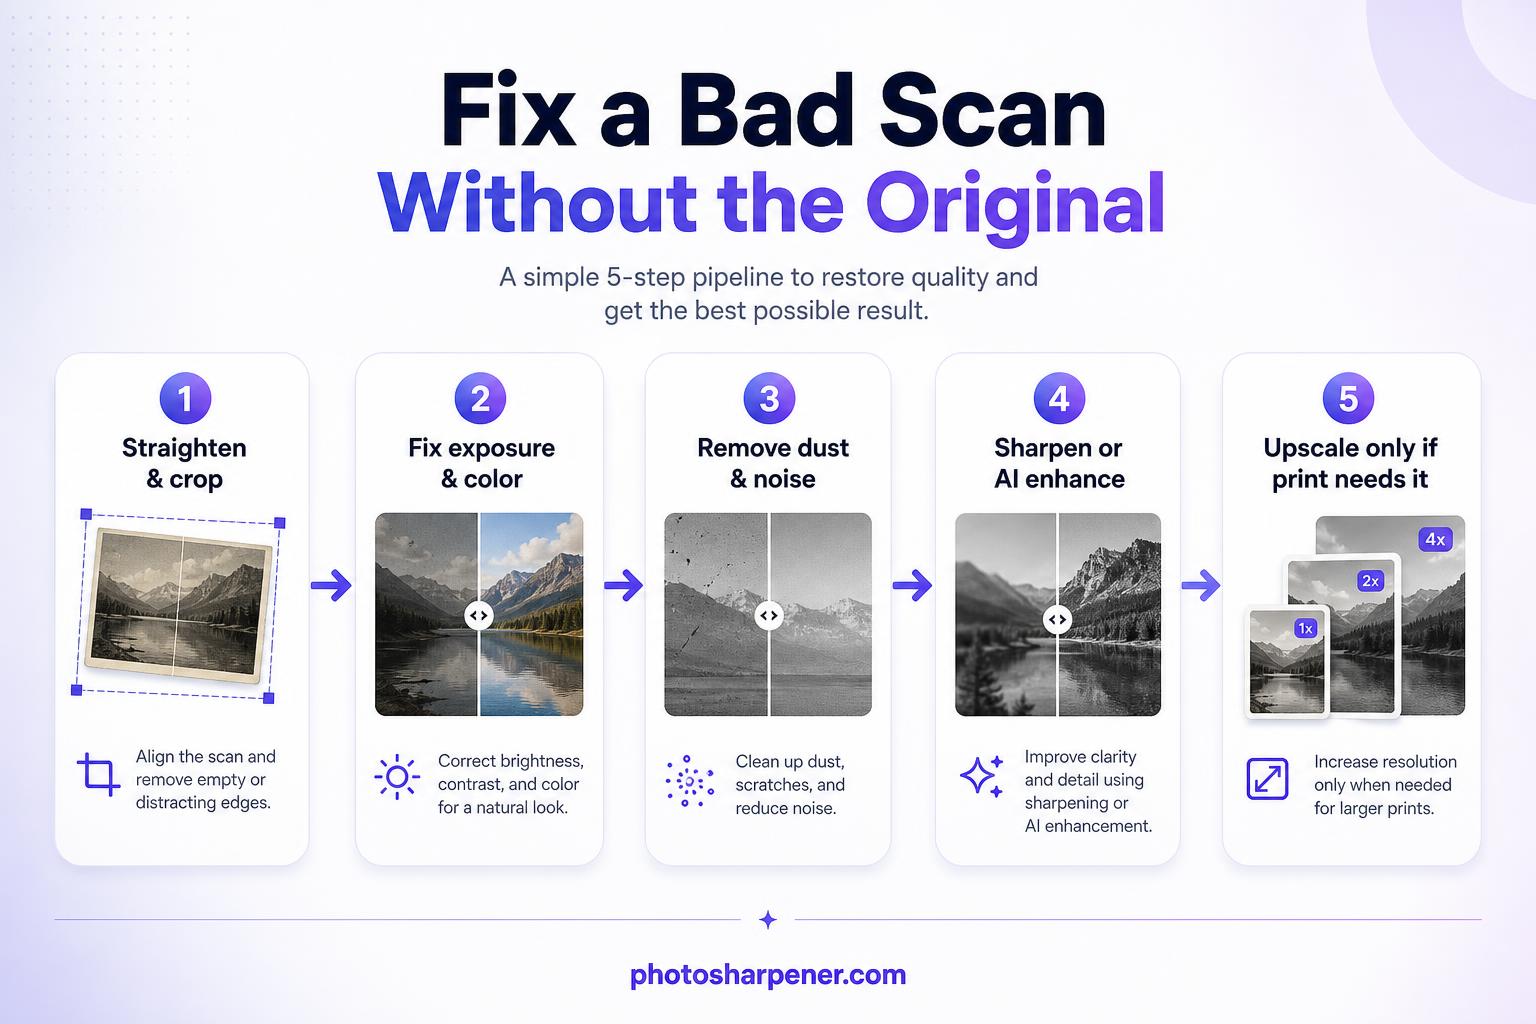
That order lines up with what most restoration guides and ranking articles agree on, and it reduces the chance of making damage bigger before you have cleaned it.
Watch for the signs that you are overprocessing the image
Halos, waxy skin, and fake texture are warning signs
A restored scan should look cleaner, not aggressively processed. Stop and back up if you notice:
- glowing outlines around faces or jackets
- skin that looks airbrushed
- eyelashes or hair turning into repeated AI patterns
- bricks, fabric, or paper grain becoming crunchy
- backgrounds that look sharper than the subject
These are classic signs that the tool is inventing more than it is recovering.
One of the best habits here is to flip back to the original every few minutes. If your edit looks impressive only because it is louder, brighter, or sharper, that is not the same as being better.
A browser-first workflow can be enough for beginners
If you are not comfortable with layers and repair brushes, do not force yourself into a full Photoshop workflow just because advanced users do. A beginner-friendly process is often enough:
- duplicate the file
- fix tilt and crop lightly
- correct exposure and color
- remove obvious dust and marks
- run one careful AI enhancement pass
- export one sharing copy and keep one master
That gets you most of the value without turning the job into a weekend-long retouching project.
Know when a bad scan has reached its limit
If the file is tiny, clipped, or badly compressed
Some files are simply too compromised. If the scan was made at very low resolution, sent through messaging apps, screen-grabbed, or repeatedly re-saved, the missing information may be too severe for a clean result. You can still improve it, but you may need to accept "better" instead of "fully restored."
The same is true when highlights are blown out or shadows are solid black. Once tone is clipped hard enough, you are no longer revealing detail. You are guessing it.
When the photo is emotionally important, a believable result matters more than a dramatic one. Slight softness with honest texture usually ages better than a hyper-sharp file full of invented detail.
If the original ever appears later, rescan instead of over-editing
This article is for the situation where rescanning is impossible today. But if the original print, negative, or album page shows up later, take the upgrade. A better source nearly always beats more aggressive editing on a weak source file.
If that happens, use a proper rescanning workflow with the right DPI, color mode, and file format. Our scan guide will save you from repeating the same quality loss twice.
FAQ
Can AI fix a very small JPEG scan?
Sometimes it can make it look cleaner and a little larger, but it cannot recover exact detail that was never captured. Expect improvement in clarity, not true forensic recovery.
Should I sharpen first or denoise first?
Denoise first, but lightly. Sharpening exaggerates noise and compression, so the cleaner sequence is tone correction, artifact cleanup, gentle denoise, then sharpening or AI enhancement.
What is the best format to save the working file in?
TIFF is best if your editor supports it because it avoids extra compression while you work. PNG is also fine for many simple workflows. If the only source you have is JPEG, convert once and avoid repeated JPEG re-saves during editing.
Is Photoshop required for this kind of fix?
No. Photoshop gives you the most control, especially for spot repairs and layer-based editing, but simpler tools can still rescue a lot of bad scans. The biggest gains usually come from correct order of operations, not from owning the most advanced software.
