Scanning & Prep
How do I improve a photo of a Polaroid without glare or color loss?

TL;DR
- Use a flatbed scanner when the print can lie flat safely, and use a careful phone photo when the Polaroid is fragile, curled, or mounted.
- Remove glare before you edit by changing the light, camera angle, or capture method.
- Scan at 600 to 1200 DPI in color, or photograph in soft even light with exposure and white balance kept steady.
- Correct color cast gently in stages instead of forcing the image back to full saturation in one move.
- Keep one untouched master copy, then do cleanup and AI enhancement on duplicates only after the source copy is already clean.
If you want a Polaroid to look better digitally, the biggest win is not an editing trick. It is getting a clean copy first. Most disappointing results come from two avoidable problems: glare bouncing off the glossy surface and color shifts introduced during capture. Fix those early, and the later restoration work gets much easier.
What usually causes glare and color loss in a Polaroid copy?
Why Polaroids are harder to copy than regular prints
Polaroids are tricky because the surface is glossy and slightly reflective, and older instant film often shifts color as it ages. So you are usually dealing with two separate problems at once. One is optical, which means glare, reflections, or rainbow-like interference from the surface. The other is chemical, which means fading, yellowing, low contrast, or a magenta or green cast.
That is why a Polaroid can look worse after a quick phone snapshot than it does in your hand. The camera may be capturing ceiling reflections, bright window streaks, and auto white balance errors all at once.
Why quick edits often make the problem look worse
A lot of people try to sharpen first or increase saturation until the image "pops" again. That usually backfires. If glare has washed out part of the frame, more contrast just makes the hot spot harsher. If the colors already drifted warm or green, a heavy global correction can make skin look strange and the white border look dirty.
The better approach is simple:
- make the cleanest capture you can
- remove glare at the source
- correct tone and color gently
- sharpen or upscale only after the file looks natural
Choose the safest capture method first
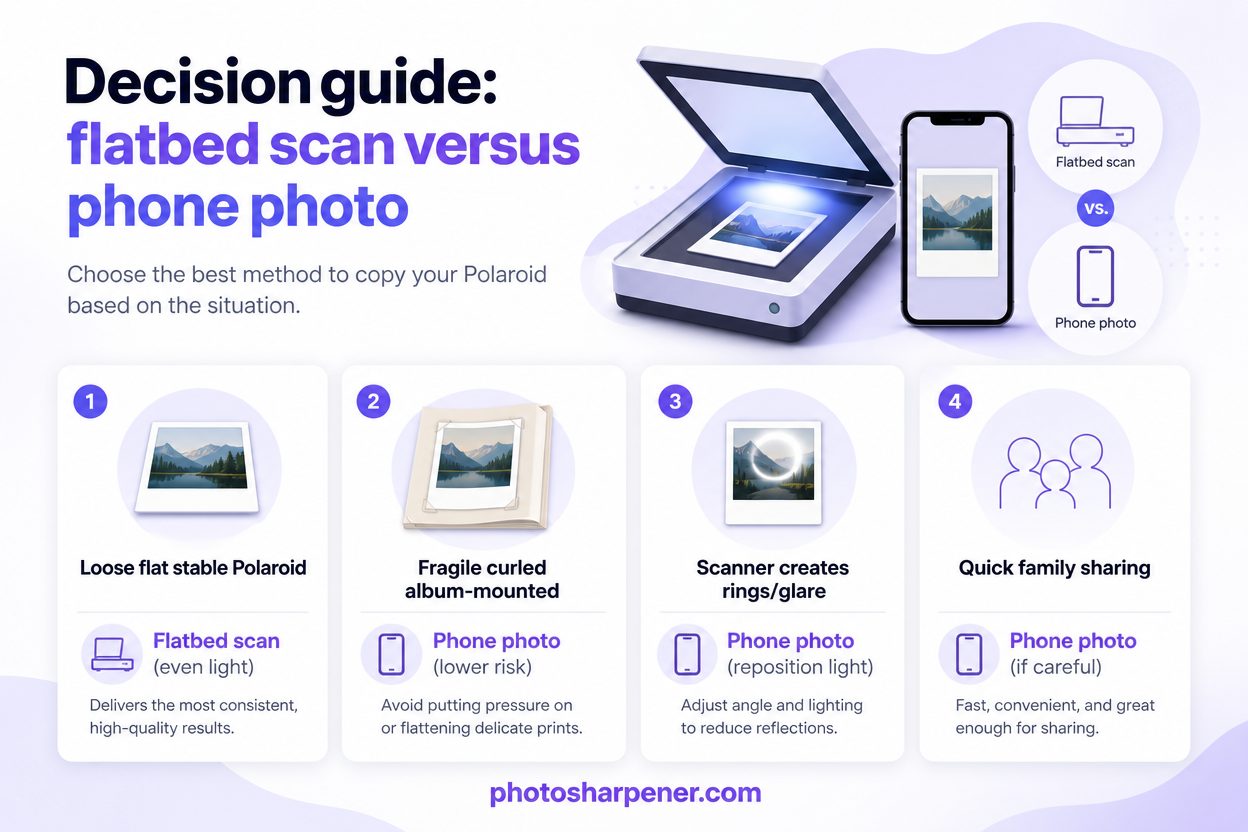
When a flatbed scan is the better starting point
If the Polaroid is loose, fairly flat, and safe to place face-down, a flatbed scanner is usually the easiest way to get even lighting and stable geometry. You are not fighting hand shake, perspective distortion, or random reflections from the room. For most people, that alone solves half the problem.
Flatbed scanning is especially useful when:
- the print is not stuck in an album
- the surface is clean enough to handle safely
- you want the most consistent color base for later restoration
- you may want to print or archive the result later
If the print is fragile or valuable, handle it conservatively. The National Archives guidance is a good reminder that preserving the original matters more than forcing a perfect scan.
When a phone photo is the safer fallback
Sometimes the safest capture is not a scan. If the Polaroid is curled, mounted, stuck behind a sleeve, or feels delicate around the edges, forcing it onto the scanner may create new damage. In that case, take a careful photo instead.
This is also the better option when the scanner keeps producing reflections, rainbow rings, or soft detail from the glossy surface. A phone photo can work very well if the light is controlled properly and the camera is kept parallel to the print.
Use this rule of thumb:
| Situation | Better choice | Why |
|---|---|---|
| Loose, flat, stable Polaroid | Flatbed scan | Even light and cleaner geometry |
| Fragile, curled, or album-mounted Polaroid | Phone photo | Lower handling risk |
| Scanner creates rings or glare you cannot solve | Phone photo | Easier to reposition light |
| Quick family sharing only | Phone photo | Fast and good enough if done carefully |
Set up the light so glare disappears before editing
How to reduce reflections when photographing the Polaroid
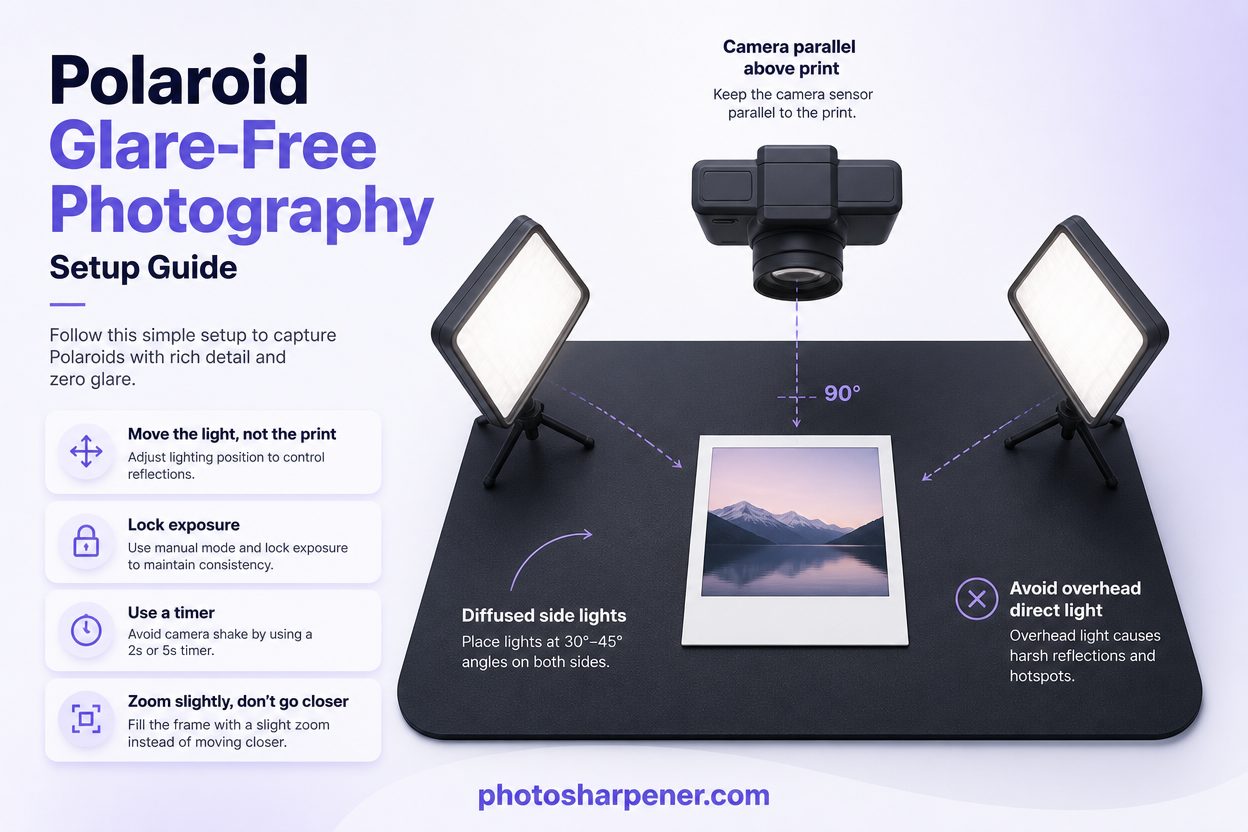
Glare is a lighting problem first, not a Photoshop problem. Start by placing the Polaroid on a dark, matte surface. Use soft window light or two diffused light sources from the sides. Keep direct overhead lights off if possible.
Then check these basics:
- hold the camera directly above the print
- keep the phone lens parallel to the image
- move the light, not the print, if you see a hotspot
- tap and hold exposure if your phone lets you lock it
- use a timer so you are not introducing movement while pressing the shutter
One practical trick is to stand slightly back and zoom in a little instead of pushing the lens very close to the Polaroid. That often reduces the dark reflection of the phone itself.
How to avoid scanner glare and rainbow artifacts
A scanner removes room reflections, but glossy Polaroids can still misbehave on the glass. If you see rainbow patterns or odd shiny patches, do not keep rescanning and hope they disappear. You are probably seeing surface interference, not dirt.
Try these fixes in order:
- clean the scanner glass and the Polaroid gently with a soft dry cloth
- rescan with the lid fully closed
- place a clean black sheet behind the Polaroid if the white backing is reflecting oddly
- if rings persist, stop and switch to a careful photo capture instead of degrading the print through repeated handling
If your scanner is good but the glossy surface keeps fighting you, photographing the print in controlled light is often the more realistic home workflow.
Scan or photograph with settings that keep real color
Best scan settings for detail and flexibility
For most Polaroids, 600 DPI is a solid starting point and 1200 DPI is worth using when the image is small, faded, or likely to be cropped. The resolution guidance from the Library of Congress is useful here because it reinforces the bigger idea: scan high enough to preserve useful detail, but do not assume extreme numbers always create a better source.
A practical home setup looks like this:
- scan in color, even for black-and-white looking prints
- use 600 DPI for normal Polaroids
- use 1200 DPI when faces are tiny or fading is severe
- turn off auto contrast, auto sharpening, and heavy restoration filters
- save a master as TIFF or PNG if your scanner allows it
Scanning in color matters because the fading and border tone often carry useful information in the color channels. If you force grayscale too early, you throw some of that away.
Best phone capture settings when you are not scanning
If you are photographing the Polaroid, the goal is a neutral, boring source file. That is good. You do not want dramatic lighting or auto-enhancement at this stage.
Use this mini-checklist:
- bright but diffused light
- no flash
- highest resolution available
- HDR off if it creates halos
- exposure slightly lowered if highlights on the glossy surface look hot
- white balance locked if your camera app allows it
If you have to choose between a slightly darker file and a file with clipped shiny glare, choose the slightly darker one. Shadows can often be recovered. Blown-out reflections cannot.
Correct color loss without making the Polaroid look fake
How to fix faded or shifted color in stages
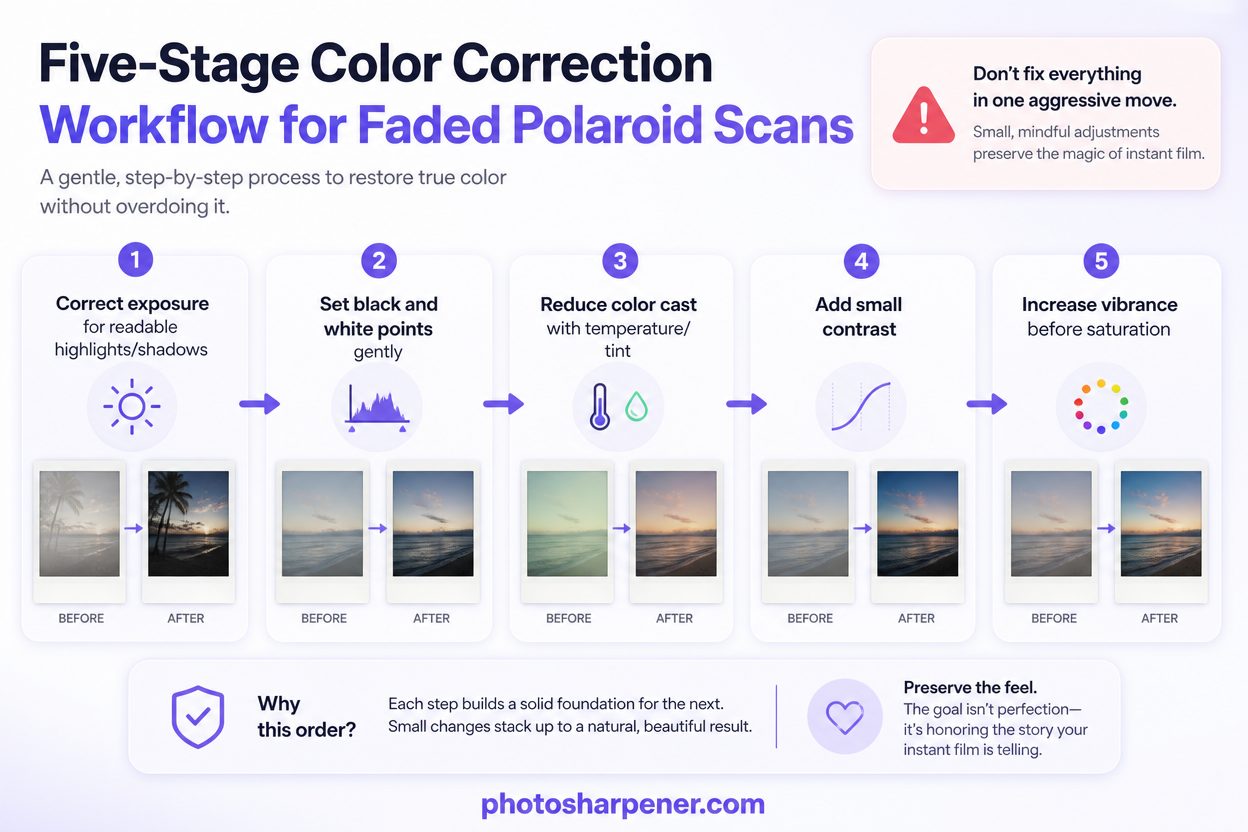
Older Polaroids often lose contrast and drift yellow, green, pink, or magenta depending on storage and film age. The mistake is trying to fix the whole image with one aggressive slider move.
A safer order is:
- correct exposure so highlights and shadows are readable
- set black and white points gently
- reduce the obvious cast with temperature, tint, or color balance
- add a small amount of contrast
- increase vibrance before saturation if the file still looks flat
This sequence helps you see the real problem. Sometimes what looks like a color issue is mostly low contrast. Sometimes what looks like fading is actually glare washing the tones out.
How to keep skin tones and the white border believable
Polaroids look fake quickly when correction goes too far. Watch two areas while you edit: faces and the border. If skin turns gray, orange, or plastic-looking, back off. If the white border starts looking blue or fluorescent white, your correction is probably too strong.
One useful rule is to judge the file at normal viewing size, not only zoomed in. A Polaroid should still feel like a Polaroid. You want a cleaner, clearer version of the original, not a digital repaint.
If the scan is washed out beyond simple correction, our guide on recovering detail from a washed-out scanned photo is the right next step.
Clean and prep the file before AI enhancement
Remove dust, crop later, and keep one untouched master
Do not do destructive edits on the only copy of the file. Save the original scan or photo first, then work on duplicates. That gives you an escape route if a cleanup pass goes too far.
It also helps to delay tight cropping. Keep a small amount of border around the Polaroid until the end. That extra edge context makes it easier to judge color balance and decide whether the border itself is part of the memory, especially if it includes handwriting or date notes.
Before AI or sharpening, do these simple cleanup tasks:
- spot-remove obvious dust
- straighten the frame
- crop only after the tone and color look right
- save a working version separate from the master
Fix the capture problems before you chase sharpness
This is where many restorations get sidetracked. If the file still has glare, perspective distortion, or a heavy color cast, sharpening it only locks those flaws in harder.
A good checkpoint is this: if the picture already looks natural at screen size, but just a little soft or faded, it is ready for the next stage. If it still looks obviously reflective, crooked, or tinted, keep fixing the capture-level problems first.
If the source is weak because you no longer have the original or the scan itself is flawed, this related guide on how to improve a bad scan without the original photo will help you decide what is still recoverable.
When AI sharpening and restoration actually help
Where AI tools add the most value
Once the Polaroid has been captured cleanly, AI tools can help with the last 20 percent: mild softness, low resolution, facial clarity, and gentle reconstruction of texture. This is where a browser-based tool like PhotoSharpener fits naturally. It can improve detail, reduce light compression damage, and upscale a cleaned file without forcing you into a heavy desktop workflow.
AI is most useful when:
- the glare problem is already solved
- the colors are broadly correct
- the print is slightly soft or low-resolution
- you want a cleaner file for sharing or reprinting
What AI cannot realistically recover
AI is not magic for every Polaroid problem. If part of the print is covered by blown glare, if the chemistry has destroyed large patches, or if faces were never sharp in the original instant photo, the result will still have limits.
That is especially true with one-of-a-kind family photos. Expect plausible improvement, not perfect recovery of original reality. The best results usually come from combining a careful capture, gentle color repair, and restrained enhancement rather than asking one tool to solve everything in one pass.
FAQ
Is scanning better than photographing a Polaroid?
Usually yes, if the print is loose, flat, and safe to handle. Scanning gives you steadier lighting and less perspective distortion. But if the Polaroid is fragile or the glossy surface keeps causing problems on the scanner, a careful phone photo can be the better option.
What is the best DPI for a Polaroid scan?
600 DPI is a good starting point for most prints. Use 1200 DPI when the image is small, faded, or likely to be cropped or printed larger later.
Why does my Polaroid look yellow or pink after scanning?
Part of that may be real age-related color shift in the print, and part may come from automatic scanner or phone corrections. Scan or photograph in color, keep auto-enhancements off, and correct the cast gradually instead of trying to neutralize everything in one step.
Can I remove glare from a bad capture afterward?
Sometimes you can reduce mild glare, but strong blown reflections are hard to fix because the image detail underneath may already be lost. It is almost always faster and cleaner to recapture the Polaroid with better lighting.
Should I sharpen the file before fixing color?
No. Fix glare, exposure, and color first. Then sharpen or upscale once the file already looks natural.