Noise & Texture Recovery
How to clean a noisy portrait and keep natural skin?

TL;DR
- Start by checking whether the problem is really noise, or if blur, compression, or bad exposure is doing most of the damage.
- Use local masks when you can, because backgrounds and shadows usually need more cleanup than cheeks, noses, and foreheads.
- Keep eyes, brows, lashes, lips, and hairlines sharper than the surrounding skin.
- PhotoSharpener can help with light browser-based cleanup, but stop as soon as the portrait looks cleaner and still human.
- A little grain is usually better than skin that looks waxy, flat, or painted.
Cleaning noise out of a portrait is rarely about making the file perfectly smooth. It is about making the noise less distracting while keeping the face believable. When people get a fake result, the usual problem is not that they used the wrong app. It is that they pushed the cleanup until the skin lost the tiny texture changes that make a person look real.
That is why the safest workflow is usually selective and conservative. Reduce the noise where it hurts the photo most, protect the areas that make the face look alive, and stop before the image starts looking polished in a way that no real camera would produce.
Why noisy portraits are easy to over-edit
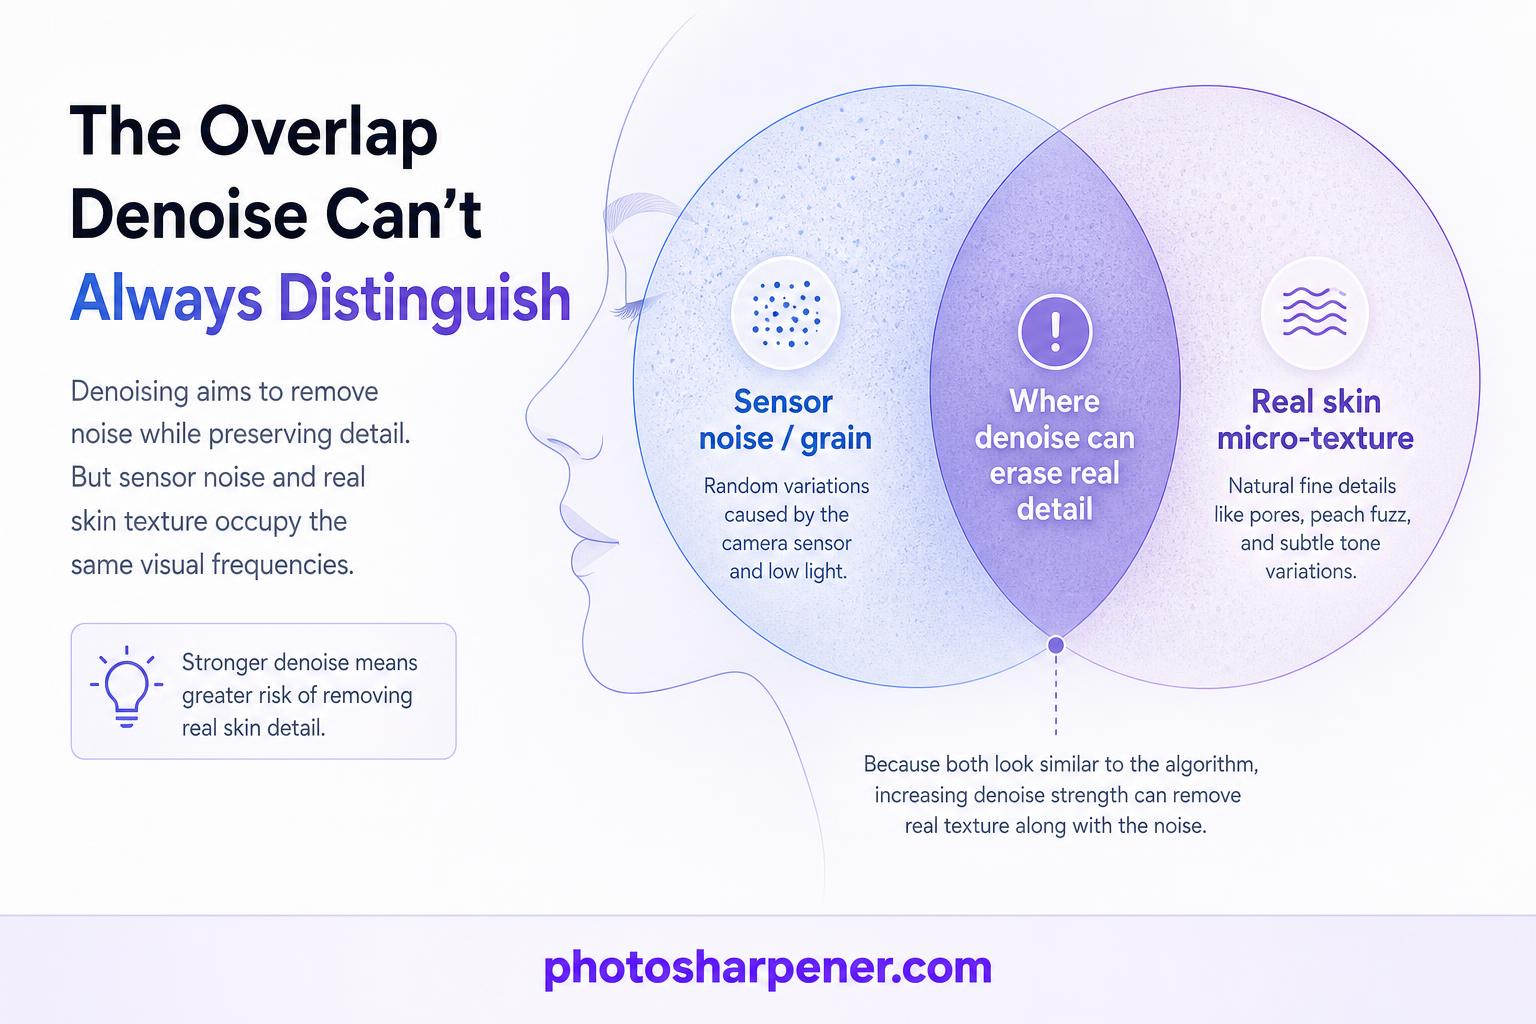
Noise and skin texture live in the same visual zone
Portrait skin is full of low-contrast detail: pores, faint freckles, soft transitions, tiny hairs, and subtle tonal shifts. Noise reduction tools are also looking for small variations in tone and color. That overlap is why a face can go wrong so quickly. When the tool cannot tell the difference between noise and real texture, it removes both.
This gets even worse on phone JPEGs, old exports, and social-media copies. Those files often already have some sharpening, compression, or automatic smoothing baked in, so another round of denoise removes what little natural texture is left.
What natural skin should still look like
Clean skin should not look blank. It should still have variation, shape, and a little imperfection. The goal is not to erase skin. The goal is to stop the viewer from noticing noise before they notice the person.
| If you see this | It usually means | Better next move |
|---|---|---|
| Smooth cheeks with crisp eyes and brows | Too much global denoise | Lower the cleanup amount and compare again |
| Flat skin with shiny highlights | Texture and tone were both over-smoothed | Restore some texture and reduce skin smoothing |
| Clean background but fake-looking face | Whole image got the same treatment | Apply stronger cleanup only to the background or shadows |
| Light grain but believable features | You stopped in the safe zone | Keep that version and move on |
If your portraits often end up plastic-looking, our waxy-face guide breaks down that failure mode in more detail.

Diagnose the file before you edit
Is it really noise, or is it blur or compression?
People often call any rough-looking portrait "noisy," but the fix depends on the actual problem.
If the face is soft because the shot missed focus, noise reduction will not restore the missing edge detail. If the portrait came from WhatsApp, Instagram, or a screenshot, compression may be doing more damage than sensor noise. If the image was heavily underexposed and brightened later, the shadow noise may be the main issue rather than the face itself.
Use this quick diagnosis:
- zoom in to full size
- check cheeks, shadow areas, hair, and eyelashes
- ask what looks wrong first: colored speckles, gray grain, blocky compression, or softness
That answer tells you whether to denoise, sharpen, use a better source file, or simply accept the limits of the original.
Check the image at full size before touching sliders
Small previews are dangerous. A face can look great in a fit-to-screen view and obviously fake at 100%. Before you start editing, inspect the forehead, under-eye area, cheeks, and the transition from skin to hairline at full size.
That habit also helps you separate harmless grain from distracting noise. A little luminance texture may disappear in a normal viewing size or print. The damage from over-smoothing usually does not.
Start with the best source you have
Original raw, camera JPEG, and social copy are not equal
The same denoise setting behaves very differently depending on the source file. A raw file gives you more room because it holds more real information. A camera original JPEG is usually the next-best option. A screenshot, cropped repost, or messaging-app copy gives you the least room and punishes aggressive editing fast.
If you have more than one version of the portrait, start with the newest and least-processed original you can find. That one decision often matters more than the exact denoise slider value.
Underexposure creates more cleanup work later
Noise often becomes obvious because the photo was dark and then pushed hard in editing. Adobe notes in its Denoise demystified post that AI denoise performs less cleanly when a file has been severely underexposed and then brightened.
So before you add heavy noise reduction, look at your exposure choices:
- if shadows were lifted aggressively, pull them back a little and reassess
- if blacks were opened so far that every pore and shadow turned gritty, reduce that adjustment first
- if the face is already bright enough, denoise less than you think
Many portraits improve more from saner tonal adjustments than from stronger noise reduction.
Use selective cleanup instead of smoothing the whole face
Mask the background and shadow areas first
In most portraits, the background, dark clothing, and deep shadow regions can tolerate more cleanup than the skin. That is why local masking beats global denoise in difficult files.
In Lightroom, the official Masking tool lets you target the subject, background, or a manually brushed area. A practical beginner workflow is to clean the background and darker zones first, then decide whether the skin still needs additional help.
This solves a common problem: the face often looks acceptable, but the background noise makes the whole image feel rough. If you denoise everything equally, you sacrifice facial texture to fix a problem that mostly lived elsewhere.
Protect eyes, lashes, brows, lips, and hairlines
Viewers read those features first. If they stay crisp, the portrait still feels alive even when the skin has been cleaned gently. If those features go soft, the whole image feels wrong.
When you brush or mask the face, keep cleanup off or lighter on:
- eyelashes
- eyebrows
- the rim of the lips
- nostril edges
- the hairline
- beard or stubble texture
This is also why spot healing individual blemishes usually looks better than global blurring. You are removing distractions without flattening the face.
A low-risk workflow in Lightroom or similar editors
Remove color speckles first, then judge luminance noise
Not all noise is equally ugly. Random red, green, and blue speckles usually look worse than soft gray grain, especially in shadow areas and skin transitions. So clean the color noise first and then decide how much luminance noise still bothers you.
If you are using Lightroom's AI Denoise or another modern AI tool, start with a modest setting and compare before and after at full size. If you are using manual controls, try to calm the color noise before you push the luminance slider.
The decision rule is simple: if the image already looks usable after color cleanup, do not keep pushing just because the software allows it.
Add only enough luminance cleanup to calm the image
This is where most portraits go off the rails. Luminance noise reduction can make a file look smoother fast, but it is also the easiest way to wipe out skin texture.
Try this order:
- balance exposure and white balance first
- reduce visible color noise
- add a small amount of luminance cleanup
- stop and inspect cheeks, forehead, and under-eye texture
- add a touch of sharpening only if the face still feels naturally detailed
If the portrait looks softer after denoise, do not automatically fight back with heavy sharpening. That often creates the worst combination: blurry texture plus hard edges.

Keep skin texture while reducing grain
Use Texture and Clarity with restraint
Texture and Clarity can help, but they are easy to misuse.
Reducing Texture slightly can soften rough micro-contrast while keeping the broader shape of the face intact. Reducing Clarity too much often makes a portrait look stylized and unnatural. On the other side, adding too much Clarity or sharpening after denoise can make pores, makeup edges, and leftover noise look harsh.
A good rule is to treat Texture as the finer control and Clarity as the riskier one. Make smaller moves, compare often, and do not judge the edit at a tiny preview size.
Heal blemishes separately instead of blurring everything
A common beginner mistake is using global smoothing to hide three small distractions. That is backward. If the issue is a few pimples, stray hairs, sensor dust, or temporary red spots, fix those directly with healing or cloning first.
This keeps the skin texture that belongs there while removing the things the viewer does not need to stare at. It also reduces the temptation to turn the whole face into a soft layer just to cover isolated problems.
When AI denoise and online enhancers help most
Good candidates for AI cleanup
Modern AI tools are genuinely useful when the portrait is mostly intact but needs noise cleanup, slight detail recovery, or a cleaner export for sharing. They work best on:
- high-ISO portraits that are still in focus
- phone photos with moderate shadow noise
- event or indoor portraits where the face is sharp but the file looks rough
- old digital photos that are noisy and slightly soft, but not severely blurred
For quick browser-based cleanup on JPEG portraits or old scans, PhotoSharpener can be a practical option because it combines light denoise, sharpening, and upscale help in one simple workflow. The same rule still applies, though: use it to improve the portrait, not to sand all the skin smooth.
When to stop before the skin turns waxy
Stop the moment the image looks cleaner and the face still feels human. Do not keep editing just because the preview keeps changing.
These are warning signs that you have already gone too far:
- pores vanished entirely
- cheeks look flatter than the original lighting suggests
- the nose and lips feel cut out against softened skin
- brows, lashes, or beard texture look sharper than the surrounding face
- skin looks smoother than makeup ads, but the file was just a normal portrait
Once you notice those signs, back up rather than trying to compensate with more sharpening.
If the portrait already looks plastic
Re-edit from the original before trying to rescue it
If you still have the original, go back to it. That is almost always the cleanest fix.
Trying to rescue an over-smoothed export is possible, but limited. You can lower sharpening, reduce contrast, and restore some natural irregularity, yet you usually cannot fully rebuild texture that was already erased. If you only have the processed copy, your best outcome is usually "more believable than before," not "perfectly restored."
Add a little grain only if the image feels too sterile
A light touch of grain can help a denoised portrait feel photographic again. Adobe explicitly recommends this in its Denoise guidance when an image ends up too smooth.
Keep the goal modest. You are not trying to make the portrait noisy again. You are only trying to put back enough texture so the face does not feel airbrushed.
If the image still looks wrong after that, the real fix is usually a gentler re-edit, not more finishing effects.
When you need Photoshop-level retouching
Frequency separation is for uneven tone plus texture problems
If the portrait has both noisy texture and patchy tone, frequency separation or similar retouching methods can help because they let you work on color and texture separately. That is why they stay popular for careful portrait retouching.
This is usually the right tool when the file needs more than denoise, such as uneven makeup, blotchy skin tone, or rough texture in only a few areas. It is not the first thing most people need for a casual portrait cleanup.
Most beginners should keep it simple first
If you are new to editing, do not jump into advanced retouching just because the image looks rough. In many cases, a better result comes from:
- a cleaner source file
- selective masking
- moderate denoise
- spot healing
- a little patience at 100% zoom
Advanced retouching helps hardest cases, but it also makes it easier to overwork a normal portrait.
A quick export check that catches bad edits
Signs the result still looks natural
Before exporting, ask yourself:
- does the skin still have some texture when viewed up close?
- do the eyes and hair feel connected to the face, not pasted on top of it?
- does the face still match the lighting in the original?
- would this still look believable in a print, not only on a phone screen?
If the answer is yes, the portrait is probably done.
Signs you should undo and retry
Redo the edit if you notice any of these:
- cheeks look like soft plastic
- the forehead is glossy and empty of detail
- skin transitions look smeared around the nose or jaw
- sharpening halos appeared around eyes, lips, or hair
- the subject looks less like a photograph and more like a beauty filter
The safest stop rule is simple: leave a little noise if removing it would erase the person.
FAQ
Should I remove all the noise from a portrait?
Usually no. Remove the distracting noise, not every last trace of grain. A fully clean portrait often looks less natural than one with a small amount of residual texture.
Is Lightroom enough, or do I need Photoshop?
Lightroom is enough for many portraits, especially if the main job is local masking, moderate denoise, healing, and tonal cleanup. Photoshop becomes more useful when you need layer-based retouching, frequency separation, or detailed control over tone and texture independently.
Can online tools clean a noisy portrait without ruining skin?
Yes, if the file is reasonably good to begin with and you keep the edit conservative. Online tools can work well for moderate cleanup, but they can also flatten skin fast if you push them too hard or start with a heavily compressed image.
Why does the face look worse after sharpening?
Because sharpening boosts contrast around edges, and after denoise the face may already have lost authentic micro-texture. So sharpening brings back hard outlines without bringing back real skin detail. When that happens, reduce sharpening first and reevaluate the denoise amount.

Affiner · Agrandir · Restaurer
Détail réel reconstruit en ~8 s. Jusqu’à 4× d’agrandissement.