Old Photo Restoration
Best way to improve my only childhood relative photo?

TL;DR
- Start with the safest source you can get: a flatbed scan around 600 DPI, saved as an untouched master before any edits.
- Treat blur, fading, and physical damage as separate problems so you do not sharpen scratches or let AI invent facial detail you cannot verify.
- If you test
PhotoSharpener, keep it to one conservative pass and compare the restored face against the original at full zoom.- Only upscale after you know the print size, because a smaller natural print is better than a larger version built on synthetic detail.
If this is the only childhood photo you have of a relative, the job is not just "make it sharper." You want to make it clearer without changing who the person looks like. That means your workflow should protect the original first, separate blur from damage, and use AI carefully enough that the face still feels true to the real photo.
Most disappointing restorations happen for a simple reason: people push one tool too hard on a weak scan. The better path is slower and more reliable. Capture the best digital master you can, fix obvious physical problems first, use one measured restoration pass, and only then decide whether you need extra upscaling for print or sharing.
Start with a realistic goal for an irreplaceable photo
Improvement usually means clearer, not perfect
An old childhood photo can improve a lot when the main problems are softness, fading, scanner noise, small size, or light surface damage. Those are exactly the situations where modern restoration tools help most. Edges become cleaner, facial features separate better, and the image can look presentable again for family sharing or a modest print.
What you should not expect is total recovery from information that was never captured. If the eyes are only a blur blob, a tool can generate plausible detail, but it cannot prove that those invented eyelashes or eyelids are historically correct. That matters more when the photo is your only record of a person at that age.
Protect identity before chasing dramatic detail
With an ordinary snapshot, an over-processed result is just annoying. With an only childhood photo, it can feel wrong in a deeper way because the person's likeness matters more than the wow factor.
A simple rule helps: if the restored version looks cleaner but the face feels less like the same person, back off. Slight softness is easier to accept than a polished face that no longer matches the original expression, age cues, or bone structure.
Make the safest and strongest digital copy first
Scan the print before you edit anything
If you still have the physical photo, start with a flatbed scan instead of a phone picture whenever possible. The Library of Congress notes in its basic scanning guidance that 300 to 400 DPI is often fine for snapshot prints and common enlargements, while higher settings are useful when you need to crop or recover detail from small originals. For an important family photo, I would usually scan at 600 DPI and keep that first file as the untouched master.
Save the master as TIFF if your scanner allows it, or a highest-quality JPEG if it does not. Straighten the photo, but do not overwrite the raw scan. You want one file that always represents the cleanest original capture you can make.
Handle brittle originals gently
Old prints and mounted photos can crack, curl, or shed surface material when pressed too hard. The Library of Congress also flags fragile photographs and curled or brittle items as materials that need careful handling during digitization in its preservation scanning guidelines. In practical terms, do not force a damaged print flat, do not tape tears just to scan it, and do not treat it like a casual office document.
If the photo is too fragile to scan safely, make the best overhead capture you can under soft, even light. Keep the camera square to the image and fill the frame without digital zoom. If the source is actually a brittle press clipping instead of a standard print, use a newspaper workflow because halftone dots and paper damage change the restoration order.
If you only have a phone capture, re-capture it well
Sometimes the print is gone and you only have access to a photo in an album or on a relative's phone. In that case, use a phone scanning workflow that reduces glare and skew. Google's PhotoScan tips are useful here: keep the phone directly above the print, use a flat contrasting background, and avoid tilting while scanning.
That will not beat a proper flatbed scan, but it can still give restoration tools more honest input than a random angled snapshot with reflections across the face.
Diagnose the main problem before you pick a tool
Blur, fading, and physical damage are different jobs
This is where most people lose quality. They treat every bad old photo as one generic "enhance" problem, then wonder why the result looks fake. Different damage types need a different first move.
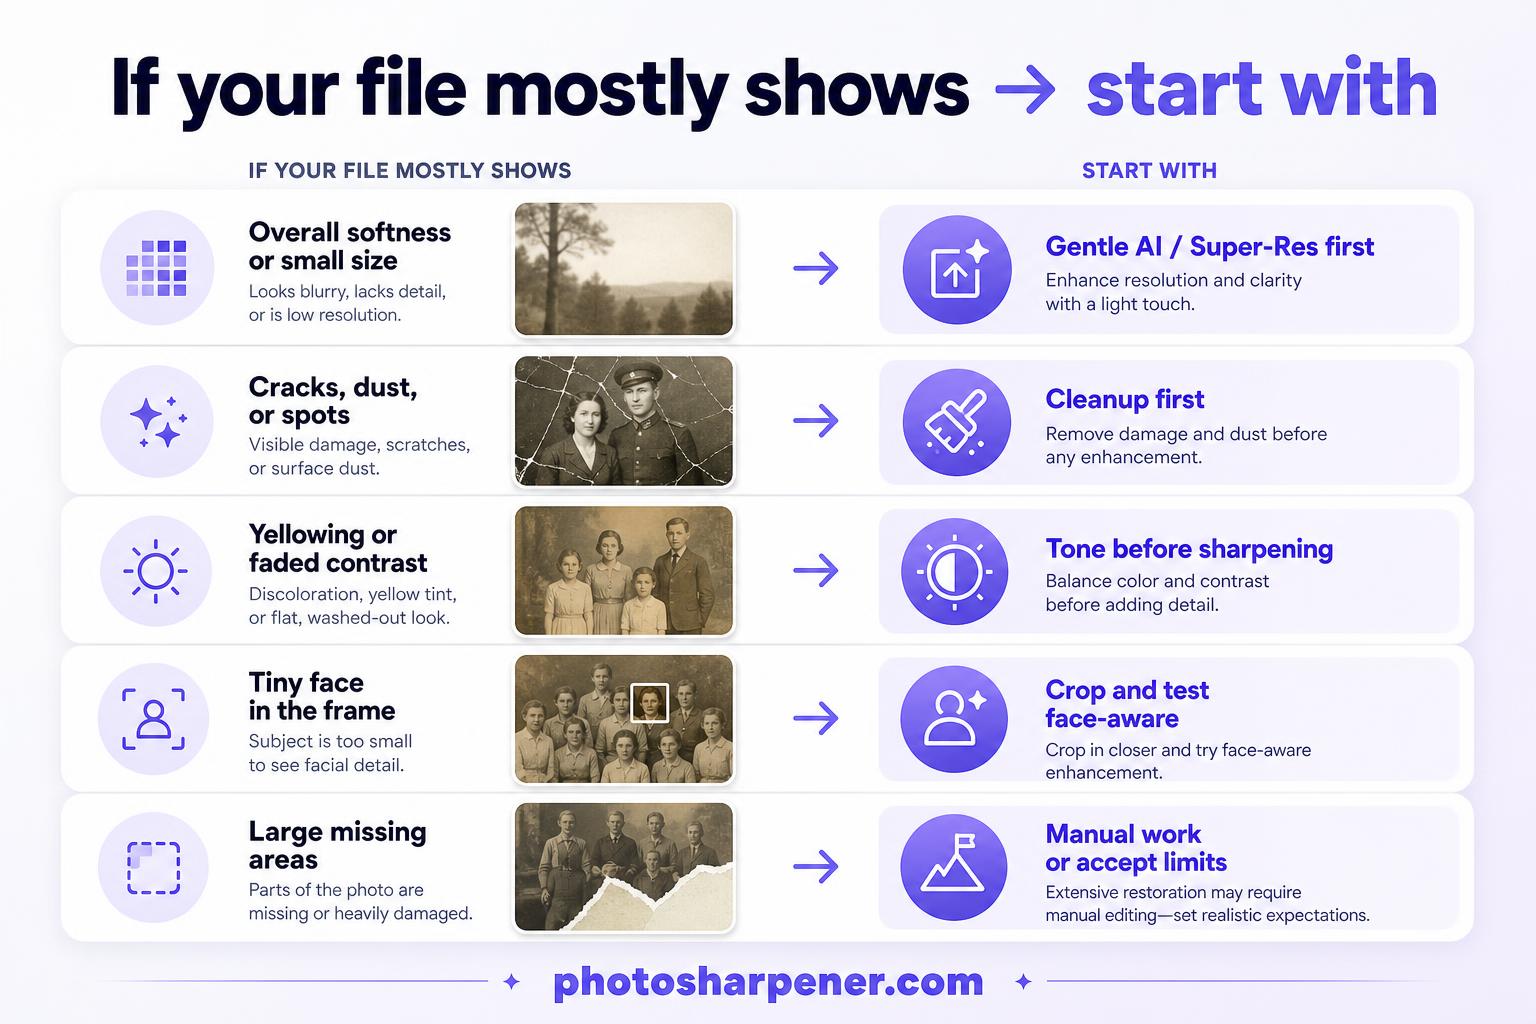
| If your file mostly shows | Start with |
|---|---|
| Overall softness and small size | Gentle AI restoration or super-resolution |
| Cracks, dust, stains, fold marks | Cleanup and repair before strong enhancement |
| Yellowing or washed-out contrast | Tone correction before extra sharpening |
| Tiny face in a larger scene | Crop a working copy and test face-aware restoration carefully |
| Large missing areas | Accept limits or move to manual retouching |
If you diagnose the image first, the next step becomes much easier. If you do not, you end up sharpening scratches, enlarging dust, or reconstructing a face from almost no usable structure. When cracks, fading, or tape residue are part of the problem, follow a damage repair workflow before you push sharpening harder.
Look at the face at 100% before processing
Zoom in and inspect three things:
- Are the eyes and mouth still recognizable?
- Is the softness mild, or is the face already a smear?
- Are the worst problems local, like one crease or one faded patch, instead of everywhere?
If the answer is mostly yes, the photo is a good candidate for improvement. If the face is extremely tiny, heavily torn, or completely blurred, your realistic goal shifts from "restore detail" to "make it clearer and more viewable."
Clean and stabilize the image before heavy enhancement
Crop, straighten, and remove obvious distractions
Start on a working copy, not the master scan. Crop away scanner borders, album edges, and empty background that do not matter. Straighten the image so the face is easy to judge. Remove obvious dust blobs or one or two major scratches if they cross important features.
Do not spend an hour micro-retouching every mark at this stage. You are trying to stop obvious defects from being mistaken for real detail by later tools.
Fix tone before you sharpen
A faded childhood photo often needs tonal separation more than "sharpness." If blacks are gray and highlights are flat, a gentle levels or contrast correction can make the photo look more alive before any AI pass. This is especially useful when the relative's hairline, clothing edge, or jawline is getting lost in haze.
Keep the change light. If you crush the shadows or brighten skin too aggressively, restoration tools have less believable information to work with later.
Use AI restoration in one measured pass
Start conservatively and compare versions
The best restoration results usually come from one strong but reasonable pass, not from stacking five different enhancers. Re-running enhancement on an already enhanced image often creates waxy skin, doubled edges, and invented micro-detail.
If the first pass already looks better, resist the urge to keep "improving" it just because the slider exists.
For a photo like this, I would test two versions:
- one full-image restoration pass
- one face-aware pass or cropped portrait pass if the face is the real priority
Then compare them side by side at full size. Keep the version that improves readability without changing the face too much.
Treat face restoration as a likeness tool, not a beauty filter
Face restoration can be incredibly helpful when the face is soft but still recognizable. It can also go wrong fast. If likeness is your biggest concern, use this quick face-preservation checklist alongside your side-by-side comparison. Watch for these warning signs:
- skin becomes too smooth for the age and lighting of the original
- eye shape changes
- teeth or lips become unnaturally defined
- the child starts looking like a generic AI portrait instead of your relative
This is the point where a subtle tool option matters. If the photo naturally overlaps with PhotoSharpener's workflow, a single browser-based pass can be useful because it combines super-resolution, cleanup, and optional face restoration in one place without turning the whole job into a retouching project. Keep that mention practical, though: the goal is still to preserve likeness, not to glamorize the image.
Upscale only when you know the final use
Do the print math before you enlarge
A restored file only needs more pixels if you plan to print it larger or crop tighter. For print, a simple rule works well: divide the pixel width by 300 to estimate a comfortable print width in inches at high quality.
So if your finished photo is 2400 pixels wide, an 8-inch print is a safe target. If it is 3600 pixels wide, a 12-inch print is realistic. You can sometimes print bigger when viewing distance is longer, but that should be a deliberate choice, not wishful thinking.
Stop when the image starts looking synthetic
Upscaling should make the photo easier to print, not stranger to look at. If hair turns stringy, eyelashes become little comb lines, or skin starts to look airbrushed, the upscale strength is too aggressive for the source.
For an only childhood relative photo, I would rather keep a slightly smaller honest print than force a large print built on invented detail.
Review the result like an archivist, not like a filter app user
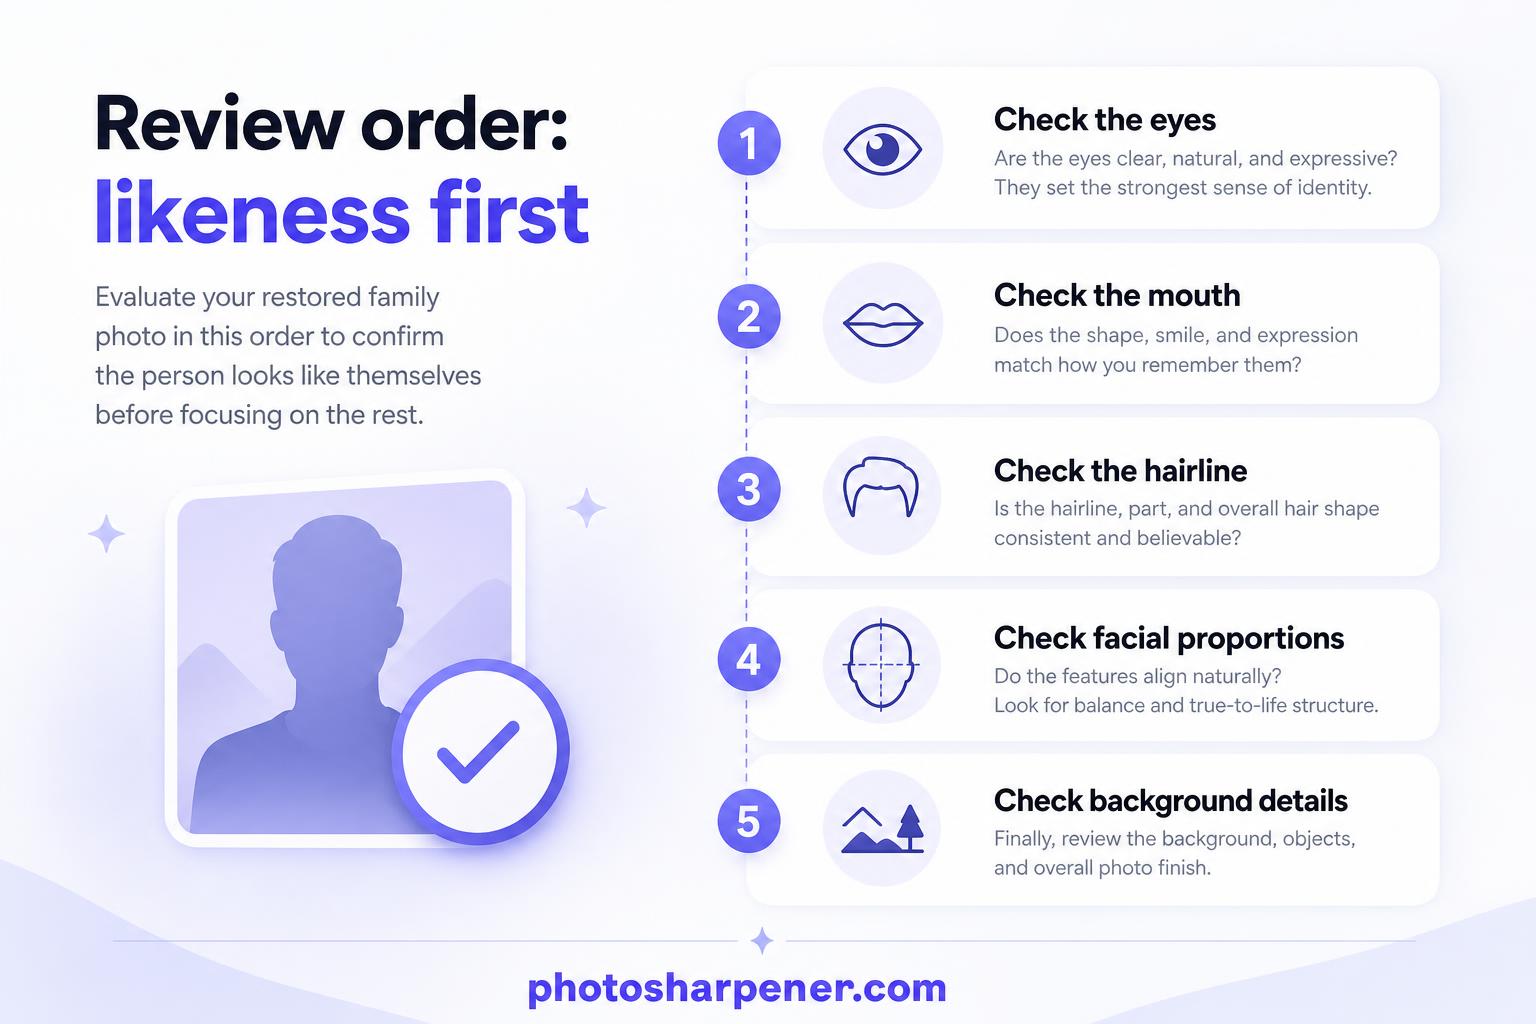
Check the parts people recognize first
When family members look at a childhood photo, they do not judge it like a lab test. They look for likeness. That is why your review order should be simple:
- eyes
- mouth
- hairline
- distinctive facial proportions
- clothing or background details that help date the photo
If those look believable, the restoration is probably doing its job. If those look wrong, it does not matter that the background wallpaper is wonderfully crisp.
Keep a master, a working file, and the final version
This one habit saves a lot of regret later. Keep:
- the untouched master scan or capture
- your working copy for edits
- the final exported version for sharing or printing
That way you can try a different tool later without starting from a compressed or already altered file.
Know when to stop and when to get manual help
Some damage needs human judgment
AI is strongest when the photo still contains the person, even if it looks bad. It is weaker when key areas are physically missing or when the original capture was never sharp enough to describe a face.
You should lean toward manual retouching or a professional restorer when:
- a tear crosses the face
- one eye or part of the mouth is missing
- the photo is cracked, silvered, or badly stained
- historical accuracy matters more than visual polish
That does not mean AI failed. It just means the image has moved from enhancement into reconstruction, and reconstruction needs more judgment.
A good result can still be imperfect
This is worth saying clearly because people get discouraged too early. A successful restoration is not always one that looks new. Sometimes success means the face is easier to read, the print becomes shareable with family, and the childhood expression feels present again.
That is already a big win for a photo you cannot replace.
A practical workflow you can follow today
If you want the shortest reliable path, do this:
- make the best scan or overhead capture you can
- save an untouched master
- crop and straighten a working copy
- repair only the biggest distractions first
- make a gentle tonal correction
- run one measured restoration pass
- compare the restored face against the original at full zoom
- upscale only if you need more print size
- keep the most natural version, not the most dramatic one
That workflow is simple, but it matches how the strongest ranking pages approach old-photo recovery: good digitization first, realistic expectations second, restoration in stages, and conservative output decisions at the end.
Improving an only childhood relative photo is partly technical and partly editorial. The technical side is about scan quality, restoration order, and output size. The editorial side is about knowing when the image still feels like the same person. When you get both right, the result does not just look sharper. It feels trustworthy enough to keep, print, and pass on.
FAQ
What scan setting is best for an only childhood photo?
If you still have the original print, 600 DPI is a strong default because it gives you room to crop, clean damage, and test restoration without throwing away detail too early. Keep that first scan as an untouched master so you can always restart from the cleanest source.
How do I know if AI is changing the person's face too much?
Compare the restored file against the original at full zoom and look at the eyes, mouth, and facial proportions first. If the person looks cleaner but less recognizable, the settings are too aggressive and you should step back to a milder version.
Should I repair damage before I run sharpening or upscaling?
Yes. Remove the most distracting scratches, dust, or fold marks first so the enhancement pass does not mistake damage for real texture. You do not need to retouch every flaw before testing restoration.
When is it worth upscaling the photo for print?
Upscale only after you know the final print size. A simple check is to divide the pixel width by 300 to estimate a comfortable print width in inches, then decide whether the current file really needs more pixels.
When should I stop using AI and get manual restoration help?
If a tear crosses the face, key facial features are missing, or the original capture is extremely blurred, manual restoration is usually the safer path. AI can still help the image look cleaner, but it may not be enough for historically sensitive or emotionally important details.
