Old Photo Restoration
How to restore and colorize a damaged newspaper photo?

TL;DR
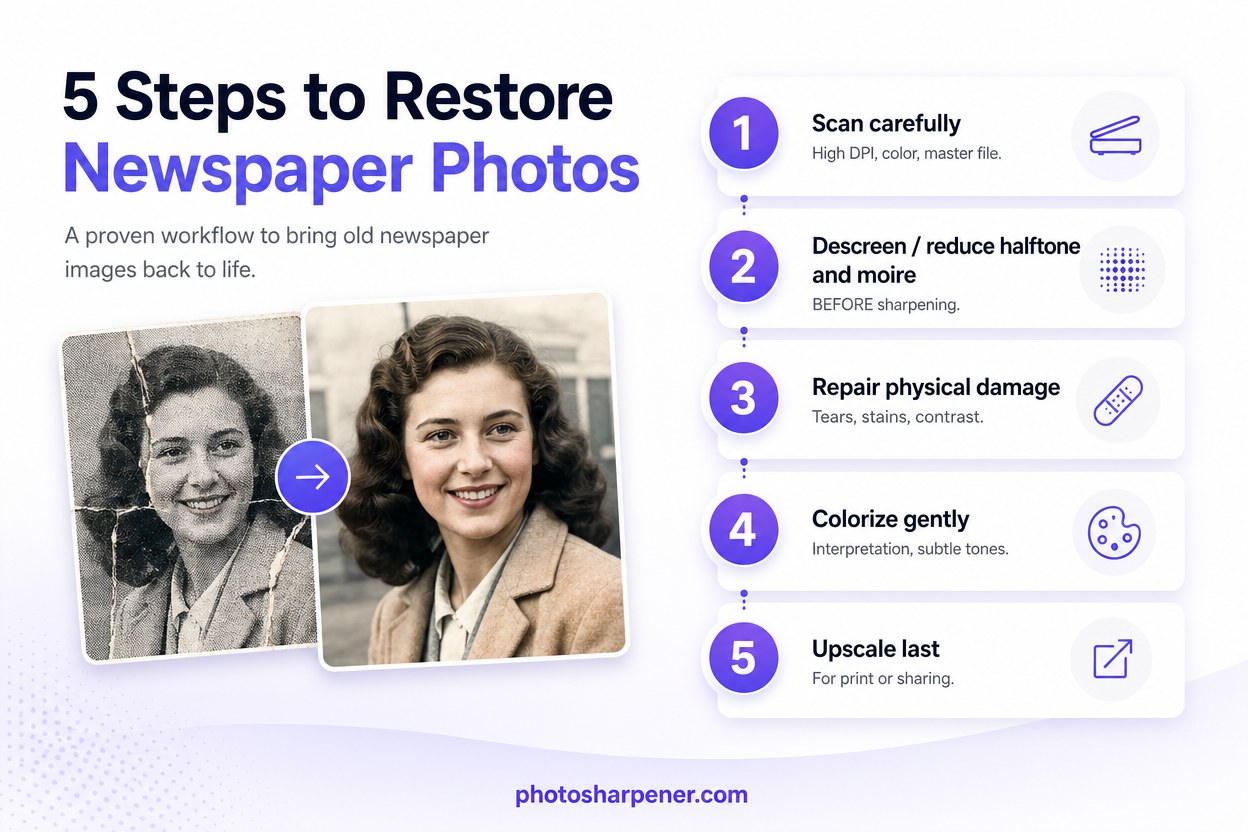
- Newspaper restoration works best in stages: scan carefully, descreen first, repair physical damage second, colorize gently, and upscale last.
- The hardest part is separating real scene detail from halftone dots, moire, and paper damage before any sharpening step.
- PhotoSharpener is most useful after descreening, when you want Real-ESRGAN cleanup and optional GFPGAN face restoration without magnifying the raw print pattern.
- Keep the final print size anchored to the pixels you actually recovered, not to the size you hope the clipping can support.
Restoring a newspaper photo is different from restoring a normal print from a family album. You are usually working from a cheap, aging paper copy that already lost detail when it was printed in ink dots decades ago. So the best workflow is not "upload and sharpen." It is: protect the clipping, make a strong scan, remove print artifacts, repair damage, colorize gently, and only then upscale for sharing or print.
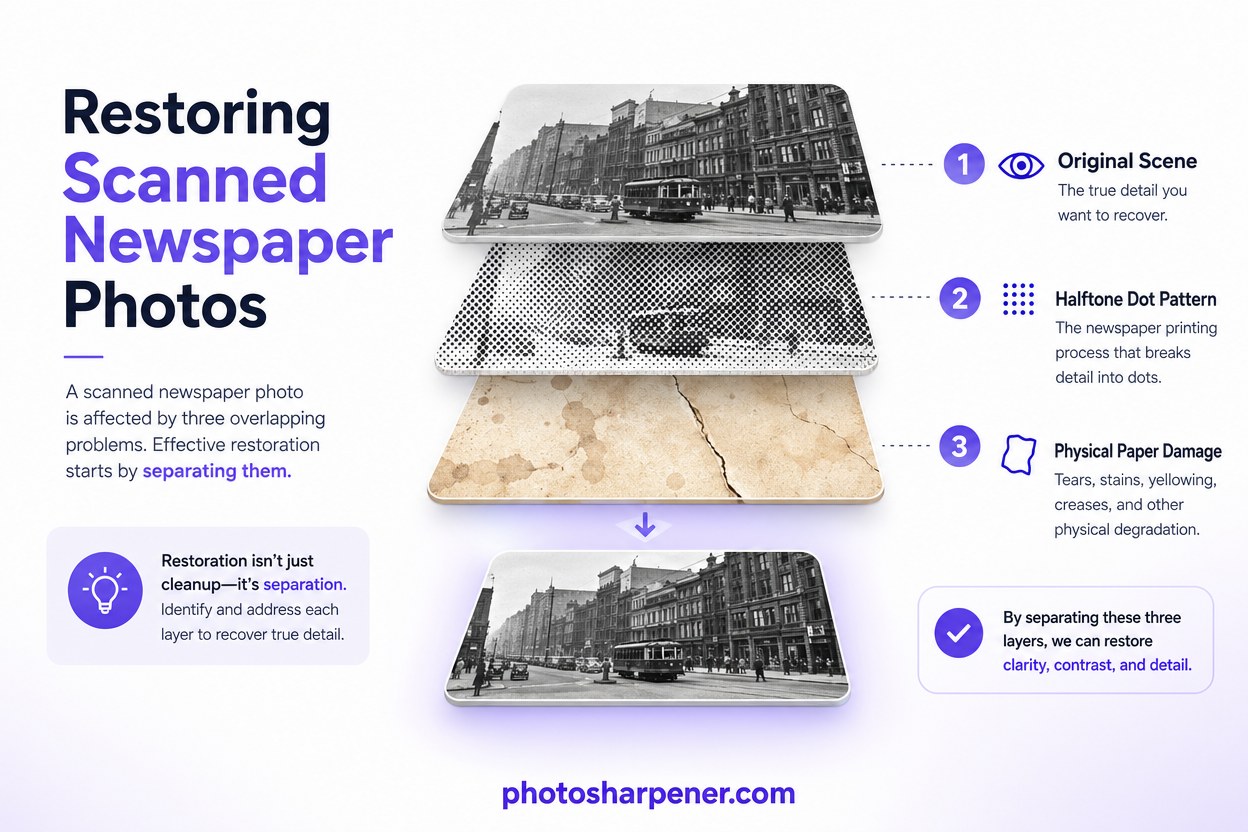
That order matters because newspaper images carry two layers of problems at once. There is the age damage you can see, like tears, yellowing, stains, fold marks, and brittle paper. Then there is the printing pattern you may not notice until you zoom in: halftone dots and moire. If you skip that distinction, most AI tools will sharpen the dot pattern right along with the real image.
Why newspaper photos are harder to restore than normal prints
Newsprint is fragile and chemically unstable
Old newspaper clippings were not made for longevity. The National Archives notes that most newspapers printed since the mid-1800s were made from low-quality wood-pulp paper that becomes discolored, brittle, and acidic over time, which is why old clippings tear so easily and stain nearby items when stored together. That changes the job immediately. You are not just improving a scan. You are rescuing information from a fragile object that may keep deteriorating every time it is handled.
This is also why a damaged clipping can look worse than an old glossy photo even when both are the same age. Newspaper paper yellows faster, weakens at fold lines, and often sheds tiny fibers into the scan. Those fibers can look like noise, scratches, or texture, but they are not image detail you want to preserve.
Halftone dots are part of the damage problem
Most newspaper photos were printed with a halftone screen, which means shades were simulated by patterns of tiny dots instead of continuous tone. When you scan that print, the scanner sensor can interfere with the original dot grid and create new ripples or mesh patterns. That is the classic moire problem.
A restoration paper from ICCV points out that old newspaper and book images are hard to restore precisely because they combine printing artifacts, paper blemishes, and missing original tonal information. In practical terms, that means your restoration tool has to separate three things that all overlap: the original scene, the newspaper dot pattern, and the physical damage on top of both.
Here is the quick diagnosis I use before touching anything:
| What you see | What is probably happening | Best first move |
|---|---|---|
| Yellow or brown paper tone | Aged acidic newsprint | Correct tone after you capture a clean scan |
| Mesh or ripple pattern over faces | Halftone dots and moire | Descreen before sharpening or upscaling |
| White cracks or missing corners | Physical paper damage | Repair after descreening, before colorization |
| Soft overall detail | Low-quality source plus print screening | Accept realistic limits and upscale last |
Protect the clipping and make the best scan you can
Handle it like a brittle document, not a photo print
If the clipping is fragile, your first mistake can be physical, not digital. Avoid flattening it aggressively, and do not tape tears before scanning. The National Archives specifically warns against back-folding brittle newspapers to flatten them and against using glue or tape for repairs because both can cause more loss.
If the clipping crackles, flakes, or starts shedding at the folds, stop forcing it flat and capture it as safely as possible.
If the paper is extremely brittle or mounted in a scrapbook, a careful overhead photo may be safer than pressing it on a scanner bed. But for most loose clippings, a flatbed scan is still the better restoration starting point because it gives you more consistent geometry and lighting.
Scan in color, at high resolution, and save a master
For most newspaper photo restoration jobs, I would scan at 600 DPI minimum. If the clipping is small, the face is tiny, or you know you want to print the result later, 1200 DPI is worth the bigger file. Scan in color even if the printed image is black and white because the paper stains, yellowing, and ink variation often live in the color channels. That extra tonal information helps separate damage from image content.
Save the first capture as TIFF or PNG if your scanner supports it. Turn off aggressive auto-enhance settings. You want the most faithful raw capture you can get, not a scanner's guess at a finished photo.
There is one newspaper-specific detail worth checking in your scanner software: built-in descreening. If your scanner offers it, test one raw scan and one descreened scan. Some descreen modes help, but others blur faces and text too early. I usually keep the raw master and make any descreening decisions on a copy so I can compare results side by side.
Remove print artifacts before you colorize
Descreen first so you do not sharpen the dot pattern
This is the step many guides skip, and it is the difference between a believable restoration and a crunchy fake-looking one. If the clipping still shows visible dot structure or moire ripples, deal with that before any strong enhancement pass. Otherwise every later step treats those dots as real texture. If the clipping also has tears, fading, or adhesive residue, layer this with a damage repair workflow instead of treating the whole problem as a sharpening issue.
Think of newspaper restoration as two separate repairs:
- remove the printing layer problems
- repair the aging layer problems
That usually means a first pass aimed at halftone reduction or moire cleanup, then a second pass for scratches, tears, dust, and contrast recovery. Once the print pattern is calmer, the actual image underneath becomes much easier for AI tools to interpret.
Repair tears, stains, and contrast loss in a separate pass
After descreening, look at the clipping at 100% zoom. Ask three simple questions:
- Are faces recognizable?
- Are major shapes intact?
- Are the worst defects local, not everywhere?
If yes, AI restoration is usually a good fit. Run a conservative cleanup pass for fold lines, stains, surface dirt, and overall faded contrast. If a tear crosses a face or there are missing chunks of the image, be cautious. AI can rebuild those areas plausibly, but plausibly is not the same as historically accurate.
This is where a tool like PhotoSharpener fits naturally in the workflow. It is useful once you have a solid scan and want to improve softness, compression, and printability with AI super-resolution and optional face restoration. I would not use any enhancer as the very first step on a raw newspaper scan. I would use it after the halftone problem is under control.
Colorize with realistic expectations
Colorization is interpretation, not recovery
A damaged newspaper photo is often a printed black-and-white reproduction of an older original. That means the exact original colors may already be lost, even before the clipping aged. So AI colorization should be treated as informed interpretation, not proof of what the scene looked like.
If historical accuracy matters, feed the model context where possible. Clothing era, military branch, school colors, sports uniforms, vehicle type, and the city or decade can all help you judge whether the result feels right. If the AI gives everyone modern skin tones, bright neon clothing, or saturated backgrounds that fight the age of the image, pull it back.
Keep the colors subtle so the image still feels real
The best colorized newspaper restorations are usually a little restrained. Skin should look believable, but not airbrushed. Suits, streets, and backgrounds should support the subject, not steal attention. Old printed images often feel more convincing when some softness and grain remain.
A useful rule is this: if the color version looks better as a dramatic social post than as a family archive image, you probably pushed too hard. Run two or three versions and keep the one that respects the source, not the one with the loudest contrast.
Upscale only after the restoration and color work
Enlargement should come last
Upscaling early makes every problem bigger. Halftone dots get bigger. Tears get bigger. Stains get bigger. So do incorrect AI guesses. Once the scan is cleaner and the tones are stable, then you can decide whether you need more pixels for printing or sharing.
PhotoSharpener's browser-based workflow is most useful here because this is the point where super-resolution actually helps instead of magnifying defects. If your restored file still looks small for the print size you want, a measured 2x or 4x upscale after cleanup is much safer than trying to enlarge the raw clipping first.
Match the final print size to the pixels you really have
Do the boring math before ordering a print. If your final restored file is 2400 pixels wide, that is comfortable for an 8-inch-wide print at 300 PPI. You can sometimes print larger if the viewing distance is longer, but you should decide that deliberately, not by hope.
Here is a simple print-sizing guide:
| Final pixel width | Good target print width |
|---|---|
| 1800 px | about 6 in at 300 PPI |
| 2400 px | about 8 in at 300 PPI |
| 3000 px | about 10 in at 300 PPI |
| 3600 px | about 12 in at 300 PPI |
![]()
If the restored clipping still looks soft at full size on screen, making the print bigger will not solve it. A smaller honest print almost always looks better than a large print built on invented detail.
How to tell when AI is helping and when it is inventing
Watch faces, uniforms, and text first
Newspaper photos often fail in predictable places. Faces get over-smoothed. Uniform insignia turn generic. Hair becomes painted. Captions and signage become convincing-looking nonsense. Those are the places to inspect before you fall in love with the overall before-and-after.
My review order is simple:
- check the eyes and mouth
- check any lettering or dates
- check known objects like medals, hats, car badges, or building lines
- zoom back out and see whether the image still feels like the same clipping
If the file looks cleaner but specific details became less truthful, back off the strength. A slightly imperfect restoration is usually better than a polished hallucination. For portraits, use the same side-by-side checks you would use to preserve the original face so colorization and cleanup do not push the person toward a generic AI look.
If the clipping is also your only childhood image of a relative, an only-photo workflow helps you keep likeness and print goals in balance instead of chasing the most dramatic cleanup.
Know when manual work or a human restorer is the better call
AI is strongest when the newspaper clipping still contains the scene, even if the scene is ugly. It gets much weaker when large parts are physically gone, when a face is half missing, or when the source is a tiny clipping reproduced from an already-poor press image.
Choose manual retouching or professional help when:
- a face is partially missing
- important text must be historically correct
- the clipping is too brittle to scan safely
- the output is for archival or exhibition use, not just family sharing
That is not AI failing. It is just the point where judgment matters more than automation.
FAQ
Can AI remove the newspaper dot pattern?
Often yes, at least enough to make the photo look more like a real image and less like a scanned clipping. The important part is doing that before strong sharpening or upscaling. If you sharpen first, the dots get promoted into fake detail.
Should I colorize before or after fixing damage?
After. Clean up the halftone pattern, tears, stains, and faded contrast first. Then colorize. Color models make better decisions when the structure underneath is stable.
Is a phone photo of the clipping good enough?
Sometimes, especially if the original is too brittle or mounted to scan safely. But a phone capture usually makes glare, paper warp, and perspective correction harder. If you can scan safely, scan. If you cannot, use even light, shoot square to the page, and keep the highest-resolution original file.
Will a restored newspaper photo ever look like the original film photograph?
Usually not completely. A newspaper clipping is already a reproduction with lost tonal depth and printing artifacts baked in. But a good workflow can get you much closer to a clean, readable, emotionally satisfying image than the raw clipping suggests.
