Noise & Texture Recovery
Why does noise reduction make faces waxy, and avoid it?

TL;DR
- Faces go waxy when noise reduction removes real skin texture along with grain.
- Check the file at full size before editing because blur, compression, and overprocessing can look similar.
- Start with moderate denoise, not the strongest setting, and judge cheeks, forehead, and under-eye areas first.
- Clean backgrounds and shadows more aggressively than faces.
- PhotoSharpener and similar tools work best when used conservatively, because a little remaining noise usually looks better than perfectly smooth skin.
Because noise reduction often mistakes real skin texture for noise. Pores, faint lines, soft transitions, and tiny hairs all live in the same low-contrast zone that denoise tools are trying to smooth out. Push the cleanup too far, and the face stops looking clean and starts looking coated.
That waxy look usually comes from two steps working together: heavy smoothing first, then sharpening that brings back edge contrast without bringing back real texture. The result can look fine in a small preview and very wrong when you zoom in.
What the waxy look really is
Why faces show the problem first
Skin is full of subtle texture, but most of that texture is low contrast. It does not look like the hard edge of a building or the high-contrast thread in a jacket. To a denoise algorithm, skin pores and faint facial texture can look dangerously close to random noise.
That is why cheeks, foreheads, and under-eye areas break first. They contain soft detail, smooth tonal transitions, and highlights that can quickly turn plastic when the cleanup is too strong.
What a healthy cleanup should still preserve
A good denoise pass should make the image feel calmer, not airbrushed. You still want the face to keep shape, variation, and believable micro-texture.
| If you see this | It usually means | Best next move |
|---|---|---|
| Smooth cheeks with shiny-looking highlights | Too much global denoise or beauty smoothing | Lower denoise strength and compare again at 100% |
| Crisp eyes but flat skin | Sharpening is emphasizing edges after texture was removed | Reduce sharpening and recover a little texture or grain |
| Clean background but fake-looking face | Whole frame got the same treatment | Use selective cleanup so skin gets less processing |
| Remaining light grain in skin | You stopped before overprocessing | Usually keep it if the face still looks real |
Why noise reduction causes it
Noise and real skin texture live in the same visual zone
Noise reduction works by suppressing random-looking variation. The problem is that a lot of real facial detail also looks like small, low-contrast variation. So when the slider goes too far, the tool does not only remove noise. It also removes the tiny irregularities that make skin look human.
This tradeoff shows up in practically every editing workflow, from phone editors to desktop raw processors. The better tools preserve more detail, but none of them can ignore the basic tension between smoothing noise and keeping texture.
Sharpening after denoise often makes the result worse
Many people try to fix the softness by adding sharpening after the face already got smoothed. That can help eyes, lashes, hairlines, and clothing seams, but it rarely restores authentic skin texture. Instead, it boosts boundary edges and shiny highlights, which makes the face look harder around the edges and flatter in the middle.
That is why the classic failure pattern is a face with very defined eyes and brows but oddly plastic cheeks.

Check the file before you touch the sliders
Is it noise, blur, or compression?
Not every rough-looking face is suffering from noise alone.
If the photo is blurry, denoise will not restore missing definition. If the file is heavily compressed, the roughness may come from JPEG blocks and smeared detail rather than sensor noise. If the image already went through strong phone processing, you may be editing an over-smoothed face a second time.
The fastest diagnosis is simple:
- zoom to full size
- inspect skin, hair, and clothing
- ask what looks wrong first: grain, blur, or mushy detail
If detail was never there, denoise cannot preserve it.
Where to inspect before deciding the edit is done
Adobe's own Camera Raw guidance recommends judging sharpening and noise reduction at at least 100% zoom. That is the right habit here.
Check these areas every time:
- the cheek just below the eye
- the side of the nose
- the forehead highlight
- hairline and eyebrows
- textured clothing near the face
If those areas still look believable, the edit is usually on track. If they look smeared, waxy, or painted, back off before you export.
Use a safer noise-reduction workflow
Start with the best source you have
The cleaner the source file, the less aggressive the denoise needs to be. A raw file gives you more room than a social media download. A fresh scan gives you more room than a re-saved JPEG. A phone original gives you more room than a screenshot of that phone original.
If you are working from an old print or scan, start with the cleanest capture you can. Our scan setup guide is worth following first, because a better scan reduces the need for destructive cleanup later.
Apply denoise early and keep the first pass moderate
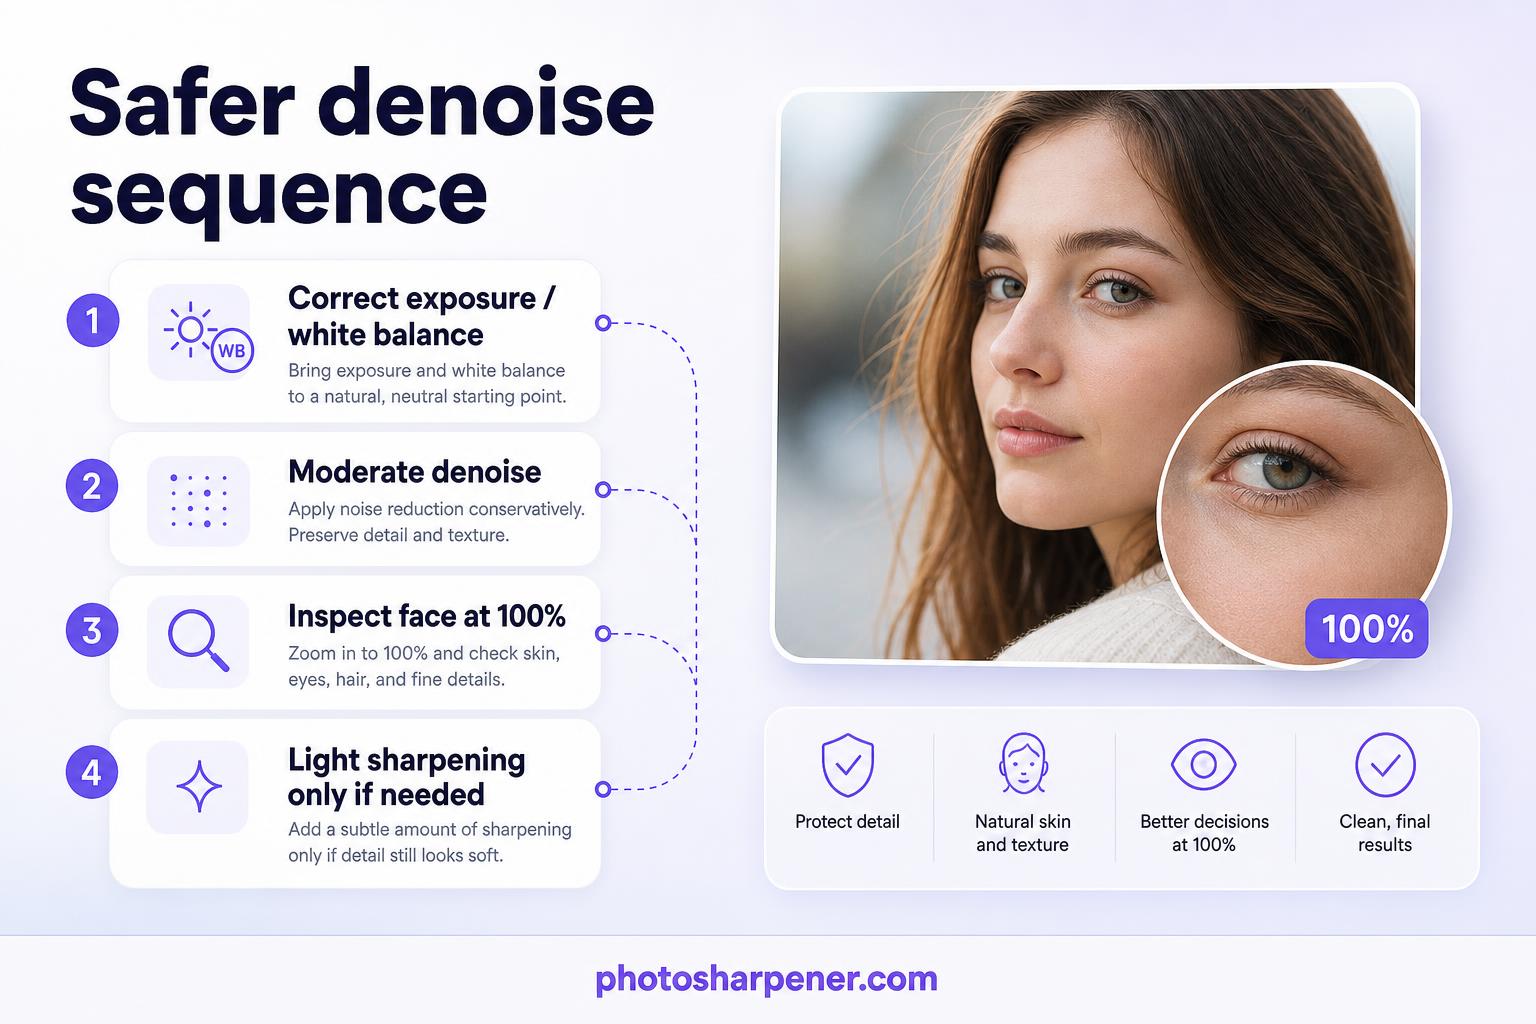
The safest workflow is usually:
- correct exposure and white balance if needed
- apply moderate denoise
- inspect the face at full size
- add only light sharpening if the image still needs it
If you shoot raw, Lightroom's Denoise workflow is useful because it works on supported raw formats before the image gets flattened into a smaller export. If your file is already a JPEG, treat the first denoise pass as a gentle cleanup, not a rescue mission.
Denoise selectively instead of treating the whole frame the same
Protect faces, hair, and textured fabric
The biggest improvement usually comes from not denoising everything equally. Skin needs a lighter hand than a dark background. Hair needs a different balance than smooth sky. Fabric often holds useful texture that should stay.
If your editor allows masking, give the face a milder setting than the background and shadows. This single change solves a lot of waxy-skin problems because it stops the tool from sanding down the most sensitive area of the image.
Clean the background more than the subject
Most viewers forgive a little grain in skin much faster than they forgive fake skin texture. So when you need to choose, leave a touch of luminance noise on the face and push the cleanup more in the background, wall, or shadow region.
This matters even more for portraits taken indoors, low-light phone photos, and older family pictures where the face is the emotional center of the image.
How to keep skin natural after cleanup
Leave a little luminance noise if the face still looks real
A very small amount of residual grain is often a good sign. It means you stopped before the file crossed into the plastic zone.
Many beginners chase a perfectly smooth preview because it looks cleaner on a small screen. But once the image is viewed larger, that "perfect" smoothness is exactly what makes a portrait feel synthetic.
Add back a tiny amount of grain if the result feels too polished
Adobe explicitly suggests using grain when a denoised file feels too smooth. This sounds backward at first, but it works because a little controlled texture can make a face look more natural than a clinically smooth surface.
The key is restraint. You are not trying to make the photo noisy again. You are only restoring enough texture so skin stops looking dipped in wax.
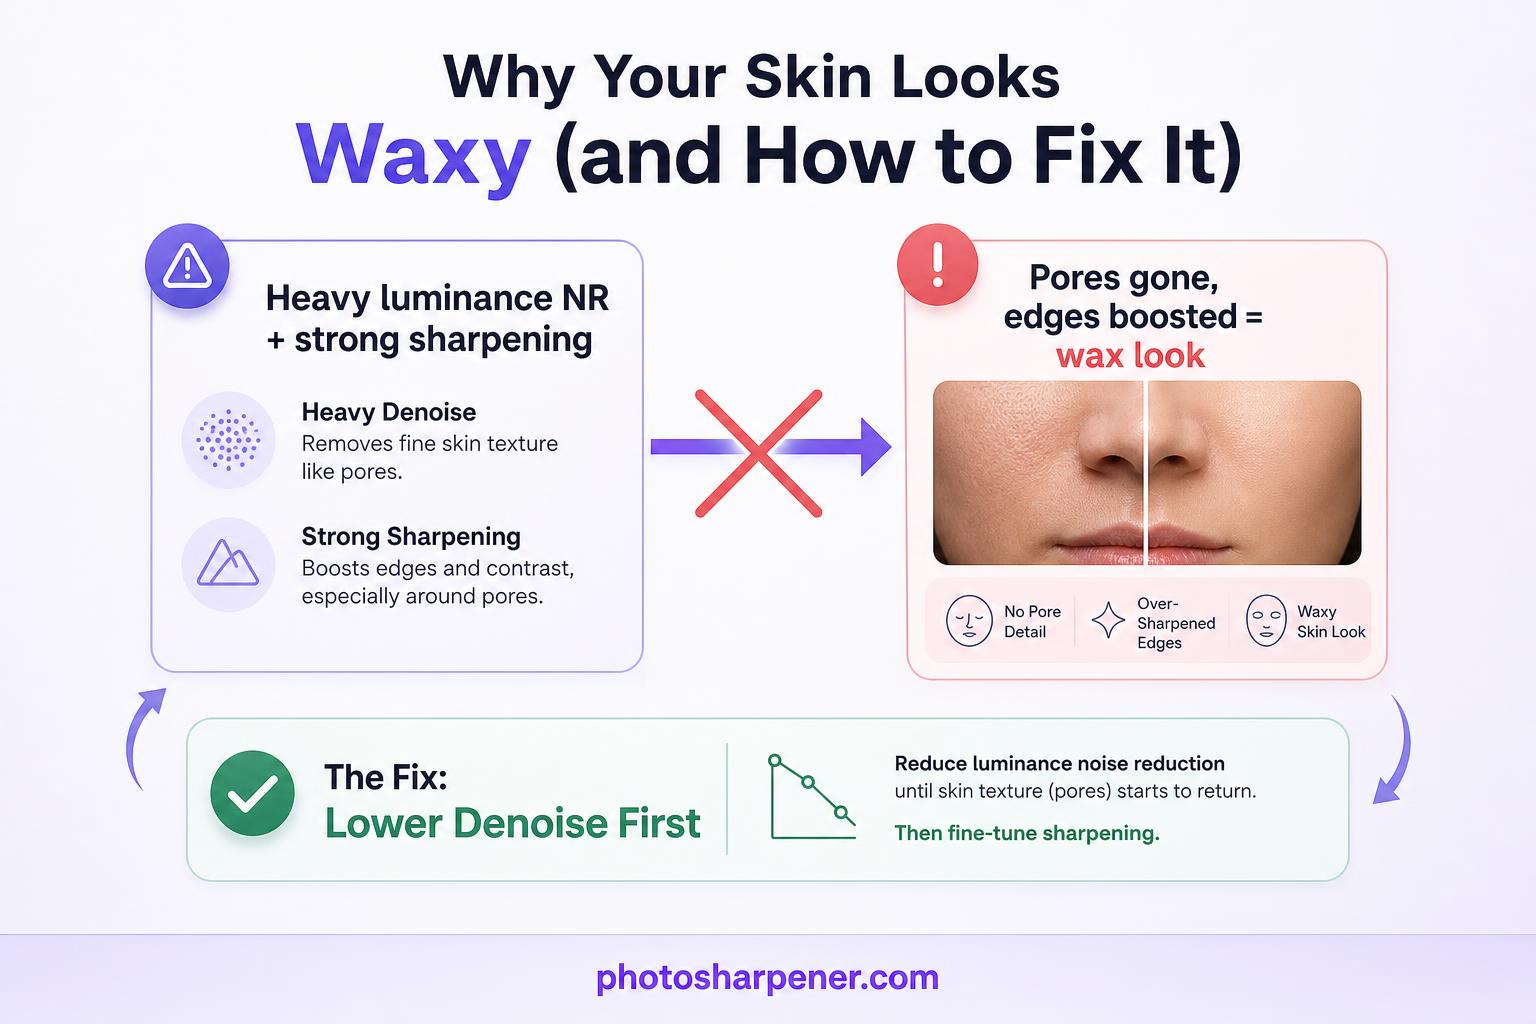
Settings combinations that usually create the wax look
Heavy luminance reduction plus strong sharpening
This is the most common combination behind waxy faces. Luminance noise reduction wipes out pore detail, then sharpening boosts edges and contrast in all the wrong places.
If your face looks soft in the middle but hard around the features, this is probably the problem. Lower the denoise first. Only then decide whether the image still needs sharpening.
Multiple cleanup passes in different apps
One strong denoise pass can already be too much. Two or three lighter passes across different apps often become just as destructive because each tool removes a little more texture.
This happens a lot with phone workflows:
- the camera already smoothed the image
- an editor applies more noise reduction
- an AI enhancer smooths again
- a beauty filter or portrait tool finishes the damage
If the file already looks suspiciously clean before you start editing, assume some smoothing is already baked in.
What to do for phone photos, portraits, and old scans
Phone photos often arrive partially denoised already
Modern phones do a lot of processing before you ever open the photo. That is helpful for quick sharing, but it also means the skin may already be halfway to the waxy look before you add your own edits.
For phone portraits, use smaller adjustments than you think you need. If the face looks clean enough at normal viewing size, stop there.
If you want a browser-first workflow for JPEGs, screenshots, or scans, PhotoSharpener can be a practical option for light cleanup and detail recovery. Use it conservatively, though, because the best result here is usually believable skin plus cleaner edges, not maximum smoothing.
Scanned portraits need special care
Old scans can combine grain, compression, paper texture, and faded detail in the same face. That makes it tempting to push the cleanup harder than you should.
Go gently. Fix tone first, then reduce only the noise that is actually distracting. If the scan itself is weak, our bad scan guide is a better starting point than trying to denoise the problem away.
Signs you should back off and redo the edit
Fast warning signs
Redo the edit if you notice any of these:
- cheeks look smoother than skin normally does
- forehead highlights look glossy or painted
- the boundary between face and background looks too crisp
- pores vanished but eyebrows look sharp
- skin tone is even, but the face lost depth
Those are not small finishing issues. They usually mean the image crossed the line into overprocessing.
A simple stop rule that works
Use this decision rule: if a little visible noise remains but the face still looks like a real person, keep that version.
In portrait editing, believable usually beats cleaner.
FAQ
Can I fully reverse waxy skin once I saved over the file?
Not always. If you still have the original or a raw file, go back to that and re-edit with milder settings. If you only have the overprocessed export, you may improve it a little by reducing sharpening and adding a touch of grain, but fully recovering natural skin texture is harder once it has been smoothed away.
Should I sharpen before or after noise reduction?
Usually after, and only lightly. Noise reduction should come early because sharpening first can make the noise and artifacts more obvious. But once denoise is done, add sharpening carefully and judge the face at 100% zoom before exporting.
Is a little noise better than perfectly smooth skin?
Most of the time, yes. A small amount of natural-looking grain usually feels more believable than skin that looks airbrushed, plastic, or painted.
Can online tools fix this if I do not use Photoshop or Lightroom?
Yes, but the same rule still applies: keep the cleanup moderate and compare against the original. Online tools are convenient for JPEGs and scans, but they can also over-smooth faces quickly if you push them too hard.

Affiner · Agrandir · Restaurer
Détail réel reconstruit en ~8 s. Jusqu’à 4× d’agrandissement.