Old Photo Restoration
Can a scratched film scan be restored if the original negative is lost?

TL;DR
- A scratched film scan can often be improved even if the original negative is lost, especially when the scratch is narrow and the surrounding detail is still readable.
- Work from the largest, earliest, least-compressed file you can find and keep an untouched master copy.
- Remove or reduce the scratch before heavy sharpening or upscaling, or you will make the damage more obvious.
- AI restoration is useful for mixed damage, but manual retouch is often safer for one important frame, facial features, or readable text.
- If the scratch erased critical image detail, the result can look better without being historically exact.
Yes, often it can be improved a lot. But once the original negative is gone, the job changes. You are no longer restoring the film itself. You are restoring the best digital evidence that survived from it.
That difference matters because scanner features, film handling choices, and rescanning options are mostly off the table now. Your goal is to make the scratch less visible, protect the real detail that is still in the scan, and avoid over-processing the image until it looks synthetic.
What can still be restored when the original negative is gone
Losing the negative does not automatically mean the image is beyond help. A surprising amount of scratch damage in scans is visual disruption rather than total loss. If the line is thin, the tone around it is consistent, and the photo still has texture on both sides of the damage, modern restoration tools can often rebuild a believable result.
The limit is simple: software can hide or reconstruct damage, but it cannot truly recover image information that no longer exists anywhere. If the original film emulsion was gouged deeply and the scan shows a hard line straight through a face, a hand, or printed lettering, the missing detail is gone from the source. The best restoration will be a reconstruction based on nearby pixels, not a factual recovery.
That sounds discouraging, but in real family-photo use it is often good enough. Most people want a photo that looks natural in an album, on a screen, or in a modest print. They do not need a forensic-perfect recovery. They need the scratch to stop pulling the eye away from the memory.
Another important consequence of a lost negative is that hardware cleanup options are gone too. Infrared scratch-removal features and better scanning settings only help while the film is physically being scanned. Once the negative has disappeared, the scan you already have becomes your starting point and your ceiling.
Figure out what kind of scratch the scan is showing
Before you repair anything, spend two minutes deciding what the line actually is. People often call every streak a scratch, but the fix depends on whether you are looking at real film damage, a scanning artifact, or damage that has already been sharpened and compressed by previous edits.
Signs of a real film scratch versus a scanning artifact
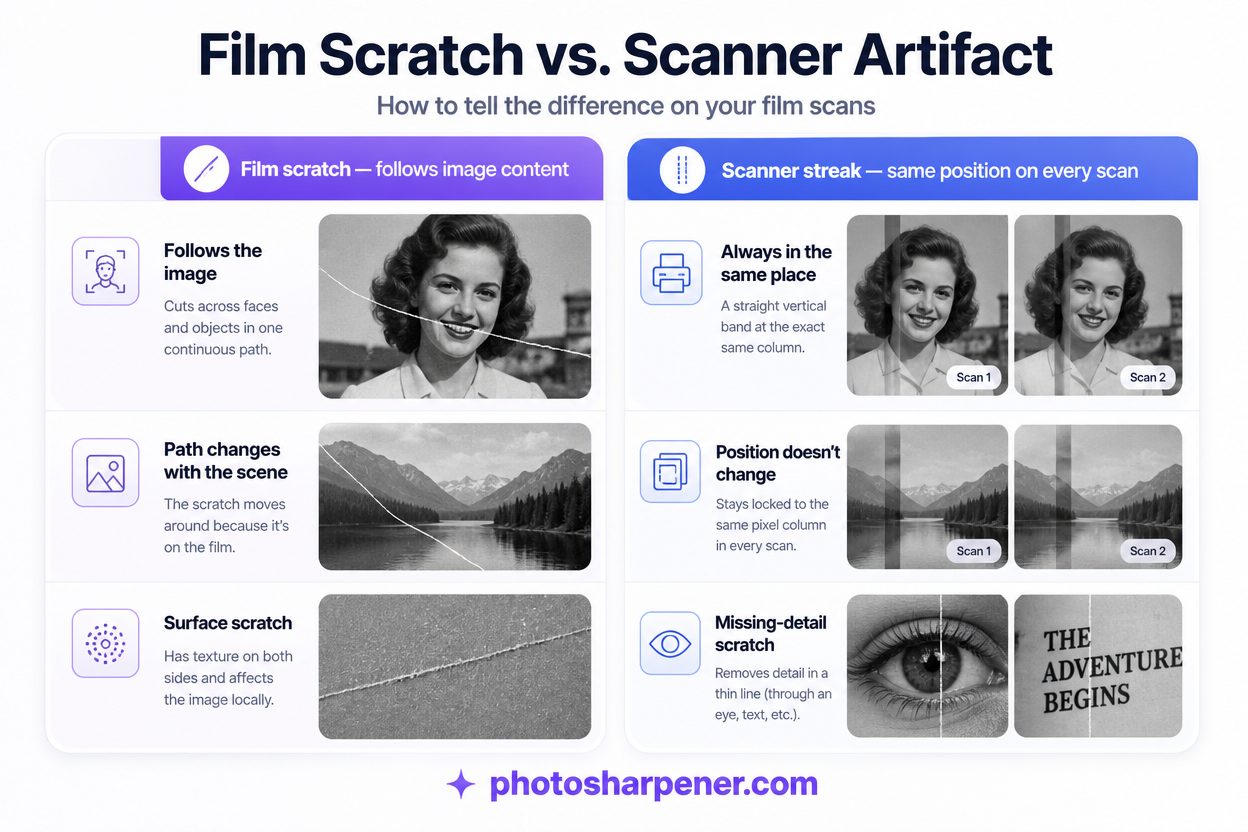
A real film scratch usually behaves like part of the picture. It cuts across faces, clothes, sky, and background objects in one continuous path. If you have several frames from the same roll or a low-resolution proof sheet, look for the same mark there. A genuine film scratch often repeats in the same place on the original image area.
A scanning artifact behaves differently. It may be perfectly straight from top to bottom, sit at the same pixel column in multiple unrelated scans, or look more like a uniform band than a physical cut. If you inherited files from an old scanner and more than one image has the same streak, you may be looking at a scanner problem rather than damage in the film itself.
This distinction matters because a scanner streak is often easier to conceal cleanly. If the issue came from the scan, the image information may still be mostly intact underneath the line.
Surface-looking scratches versus missing-detail scratches
Now zoom in at 100%.
If the scratch sits over image detail but you can still sense texture, grain, or tone on both sides, the repair is usually straightforward. The restoration tool has enough context to bridge the line without inventing too much.
If the scratch wipes out detail entirely, the job becomes harder. A scratch across an eye, a mouth, a wedding ring, or handwritten text forces the software to guess. That does not mean you should give up. It means you should be more conservative and check the result more critically.
If the scan also has fading, dust, and general wear, you are dealing with a broader restoration problem, not just one line. In that case, the workflow from this guide on cracks, fading, and tape damage is a useful mental model.
Treat the best surviving scan like your master negative
When the original negative is lost, the scan becomes the archive. That means file choice matters almost as much as the repair method.
Find the highest-quality file you still have
Use the earliest, largest, least-processed version you can find.
Best case:
- the original scanner export
- a TIFF or PNG
- a full-resolution JPEG saved once
Worst case:
- a WhatsApp copy
- a social-media download
- a screenshot of the image
- a JPEG that has already been edited and re-saved multiple times
If you only have a weak file, you can still improve it, but start with realistic expectations. Compression blocks, prior sharpening halos, and color clipping often do more damage than the scratch itself. If the scan looks heavily processed before you touch it, this bad scan cleanup workflow is the right place to start.
Make a working copy before you restore anything
Duplicate the file and work on the copy. Keep the untouched master even if it looks awful.
This sounds obvious, but it saves people all the time. If your first restoration run smooths faces too much, bends texture around the scratch, or adds fake detail, you need a clean place to restart from. If you keep overwriting the same JPEG, every correction attempt becomes harder because you are repairing yesterday's repair.
If you later discover another source, such as a print made from the same frame or a better scan someone else saved years ago, compare it before you commit to a heavy restoration. Even a smaller but cleaner source can sometimes help you judge what the repaired version should look like.
Use the restoration order that gives the scratch the least room to spread
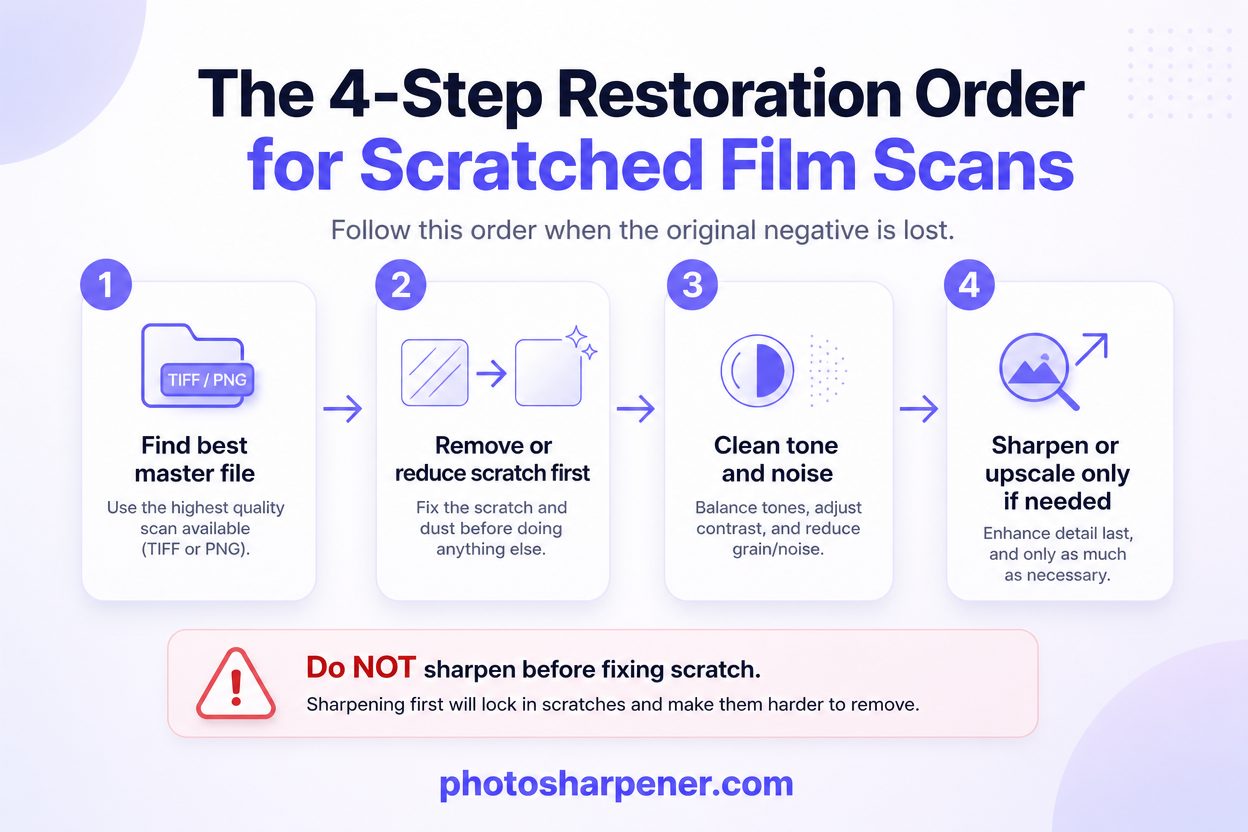
The most common mistake is jumping straight into sharpening or upscaling because the scan feels soft. That usually makes the scratch more obvious and harder to remove cleanly.
Clean the damage before strong sharpening or upscaling
A scratch is a high-contrast edge. Sharpening tools love high-contrast edges, even when they are damage. So if you upscale or sharpen first, you often turn one distracting line into a sharper, brighter, more stubborn line.
Start by reducing the scratch visibility, then clean up tone and noise, and only then decide whether the image needs more sharpness or more pixels. This order gives the restoration model a truer base to work from.
If your end goal is printing, the rule still holds. Fix the defect first, then decide whether you need extra resolution. The same logic shows up in print-prep workflows such as What resolution is needed to print an AI-upscaled photo?: cleanup before enlargement almost always produces the more believable print.
Start with the least aggressive repair that solves the problem
For one narrow scratch across a simple area like sky, wall, or background blur, a manual healing or clone-style correction is often the cleanest option. You control exactly where the replacement texture comes from, and you avoid changing the rest of the image.
For multiple scratches, mixed softness, and broad age-related damage, AI restoration becomes more attractive because it can address several problems in one pass. The key is to keep the first pass conservative. You want the tool to rebuild continuity, not reinterpret the whole photograph.
This is where a browser-first tool like PhotoSharpener fits naturally. It works best when you feed it the cleanest master copy you have, use it to reduce visible damage and rebuild detail conservatively, and then review the result before deciding whether extra face restoration or stronger enhancement is actually necessary.
When AI restoration helps and when manual retouch is safer
AI is powerful here, but it is not automatically the best choice for every scratch.
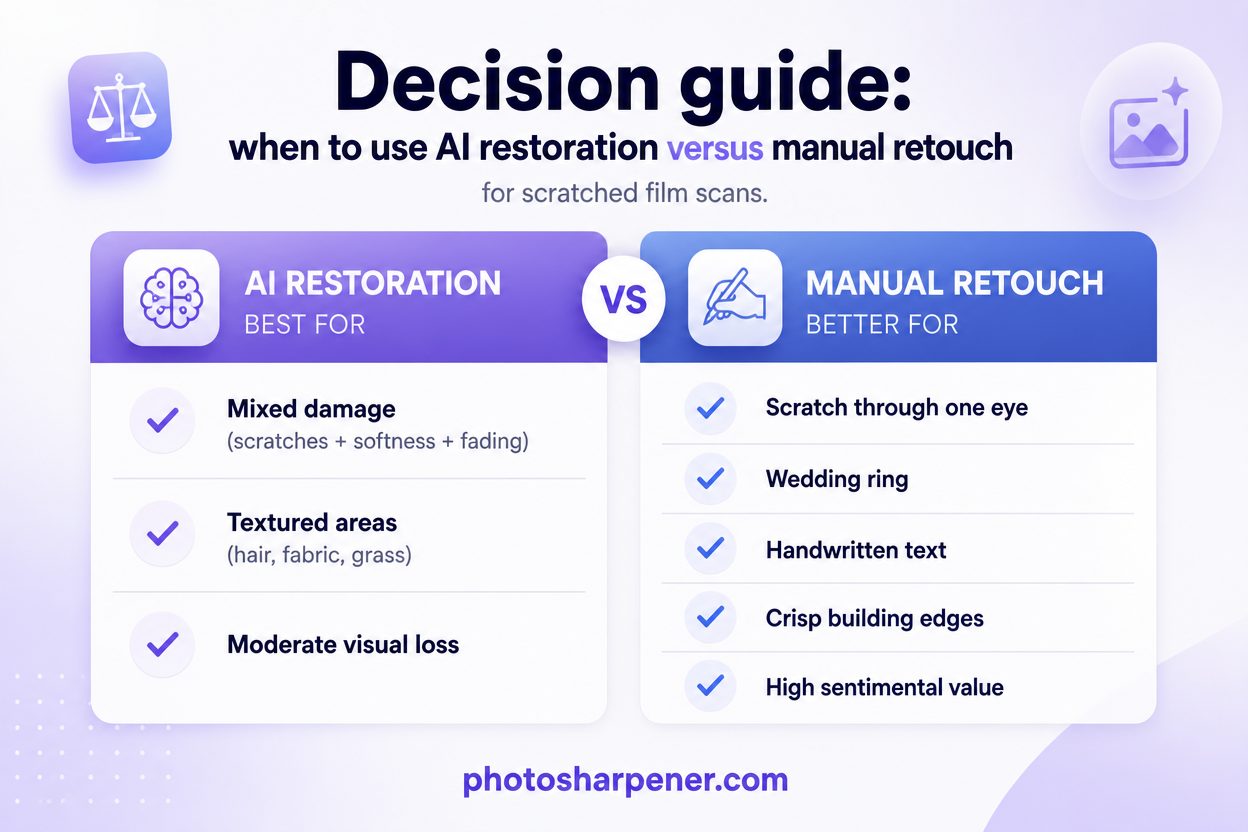
AI is strongest on mixed damage and moderate visual loss
AI restoration is especially helpful when the scan has several issues at once:
- a few scratches
- general softness from the original scan
- some compression
- faded contrast
- small portrait areas that need clarity without a full manual workflow
In that situation, AI can do the cleanup in a way that feels efficient and coherent. The result is often more natural than trying to patch every problem separately.
It also helps when the scratch crosses textured areas like hair, fabric, grass, or skin, where manual retouch can get tedious fast. Good AI restoration can bridge those regions more smoothly, as long as the missing area is not too large.
Manual retouch is often better for one important detail
If there is only one scratch and it cuts through the most emotionally important part of the photo, manual work is usually safer.
Think about cases like:
- one line through a single eye
- a scratch across a ring or medal
- a line through handwritten text
- a blemish across a crisp building edge
Those details carry meaning, and AI can easily make them plausible while making them wrong. If the image matters a lot, take the slower route. Repair the broad damage first if needed, then correct the critical detail by hand or with a very localized pass.
The same caution applies to faces. If a scratch crosses a portrait, judge the result with the identity checks from this guide on keeping AI from changing the person's face. A softer but recognizable face is usually better than a sharper face that no longer looks like the same person.
How to check whether the restored result is actually believable
The best restoration is not the one that looks most dramatic in a before-and-after slider. It is the one that stops looking repaired.
Review the hard areas at 100 percent
After every serious pass, zoom in and inspect the places where restoration tends to fail first:
- eyes
- mouth edges
- hairline and eyebrows
- jewelry
- handwritten text
- repeated textures like brick, lace, and shirt patterns
You are checking for three things:
- Did the scratch disappear without leaving a blurry smear?
- Did the repaired area keep the same texture family as the surrounding image?
- Did any important feature become cleaner but less truthful?
If the answer to the third question is yes, back off. A believable restoration often leaves a tiny trace of age behind. That is fine.
Judge the photo at the size you will actually use
A repair can look imperfect at 200% zoom and still look excellent in a 5x7 print or on a phone screen. The reverse is also true. Some restorations look amazing when small and obviously fake when printed.
So test the image the way it will live:
- album print
- framed desk print
- family slideshow
- digital archive
If the scratch no longer grabs attention in the final use case and the subject still feels authentic, the restoration succeeded. You do not need pixel-level perfection to have a good family image again.
When the scan can be improved, but not truthfully recovered
Sometimes the honest answer is that the photo can be made nicer, but not fully recovered.
Cases where a professional is the better choice
Bring in a professional restorer when any of these are true:
- the scratch removed large facial features
- important text or documents must stay exact
- the image has strong sentimental or historical value
- the file shows multiple generations of bad editing on top of the scratch
- you may still be able to locate another source and need help comparing them
A human restorer can make accountable decisions about what to reconstruct, what to soften, and what to leave alone. That matters when the image is irreplaceable.
If another family member might have a print, slide duplicate, album copy, or alternate scan, ask before you settle for a heavily reconstructed result. Even a faded print can sometimes answer questions the damaged scan no longer can. And if another source does turn up later, use the scanning guidance in Best way to scan an old print before AI restoration? so your new master starts cleaner than the old one.
FAQ
Can a scratch be removed completely from a film scan?
Sometimes, yes, at least visually. Thin scratches over simple areas often disappear well. Deep scratches through facial features, text, or fine patterned detail are harder because the software has to reconstruct what is missing.
If the original negative is gone, should I still try AI restoration?
Yes, if the scan is the best surviving source. Just work on a copy, keep the untouched master, and judge the output conservatively. The goal is a believable image, not the strongest possible effect.
Should I sharpen the image before fixing the scratch?
Usually no. Sharpening first tends to make the scratch edge harder and more obvious. Repair the damage first, then decide whether the cleaned image still needs extra sharpness or upscaling.
What if the scratch runs through a face?
Treat that as a high-risk area. Use the lightest repair that works, compare the restored face with the original at 100% zoom, and stop if the person starts to look different. Identity matters more than drama in old family photos.