Phone Blur Troubleshooting
Why do my phone photos keep getting blurry?

TL;DR
- Most blurry phone photos come from one of five things: a dirty lens, low light, motion, focus mistakes, or a weak file copy.
- Test in bright light before you change a bunch of settings. That one step separates camera problems from lighting problems fast.
- If every app and every lens stay blurry, you may be looking at condensation, lens damage, or a hardware fault.
- If the photo is already taken, start from the original file and use a light
PhotoSharpenerpass only for mild blur. Severe blur usually cannot be rescued naturally.
If your phone photos keep getting blurry, the problem usually is not random. Your phone is reacting to something specific, and the fix depends on what that something is.
Sometimes the answer is simple, like a fingerprint on the lens. Sometimes it is the scene itself: dim light, subject movement, or too much zoom. And sometimes the photo only looks blurry because you are looking at a compressed copy from a chat app or cloud preview, not the real original.
The good news is that you can troubleshoot this without guessing. Once you know whether the blur is happening at capture, during saving, or only after sharing, the next step becomes much more obvious.
Figure out what kind of blur you are actually seeing
Blur while shooting is different from a blurry saved copy
The first question to ask is this: are your photos blurry the moment you take them, or do they only look blurry later?
If the live camera preview and the fresh photo both look soft, you are dealing with a shooting problem or a camera problem. That usually means low light, camera shake, focus misses, lens smudges, or hardware trouble.
If the photo looked fine at first but gets blurry after sending, downloading, or re-saving, the problem is usually file quality, not the camera. Messaging apps, screenshots, social downloads, and cloud-optimized previews often strip away detail even when the original shot was good.
That distinction matters because a blurry capture needs troubleshooting at the camera. A blurry copy needs a better source file.

Use a quick symptom check before changing settings
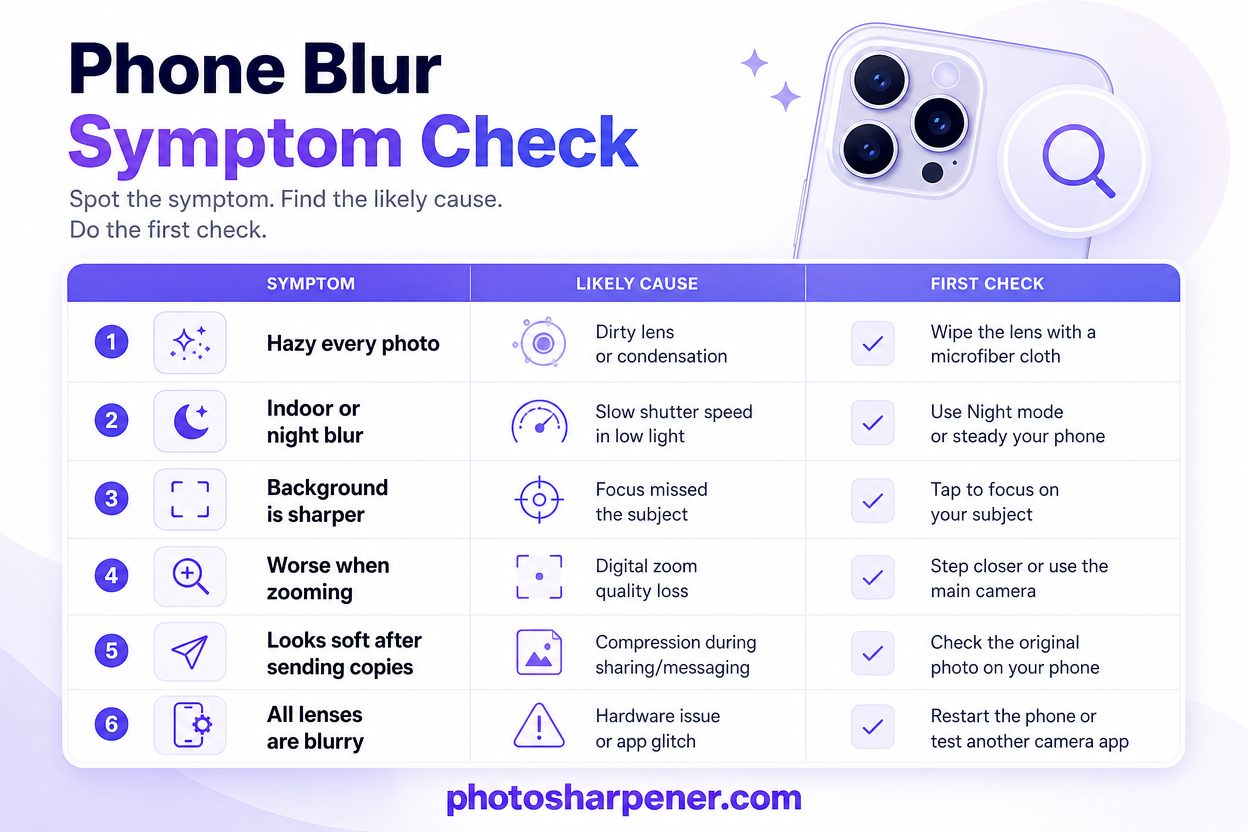
Use this table before you start toggling random camera options:
| What you notice | Most likely cause | Best first check |
|---|---|---|
| Every photo looks hazy or foggy | Dirty lens, lens protector issue, condensation | Clean lens and remove accessories |
| Indoor or night photos blur more than daylight shots | Slow shutter speed, hand shake, subject movement | Test the same shot in bright light |
| Background looks sharper than your subject | Focus landed in the wrong place | Tap the subject to focus |
| Photos get worse when you zoom in | Digital zoom quality loss | Step closer instead of zooming |
| Originals look okay but sent copies look soft | Compression or low-quality download | Go back to the original file |
| All lenses stay blurry in every app | App fault or hardware issue | Restart, update, and test another app |
This quick diagnosis saves time because you stop treating every kind of blur like the same problem. If you want the broader repair side after capture, our guide on clearing blurry photos walks through that separately.
Start with the simple physical checks first
Clean the lens and remove anything touching the camera area
This is the boring fix, but it solves a surprising number of cases.
Phone lenses pick up skin oil, pocket lint, dust, and mist faster than people realize. A very small smudge can turn highlights into haze and make the whole frame look softer than it should. Wipe the lens gently with a clean microfiber cloth, not a shirt hem or tissue full of grit.
Then remove anything that could interfere with the camera area:
- thick or misaligned case edges
- lens covers or protectors
- clip-on lenses
- magnetic mounts or accessories near the camera bump
Apple specifically recommends removing accessories or films that may block the camera or place magnets near it in its camera troubleshooting guide. This is especially worth checking if your phone started taking blurry pictures right after you changed cases or added a mount.
Test the same shot in bright light
Before you assume the phone is broken, take one simple comparison shot.
Photograph the same still object in bright daylight, then again indoors or in lower light. If the daylight shot looks crisp and the darker shot looks soft, your problem is probably not the camera hardware. It is the phone slowing the shutter to gather light.
That is a normal tradeoff on small phone sensors. As How-To Geek explains in its smartphone blur breakdown, low light pushes phones toward slower shutter speeds, and that makes even tiny hand movements show up in the image. So if blur shows up mostly at night, in restaurants, or around pets and kids indoors, start by treating it as a capture-condition problem, not a repair problem.
Fix the common shooting mistakes that create blur
Hold steady when the phone slows the shutter in low light
Most people think "my camera is blurry" when the real problem is "my shutter stayed open longer than I realized."
In dim scenes, your phone often lowers shutter speed so it can collect more light. That helps brightness, but it also means:
- your hand movement becomes visible
- your subject can blur even if you barely notice them moving
- tapping the screen can shake the phone enough to soften the shot
The practical fix is simple:
- brace your elbows against your body or a solid surface
- use both hands
- ask people to stay still for a beat
- take a short burst instead of one single frame
- if possible, move toward better light instead of relying on zoom or heavy night processing
If you consistently get blur from kids, pets, food indoors, or night street scenes, this one change usually matters more than editing later.
Tap to focus, back up a little, and avoid heavy digital zoom
The second big cause is focus and framing.
Phone cameras are usually good at autofocus, but they still miss when the subject is too close, backlit, low-contrast, or surrounded by distracting objects. Tap the exact subject you care about before you shoot. If the camera keeps hunting or pulsing, back up slightly and try again. Many blurry close-ups happen because the subject is simply inside the phone's minimum focusing distance.
Digital zoom makes the problem worse. Once you go past the phone's real optical range, the camera is mostly cropping and enlarging. That reduces detail and makes every little bit of shake more obvious. A good rule is:
- if you are under 2x or using a real telephoto lens, results may still hold up
- if you are pinching far in on a basic wide lens, expect softness
- if the photo matters, move closer with your feet when you can
If your blur looks more like missed focus than motion, our article on out-of-focus blurry photos explains what is recoverable later and what is better fixed at capture.
Rule out phone and app problems
Restart, update, and test the camera in another app
Once you have cleaned the lens and tested in good light, move to the easy software checks.
Restart the phone first. It sounds basic because it is basic, and it still clears temporary camera glitches more often than people expect.
Then test:
- the rear camera
- the front camera
- another lens if your phone has one
- another app that can access the camera
This tells you whether the blur is isolated. If only one lens is bad, that points more toward a hardware-specific issue. If the main camera is blurry in every app, that is more serious than one social app producing a weak preview.
After that, update the operating system and the camera app if your platform supports separate app updates. Google's official Pixel camera guide also recommends clearing the Camera app cache and testing in safe mode when the issue persists, which is a useful way to rule out interference from another app.
Use the platform-specific fixes that matter most
Platform-specific advice helps because not every blur problem has the same trigger.
For iPhone, Apple's support guidance says to remove cases, films, converters, and magnetic accessories near the camera, clean both lenses, restart the device, and update iOS in its official support article. That is especially relevant if the blur shows up with motion in low light or began after adding an accessory. If you want the Apple-specific decision tree, our iPhone blur guide turns those checks into a step-by-step workflow.
For Pixel phones, Google calls out cleaning both the lens and, where present, the laser sensor, then restarting, clearing cache, updating the Pixel Camera app, and testing in safe mode in the Pixel help documentation. If you need the platform-specific version of that checklist, our Android blur guide breaks it into the short troubleshooting ladder that matters most on Android.
For any Android phone, one useful principle still holds even when the exact menu path changes: if the camera is blurry in every app, after a restart, in bright light, and with a clean lens, the problem is probably not a creative setting. It is a system issue or a hardware issue.
Know when blur points to a hardware problem
Watch for condensation, scratched glass, or damaged stabilization
There is a point where more troubleshooting stops being productive.
Pay attention to these signs:
- the lens glass looks scratched, chipped, or cloudy
- there is fog or moisture inside the camera area, not just on the outside
- the camera never locks focus near or far
- one lens is always blurry while the others are fine
- blur started right after a drop, water exposure, or strong vibration
Those clues matter because they suggest physical damage or mechanical trouble inside the camera module. Apple also notes that some accessories with magnets near the camera can interfere with stabilization and autofocus behavior, and that certain high-amplitude vibrations can degrade camera performance over time.
Condensation is another common trap. If you move from cold air into a warm, humid space, the camera can fog temporarily and everything looks milky. In that case, let the phone acclimate and dry before you judge the camera.
Get service when every app and every lens stays blurry
Here is the clean decision rule:
If you have cleaned the lens, removed accessories, restarted the phone, updated the software, tested in bright light, and compared more than one app, but the photos are still blurry every time, stop treating it like a shooting mistake.
At that point, you are likely in repair territory.
That does not always mean catastrophic damage. It could be autofocus failure, stabilization damage, internal lens haze, or a camera module that shifted after a drop. But it does mean you are past the point where editing or camera tips will solve the root problem.
Rescue photos that are already blurry the right way
Go back to the original file before you edit
When people try to save a blurry photo, they often start from the worst possible version.
They grab a chat attachment, a screenshot, or a social-media download, then push sharpening until the file falls apart. That usually creates crunchy edges, haloing, and weird texture without bringing back much real detail.
A better workflow is:
- find the original camera file or cloud original
- make a copy so you keep the untouched source
- check whether the issue is mild blur, compression, or both
- only then decide whether editing is worth it
If the blur is mild, there is a decent chance of improvement. If the file is tiny, heavily compressed, and badly blurred, your ceiling will be low no matter which tool you use.
Use AI enhancement for mild blur, not as a camera repair
Enhancement works best when the camera captured some real structure but not enough crispness.
That means:
- slight hand shake
- soft focus that is not extreme
- mild compression damage
- a photo that is acceptable but clearly weaker than it should be
If that sounds like your shot, a conservative enhancement pass can help. On supported Pixel devices, Google Photos offers Photo Unblur for exactly this kind of mild rescue. If you want a browser-based option for older photos, scans, or everyday phone shots, PhotoSharpener can be a practical way to test gentle cleanup and upscaling without building a full desktop workflow.
But keep the goal realistic. These tools can often make a photo cleaner and more usable. They do not repair a broken autofocus motor or recover detail that was never captured in the first place.
Build a workflow that keeps phone photos sharp
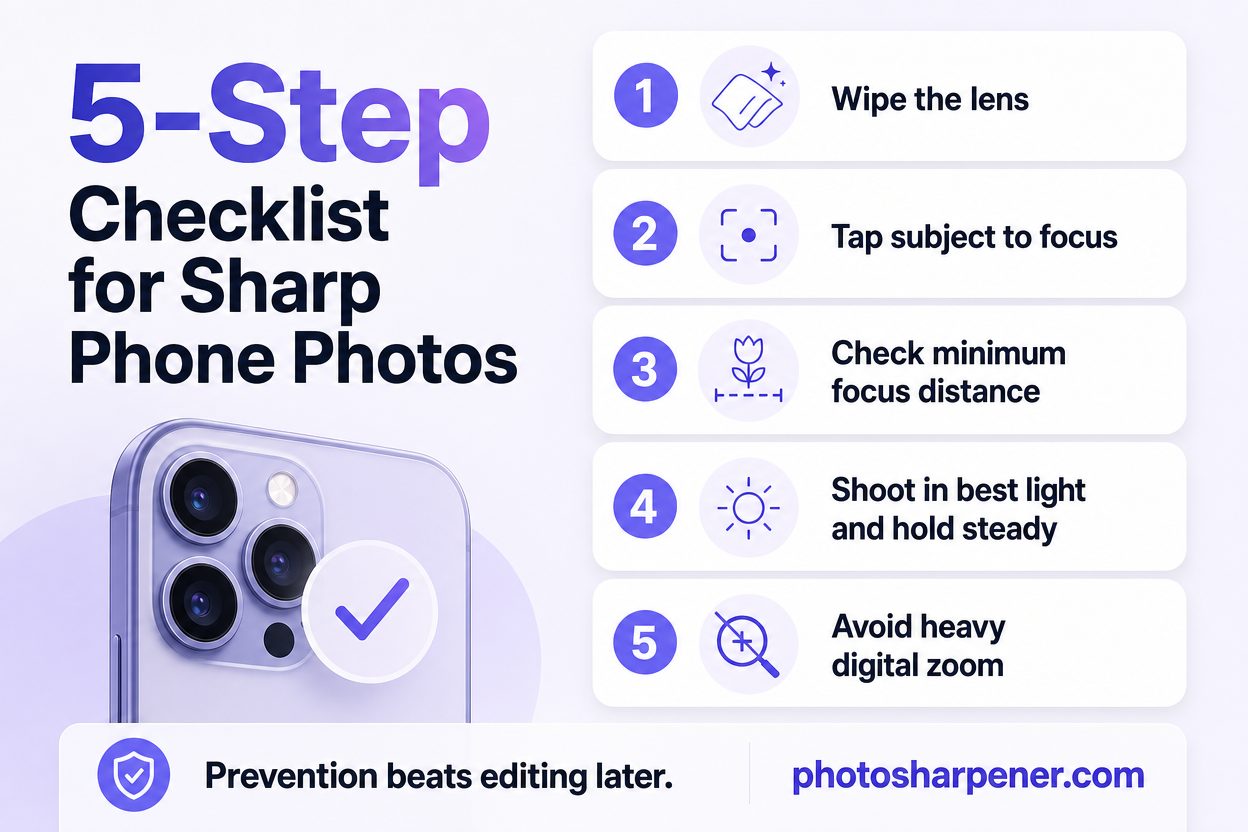
A five-step checklist before you press the shutter
If you want one routine that prevents most blurry phone photos, use this:
- wipe the lens
- tap your subject to focus
- check that you are not too close for the lens to focus
- shoot in the best light available and hold still
- avoid heavy digital zoom unless you have no other option
That checklist is quick enough to become a habit, and it covers the biggest real-world causes of blur without turning photo-taking into a project.
Simple habits that protect quality after capture
Sharp capture is only half the battle. A good photo can still look bad later if you handle the file carelessly.
To protect quality:
- keep the original image instead of only the sent copy
- avoid repeated screenshots and re-saves
- export one clean master if you edit
- send full-quality files when the app gives you that option
- if a phone photo matters, back it up before you start experimenting
This matters because people often blame the camera for a file-quality problem that happened after the shot. The camera created one version. Messaging, social uploads, and screenshots created the weaker one.
FAQ
Why are only some of my phone photos blurry?
Because the problem often depends on the situation, not the phone alone. Low light, motion, missed focus, close-up distance, and digital zoom all change from shot to shot. If some photos are sharp and others are not, look at the conditions first.
Can I fix a blurry phone photo after it is taken?
Sometimes, yes. Mild blur and mild compression often improve noticeably if you start from the original file and use a careful enhancement pass. Heavy motion blur, severe focus misses, and tiny compressed copies are much harder to rescue naturally.
Why do photos look worse after I send them through a chat app?
Because many chat and social apps compress images to save bandwidth. The original photo may be fine, but the sent version is smaller, softer, and more artifact-heavy. If the picture matters, send the original file, use a document attachment option, or go back to the original before editing.
