Phone Blur Troubleshooting
Best way to fix blurry Android photos?

TL;DR
- The best way to fix blurry Android photos is to work out whether the problem came from the camera, the lighting, the focus, or the file copy before you start editing.
- Clean the lens, remove any lens protector or case edge that sits too close to the camera, test again in bright light, and tap the subject to focus.
- If the photo is already taken, go back to the original file first. Mild blur can often improve with careful edits or a light
PhotoSharpenerpass. A tiny compressed chat copy usually will not.- If every app and every lens stay blurry after the basic checks, stop editing and treat it like a camera or system problem.
The best way to fix blurry Android photos is to diagnose the cause before you reach for an editor. Android photos go blurry for a few very different reasons, and each one needs a different fix.
Sometimes the problem is simple, like a fingerprint on the lens or a cloudy lens protector. Sometimes the phone slowed the shutter in low light, so tiny hand movement turned into motion blur. And sometimes the photo only looks bad because you are viewing a compressed copy from WhatsApp, email, or a social app instead of the original file.
That difference matters because the right fix changes completely. A weak copy needs a better source. A soft capture needs better shooting conditions. And a mildly blurry original may improve with careful editing or AI cleanup, but only if the file still has real detail left in it.
If this keeps happening, our phone blur guide helps you separate camera trouble from file-quality trouble. If you are comparing the same symptoms on Apple hardware, our iPhone blur guide covers the iCloud-preview and AE/AF Lock quirks that show up differently there. For this article, we will stay focused on the fastest, most reliable workflow for fixing the blurry Android photo in front of you.
Work out whether the photo is truly blurry
Camera blur and weak file copies are different problems
Before you change any settings, ask one question: did the photo come out blurry when you took it, or did it only look blurry later?
If the live camera preview looked soft and the saved photo looks soft too, you are probably dealing with focus trouble, low light, movement, a dirty lens, or a camera app issue.
If the original looked fine but the version you sent through chat looks mushy, you are dealing with compression. That is common on Android because messaging apps, screenshots, and repeated re-saves can strip away detail fast.
Treat those as two separate problems:
- a blurry capture needs camera troubleshooting
- a blurry copy needs the original file
If you mix them up, you end up sharpening the wrong file and making it look worse.
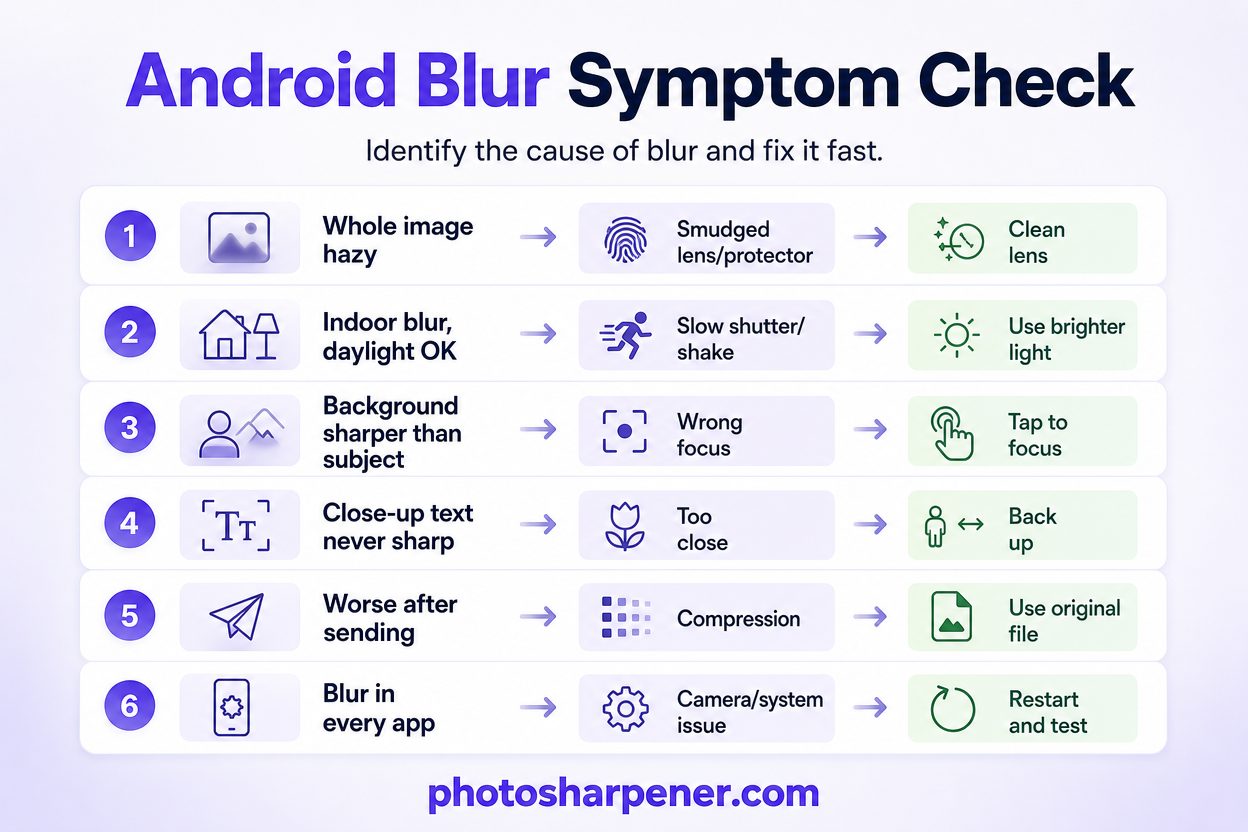
Use a one-minute symptom check before editing
This quick check saves time because it points you toward the right first move:
| What you see | Most likely cause | Best first move |
|---|---|---|
| Whole image looks hazy or glowy | Smudged lens, cloudy protector, condensation | Clean lens and remove accessories |
| Bright daylight shots look okay but indoor shots blur | Slow shutter, hand shake, subject movement | Test again in stronger light and hold steadier |
| Background is sharper than your subject | Focus landed in the wrong place | Tap the subject to focus and retake |
| Close-up text never sharpens | You are too close for the lens to focus | Back up slightly and let autofocus lock |
| Photo looks worse after sending or downloading | Compression or low-quality copy | Go back to the original file |
| Blur shows in every app on every shot | Camera app fault, system issue, or hardware issue | Restart, test another app, then troubleshoot the camera app |
Once you know which row sounds like your photo, the next steps become much more obvious.
Fix the common Android capture problems first
Clean the lens, remove accessories, and test again in bright light
This is the least glamorous fix, but it solves more blurry Android photos than people expect.
Android phones live in pockets, bags, and cars. That means the camera glass picks up skin oil, dust, and lint all day. A small smudge can scatter light across the frame and make the whole photo look soft.
Google's official Pixel camera troubleshooting guide says to clean the camera lens gently with a soft, clean cloth, and if your phone has a laser sensor, clean that too. Samsung's camera support says the same basic thing and also warns that covers and accessories around the lens can interfere with focus.
So do a proper reset on the camera area before you judge the photo:
- wipe the lens gently with a clean microfiber cloth
- remove any lens protector, clip-on lens, or thick case edge around the camera
- let the phone warm back up if you just moved from cold air into a warm room and see haze
- take one new test shot of a detailed, still subject in bright daylight
If the daylight test suddenly looks normal, the phone was probably never broken. The issue was the lens surface, the accessory, or the conditions.
Tap to focus, back up a little, and stop relying on heavy digital zoom
The next big cause is focus and framing.
Autofocus works well most of the time, but it still misses when the scene is dark, the subject has low contrast, or you are too close for the lens to focus properly. Android phones also look worse quickly when you pinch way in on digital zoom, because the phone is often cropping and enlarging rather than capturing more real detail.
Use this short fix sequence:
- tap the exact subject you want sharp
- if the focus box appears but nothing sharpens, back up a little
- if the image gets worse when you zoom in, walk closer instead
- if the subject is moving, take several frames instead of trusting one shot
Samsung also notes in its support documentation that Tracking auto-focus can make it seem like the whole scene will not focus because the camera stays locked on one touched subject. If you use a Galaxy phone and the focus feels strangely sticky, turning that feature off is worth a quick test.
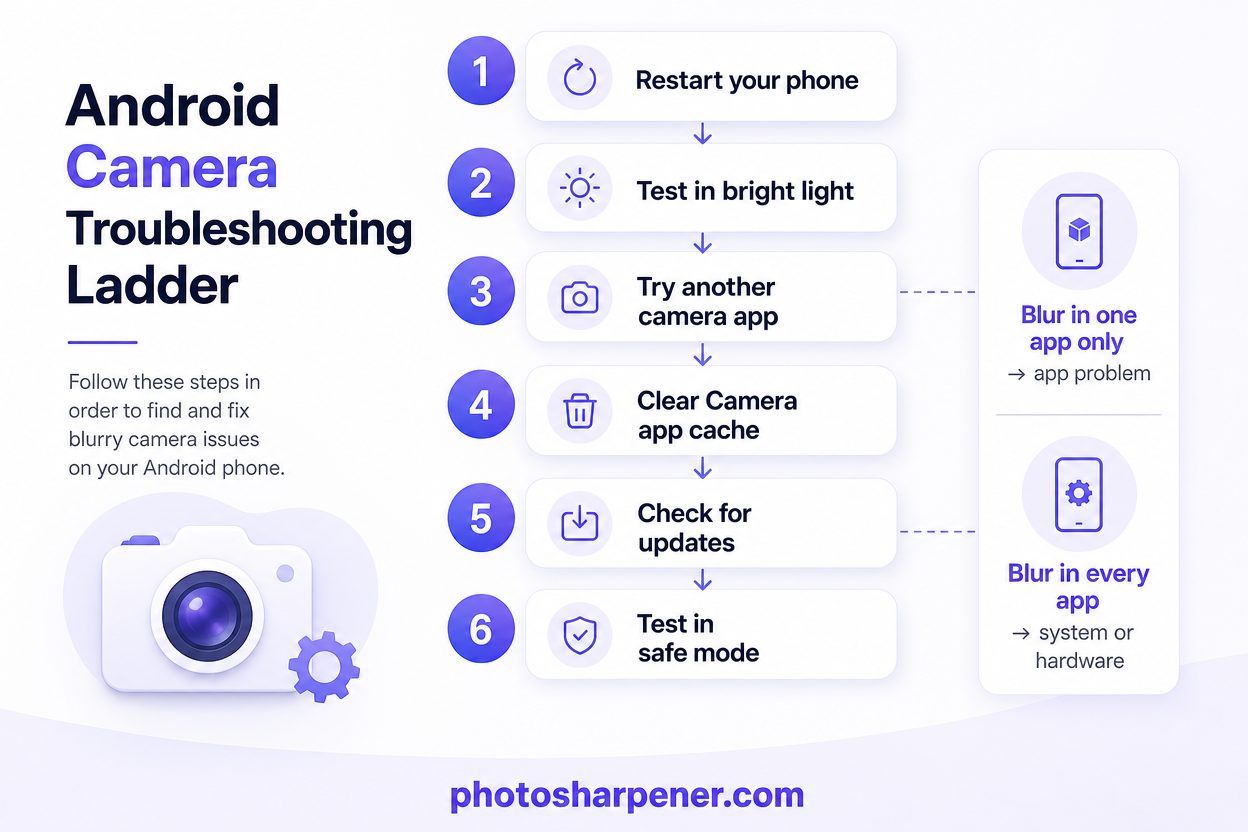
Use the Android checks that solve camera glitches
If the photo is blurry in the Camera app and in other apps, do not keep guessing. Run a simple troubleshooting ladder.
Start with the safest steps first:
- restart the phone
- open the Camera app again and test in bright light
- try another app that can access the camera
- if the issue stays the same, clear the Camera app cache, not your photos
- check for camera app and system updates
- if a recent app seems suspicious, test in safe mode
Google's Pixel support flow follows almost this exact order: clean the lens, restart, clear the Camera app cache, update, then test whether another app is causing the problem. That sequence is useful on many Android phones because it separates a temporary camera-process glitch from a deeper hardware issue.
One practical rule helps here: if the blur is only happening in one app, it is probably an app problem. If it happens in every app, you are more likely dealing with the camera system, the lens, or the hardware.
Improve a blurry Android photo that is already taken
Start from the original file, not the chat copy
If the blurry Android photo came from WhatsApp, Messenger, social media, or a screenshot, there is a good chance you are trying to rescue the weakest version of the image.
That matters because the best sharpening tool cannot restore detail that compression already threw away. So before you edit anything:
- look for the original camera file in Google Photos or your gallery
- ask the sender for the original file if the image came through chat
- use a file-sharing method that preserves quality when possible
- avoid editing a screenshot unless it is your only copy
If you want the broader recovery workflow after capture, our article on clearing blurry photos walks through that in more depth.
Use Google Photos or your gallery editor for mild blur first
If the blur is mild, built-in tools are still the best first stop because they are quick and easy to undo.
Open the photo in Google Photos or your phone's gallery editor and start small. Depending on your device, look for controls such as Sharpness, Clarity, Structure, Definition, or an auto-enhance option. Make small moves and keep checking edges, eyelashes, text, or fabric texture. If those details start looking crunchy, you have gone too far.
Google has also expanded several AI editing tools in Google Photos, including Photo Unblur, to more eligible Android devices. If your phone shows Photo Unblur inside Google Photos, try it before stacking a bunch of manual sharpness sliders. It is usually better at mild motion blur, slight softness, and old low-detail phone shots than aggressive manual sharpening.
The safest editing workflow looks like this:
- open the original photo
- make one light auto or clarity adjustment
- test Photo Unblur if your device offers it
- save a copy instead of overwriting the original
- stop when the photo looks more readable, not "perfect"
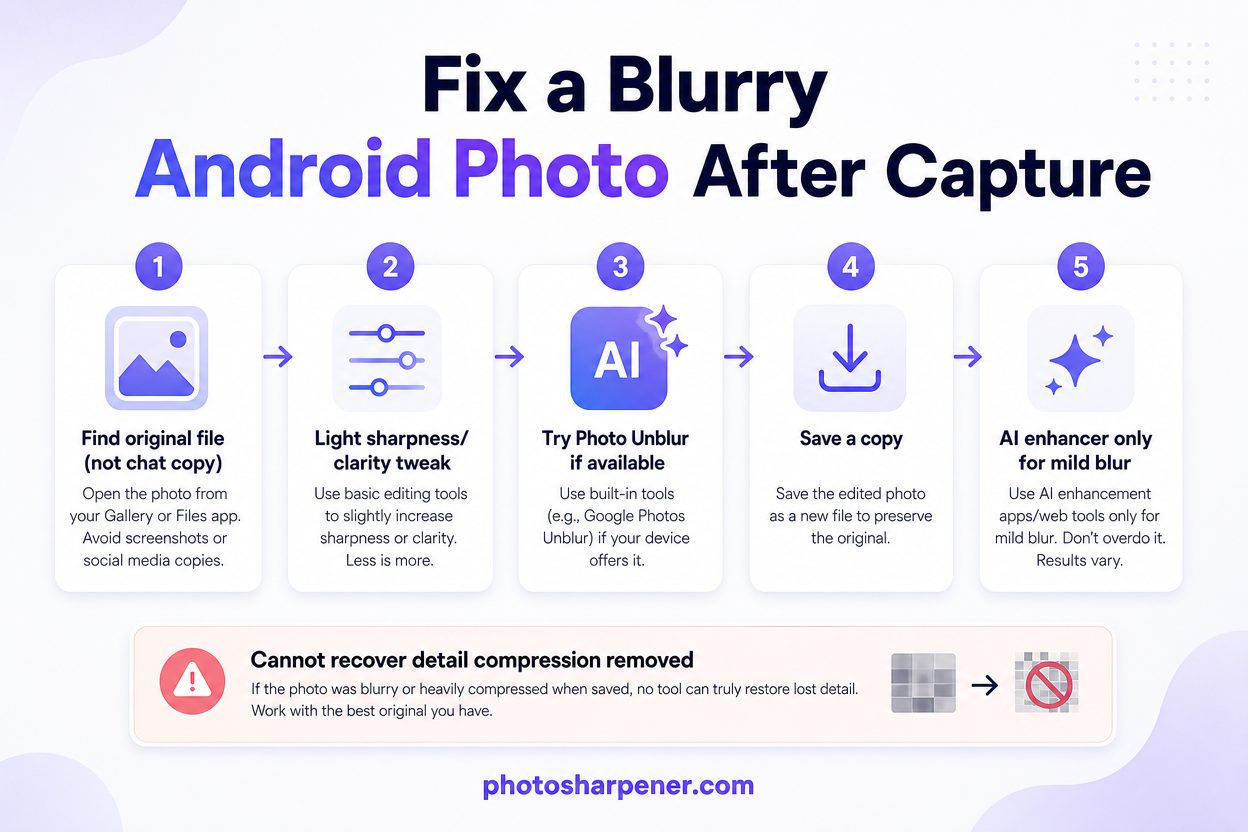
If the file is still too soft after that, an AI enhancer can be useful for mild blur, compression, or upscaling. If you want a browser-based option for everyday Android shots, scans, or family photos, PhotoSharpener can be a practical next step because it is simple to test and does not require a desktop editing workflow.
Keep the expectation realistic, though. AI can often make a weak image more usable. It cannot perfectly recover a face or a text area that the camera never captured clearly in the first place.
Know when the problem is app-related or hardware-related
Signs the problem is probably software or app behavior
Some blur symptoms are annoying, but still low-risk.
You are probably looking at an app or system issue if:
- the blur started right after an update
- one app looks blurry but another camera app looks normal
- the camera seems stuck until you restart the phone
- the blur improves after clearing cache or closing another app
That does not mean the fix will always be instant, but it usually means the camera module itself is not your first suspect.
Signs you are probably past DIY fixes
There is also a point where more editing and more random setting changes stop being useful.
Treat the issue like a repair problem if:
- one lens is always blurry while the others are fine
- autofocus never locks near or far
- the lens glass is cracked, scratched, or cloudy from the inside
- you hear grinding, buzzing, or abnormal clicking
- the camera stays blurry in every app, in good light, after a restart
Samsung's support guidance notes that slight clicking can be normal in a phone camera's focus mechanism, but grinding is a bad sign. Google gives similar guidance in a different way by suggesting repair when the camera still fails after the basic checks and cross-app tests.
The clean decision rule is this: if you have cleaned the lens, removed accessories, restarted the phone, tested in bright light, checked another app, and the photos are still blurry every time, stop spending energy on editing. The best way to fix blurry Android photos at that point is probably to fix the phone, not the file.
Keep future Android photos sharper
Use a five-step routine before you press the shutter
If you want one habit that prevents most blurry Android photos, use this:
- wipe the lens
- tap the subject to focus
- check that you are not too close for the lens to focus
- shoot in the best light available and hold the phone steady
- avoid heavy digital zoom unless you have no other option
That routine is fast enough to use every day, and it solves the most common real-world causes of blur without turning every photo into a project.
If you often shoot kids, pets, food indoors, or documents under room lighting, one extra trick helps a lot: brace your elbows against a table or door frame for the shot. That tiny bit of support often matters more than any sharpening app later.
Protect quality after capture
Sharp capture is only half the battle. A good Android photo can still look bad later if you keep saving weaker copies.
To protect quality:
- keep the original file instead of only the version you sent through chat
- avoid repeated screenshots and re-saves
- export one clean final copy if you edit
- send important images using full-quality file sharing when possible
If you skip this part, it becomes easy to blame the camera for quality loss that actually happened after the photo was taken.
FAQ
Why are my Android photos blurry all of a sudden?
Usually because of one recent change: a smudged lens, a shifted case or lens protector, low light, condensation, or a camera app glitch after an update. Start with a clean lens and one bright-light test shot before changing anything deeper.
Can I fix blurry Android photos without downloading an app?
Often, yes, if the blur is mild. Start with Google Photos or your built-in gallery editor and make very small sharpness or clarity changes. If the photo is heavily blurred or badly compressed, built-in tools may not be enough.
Why does my Android camera stay blurry in every app?
If the blur appears in every app, the problem is probably not just one app setting. It is more likely a lens problem, a camera-system issue, or hardware trouble. Restart the phone, clear the Camera app cache, test in bright light, and if nothing changes, consider service.
What is the best way to send Android photos without making them blurry?
Use the original file whenever possible instead of a screenshot or compressed chat version. If the app gives you a document or original-quality option, use that. The sharper the source you keep, the more likely later enhancement will still look natural.
