Noise & Texture Recovery
Can noise be removed from a photo without detail loss?

TL;DR
- You can remove most distracting photo noise, but there is no honest workflow that guarantees zero detail loss.
- Start from the cleanest file available, separate color noise from luminance noise, and denoise before sharpening.
- Check eyes, hair, fabric, and text at 100% so you stop before the image turns waxy or smeared.
- PhotoSharpener can be useful for quick denoise, sharpening, and upscaling in one pass, but the best result still comes from backing off before artifacts replace real texture.
If you mean literally zero detail loss, the honest answer is no. Every noise reduction tool has to smooth some pixel variation, and some of that variation is real texture. But in practical terms, yes, you can usually remove most of the distracting noise while keeping the detail that actually matters if you start with the best file you have, clean it up in the right order, and stop before the photo starts looking fake.
That distinction matters because many bad edits happen when people chase a perfectly smooth file. A cleaner photo with natural skin, fabric, hair, and edges usually looks much better than a spotless photo that has turned waxy or smeared. So the goal is not zero noise. The goal is a result that still looks like a real photograph.
The honest answer: yes, but not in the literal sense
What a good result actually looks like
A successful denoise edit does not mean every speckle is gone. It means the noise stops pulling attention away from the subject.
For a portrait, that usually means skin still has some natural texture, while the rough shadow noise in the background becomes less obvious. For a product shot, it means edges and labels stay readable while flat areas get cleaner. For an old scan, it means the photo looks calmer and more printable without erasing the texture that makes it feel photographic.
In other words, the best result often keeps a little grain and throws away the ugly part.
When the answer is mostly no
Sometimes there just is not enough real information left to protect. If the image is heavily compressed, badly underexposed, several saves away from the original, or both blurry and noisy, then detail loss is already baked in before you start editing.
That is why two photos with the same amount of visible noise can behave very differently. A clean original RAW or camera JPEG often survives denoise very well. A WhatsApp copy or a screenshot can fall apart fast because compression damage is sitting right on top of the noise.
Why noise reduction can erase real detail
Color speckles and grain are not the same problem
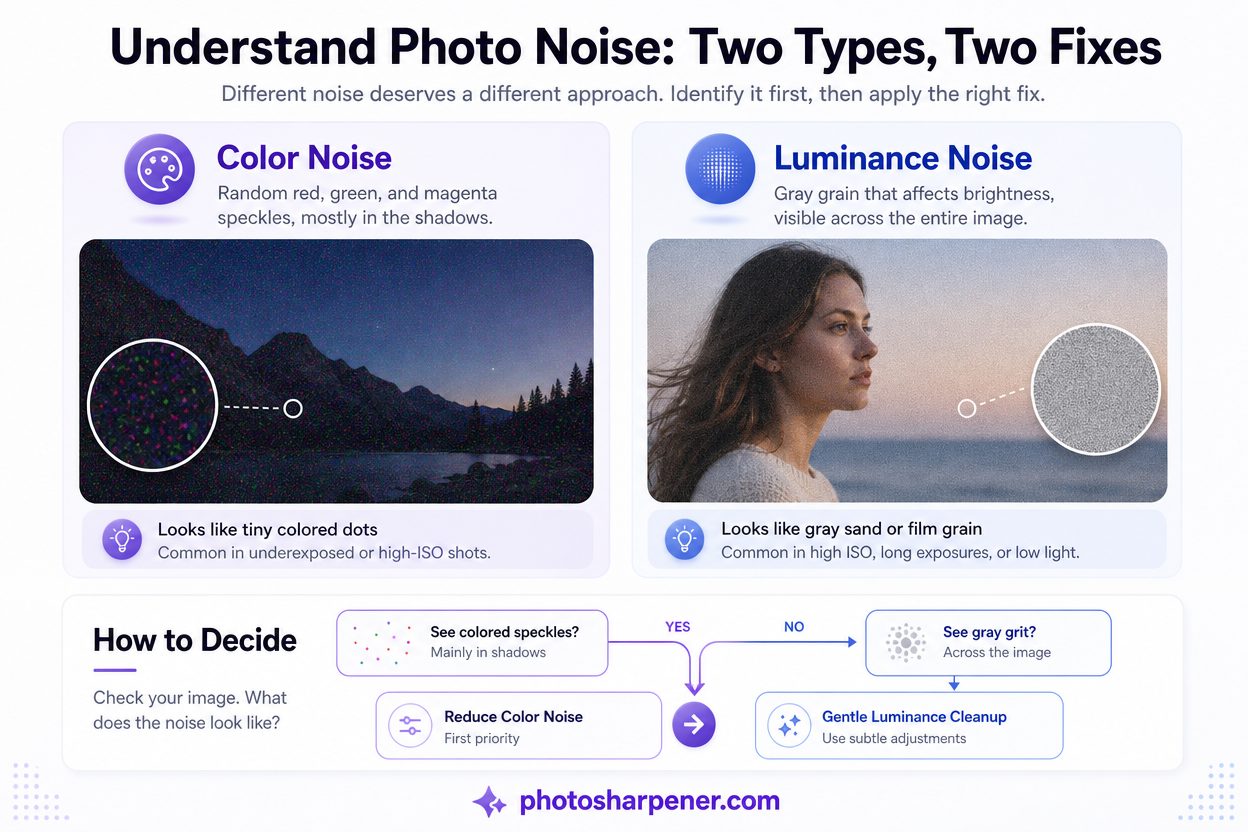
Noise usually shows up in two forms:
- color noise, which looks like random red, green, or magenta speckles
- luminance noise, which looks more like gray or rough grain
Color noise is usually easier to remove without hurting the image too much. Luminance noise is harder because it lives closer to the same visual territory as real detail.
Use this quick check before you edit:
| What you notice first | What it usually means | Best next move |
|---|---|---|
| Red, green, or purple speckles in shadows | Color noise | Reduce color noise first |
| Gray grit across skin, sky, or walls | Luminance noise | Use gentle luminance cleanup |
| Blocky edges or mushy flat areas | JPEG compression | Find a cleaner source file if possible |
| Soft eyes, fuzzy text, or smeared edges | Blur or missed focus | Do not expect denoise to fix it |
If you misread the problem, the fix gets worse fast. People often push denoise harder when the real problem is blur or compression, and that only wipes out the remaining texture.
If the whole image looks rough rather than just one area, our guide to fixing grainy photos helps you separate general noise cleanup from blur and compression problems before you push the sliders too far.
Why skin, hair, fabric, and text break first
Noise reduction tools look for tiny tonal changes that seem random and smooth them out. The trouble is that pores, eyelashes, hair strands, fabric weave, foliage, and small text also depend on tiny tonal changes.
That is why detail-heavy areas are usually the first places to fail. A background wall can tolerate a lot of cleanup. A face usually cannot. Once eyebrows, hair edges, and fine text turn mushy, you have already crossed the safe line.
Start with the cleanest file you can get
Why RAW and original files hold up better
The best denoise setting in the world cannot beat a better source file. RAW files hold the most image data, so modern AI tools can separate noise from detail more effectively. Original camera or phone files are usually the next-best option. Edited exports, social downloads, screenshots, and messaging copies give you much less room.
If you have multiple versions of the same image, use them in this order:
- the RAW file
- the original camera or phone image
- the highest-resolution export
- the social, chat, or screenshot version only if nothing else exists
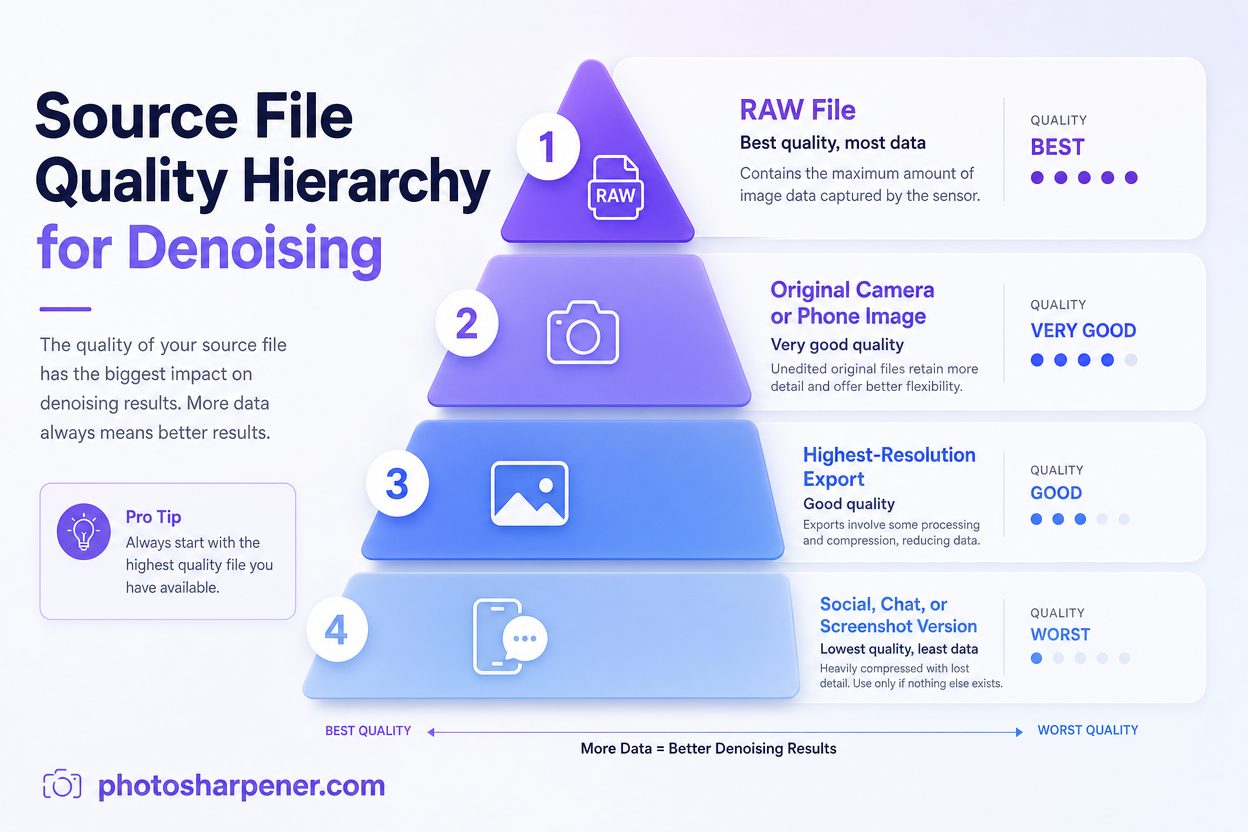
That choice often matters more than the exact slider value.
How to spot compression damage before you denoise
Compression damage does not always look like classic noise. It can show up as blocky transitions, halos around edges, smeared skin, crunchy text, or strange watercolor patches in flat areas.
If you see those symptoms, lower your expectations a bit. You can still improve the photo, but the best outcome is often less distracting, not fully clean. A browser-based tool like PhotoSharpener can be useful for this kind of one-off repair because it combines denoise, sharpening, upscaling, and optional face restoration in one workflow, but the same rule still applies: stop when the image looks better, not when every artifact is gone.
Use the safest cleanup order
Fix exposure before you judge the noise
Noise decisions are much easier when the photo is already close to the brightness you want. A file that looks fine when dark can suddenly show rough grain once you lift the shadows. A file that looks noisy can also calm down a little after a small exposure correction instead of a heavy one.
So start by getting the basic brightness and color into a sensible range. If the shadows are pushed far beyond what looks natural, pull them back and reassess before you blame the noise alone.
This is also why capture quality matters so much. A properly exposed image usually cleans up better than an underexposed image that you have to rescue later.
Denoise before sharpening and heavy local edits
Sharpening makes noise more obvious. Heavy clarity, texture, and contrast moves can do the same. Adobe's Denoise overview also recommends applying denoise early so later edits are built on a cleaner file.
A safe order for most people looks like this:
- correct exposure and basic color
- reduce noise
- inspect important detail at full size
- sharpen lightly only if the image still needs it
- do final export after you know the file still looks natural

That order prevents a common trap, which is sharpening rough pixels first and then trying to smooth them afterward.
Reduce noise without flattening the image
Remove color noise first and go easy on luminance cleanup
If your tool separates color noise and luminance noise, start with color. Random color speckles are usually more distracting and less costly to remove. Then add luminance reduction more slowly.
This is where restraint matters most. A small move can clean the file. A big move can erase skin texture, fabric structure, or small text in seconds.
If your software offers a detail or contrast recovery control, use it carefully after the main luminance cleanup. That can help preserve structure, but it is not magic. If the image already looks painted over, recovering detail sliders will not truly bring the original texture back.
Check the photo at 100% before you push further
Tiny previews hide bad edits. Always zoom in and check the areas that are easiest to destroy:
- eyes, lashes, and eyebrows
- hairlines and beard texture
- fabric weave or product labels
- fine text
- shadow corners and smooth gradients
If those areas still look believable, you are probably close. If they look smeared, do not try to fix the problem with more sharpening. Back off the denoise instead.
Protect important detail with selective edits
Clean backgrounds and shadows more than faces
Global denoise is convenient, but it is rarely the smartest option for difficult files. Backgrounds, empty walls, dark corners, and out-of-focus areas can usually take stronger cleanup than the subject.
That is why selective masks are so useful. In editors that support them, including Lightroom's masking tools, you can calm noisy backgrounds more aggressively while leaving the face, text, or product detail on a lighter setting.
For portraits, this is often the difference between a polished result and a fake one. Our noisy portrait cleanup guide shows how that lighter-touch approach protects skin texture better than one global denoise pass.
Keep edges, text, and texture on the safe side
If the photo includes text, jewelry, eyelashes, fur, or fabric, judge success there first. Those are the details viewers notice quickly, and they are also the details aggressive denoise destroys first.
A useful decision rule is this: if the image still has a little grain but the edges, text, and texture look real, keep that version. If the file is smoother but the details look airbrushed, the cleaner version is usually the worse one.
Choose the right tool for the file
When AI denoise is the easiest option
Modern AI denoise tools are much better than older blur-heavy methods at separating noise from genuine structure. They are especially helpful when the image is noisy but still fundamentally intact, such as:
- high-ISO photos that are still in focus
- old digital images with rough shadows
- phone photos with moderate grain
- cropped images where the noise became more obvious
For most beginners, AI tools are the fastest path to a clean, believable result because they reduce the amount of manual balancing needed between smoothness and texture.
When manual sliders or desktop editors are worth it
Manual controls still help when you need more precision. They are often the better choice when:
- the photo is important enough to inspect area by area
- skin texture matters
- there is text or product detail you must preserve
- the image will be printed larger
- you want different treatment for shadows, subject, and background
This is also where a RAW workflow helps most. AI denoise on a strong RAW file plus a few careful finishing edits is often the best combination for quality.
Know when detail cannot be saved
What AI can improve and what it cannot recreate
AI has shifted the old trade-off a lot, but it has not erased it. It can often make a noisy file look much cleaner while preserving more detail than classic tools. What it cannot do is recover information that never survived the capture or export chain.
If the image is severely blurred, badly compressed, or shot so dark that the signal is barely there, AI can still make it look calmer or sharper-looking, but it is not recovering the original scene in a perfect way.
That matters because good expectations lead to better edits. You are usually aiming for convincing and usable, not perfect and lossless.
Signs you should stop and keep a little noise
Before exporting, run this quick stop check:
- skin still has some believable texture
- hair, fabric, and text still separate cleanly
- shadows look calmer, not muddy
- the photo looks natural at normal viewing size
- the file does not have a waxy or plastic finish
If those are true, you are probably done. If not, reduce the effect and keep a little noise. A tiny amount of grain is almost always less damaging than over-smoothed detail.
If the file already looks plastic or overly smooth, our waxy-face guide explains why that happens and how to back off before the image stops looking photographic.
How to get cleaner photos next time
Give the sensor more light before raising ISO
The easiest denoise fix is the one you never need. If you are taking the photo again, try to improve the capture before planning a rescue:
- move closer to a window or another light source
- avoid underexposing if you can
- use a tripod or steadier support for static scenes
- avoid unnecessary digital zoom on phones
- shoot RAW when the image matters
Even one of those changes can improve the file more than a stronger denoise pass later.
Keep the original and avoid extra exports
Many people lose detail before editing even starts. They send the photo through a messaging app, save a preview, crop a screenshot, then try to clean up the damaged copy.
If the image matters, keep the original file, back it up, and do your edits from that version. That gives any denoise tool a far better chance of cleaning the photo without flattening the detail you want to save.
FAQ
Is it possible to remove all noise and keep every detail?
Not in a literal sense. Noise reduction always involves some trade-off. But you can often remove most visible noise while keeping the important detail if the source file is strong and the edit stays moderate.
Should I denoise a JPEG, or only a RAW file?
RAW is better whenever you have it because it gives the software more real image data to work with. JPEGs can still improve, but they reach their breaking point sooner, especially if they were already compressed or re-saved.
Do I sharpen before or after denoising?
After, and only lightly if the photo still needs it. Sharpening first makes the noise more visible and harder to clean up naturally.
Can denoise fix blur too?
Not really. Noise and blur are different problems. Denoise can calm rough grain, but it does not restore focus that was never captured. If the image is soft because of motion blur or missed focus, you have to treat that separately and keep expectations realistic.